Microsoft Exchange 2010 Role Requirements Calculator is de facto a tool to calculate and design Exchange 2010 solution for the production environment. It’s a Microsoft best practice tool created using Excel application for easy usage and distribution, and it can be downloaded from Microsoft TechNet Gallery. Administrator has to key in all the necessary design information on the input worksheet of the calculator, then based on the formula the results are updated at the various resulting worksheets. One of the important result worksheets is the “Distribution” worksheet which provides a detailed server design with the database distribution model across the servers. Figure 1 given below is the reference example.
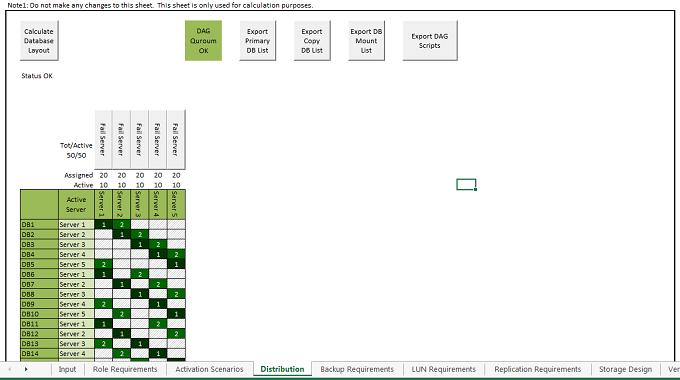
Figure 1: Distribution worksheet with Server and Database distribution model
The example shown above has 5 servers in the Database Availability Group (DAG) and each server has 20 databases, with 10 active and 10 passive copies. These databases are evenly distributed in a specific pattern with an equal number of active and passive databases. It is also designed in such a way that active database will failover to other active nodes, when one or more nodes fails in the DAG.
The role requirement calculator generates various scripts; it can be used to create/configure disk system; mount points; database; and database copies. The prerequisites for this is to have the DAG created/ configured with server nodes added to it. Click on “Export DAG Scripts” to export the DAG scripts into the local machine. Let’s explore each of the script which calculator generates and understand how to execute it.
Exchange 2010 Role Requirement Calculator scripts:
- Diskpart.ps1
- CreateMBDatabases.ps1
- CreateMBDatabaseCopies.ps1
The Diskpart Script
Diskpart script is used to create and configure disk with mount points on every DAG nodes. Click on “Export DB Mount List” button on the “Distribution” worksheet to export the “Servers.csv” configuration file. Figure 2 below shows resulting dialog window with details of the export.
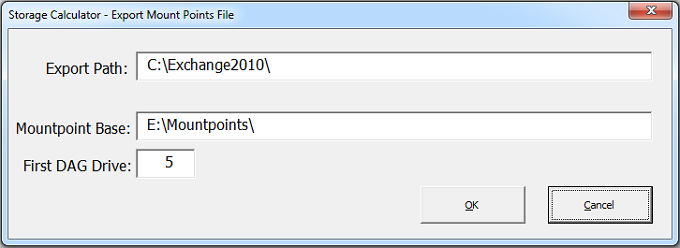
Figure 2: Exporting Mount Points file
Servers.csv has information of the server names, mountpoint on each server and other disk details. Server names are identified by number, and they need to be updated based on the actual production DAG nodes. DB names can also be updated if required. Figure 3 below is the reference screen shot.
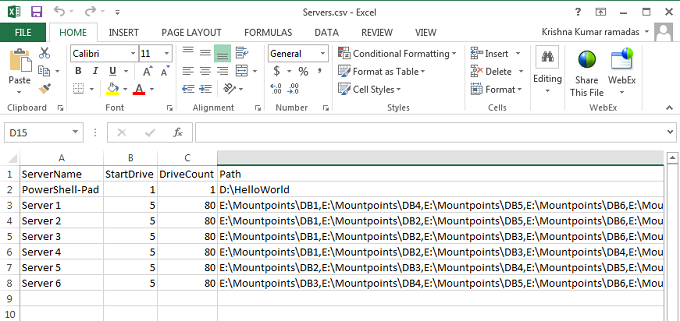
Figure 3: Servers.csv file with server and mountpoint details
Copy servers.csv and Diskpart.ps1 to each of the DAG nodes. Start Windows PowerShell and execute .Diskpart.ps1, it configures disk subsystem with mount points using servers.csv configuration file.
The CreateMBDatabases Script
CreateMBDatabase script is used to create and configure primary DAG databases. Click on “Export Primary DB List” button on the “Distribution” worksheet to export the primary database configuration file – MailboxDatabases.csv. Check the default values carefully on the Export Primary Database list excel popup window and update it based on the environment. Figure 4 below has the Export Primary Database list details. One of the important configuration settings is database and log path, public folder, GC server, Offline Address book, RPC client Access server etc. Most of the other configurations can be considered to be left default.

Figure 4: Exporting Primary Database list
Figure 5 below (MailboxDatabase.csv) shows all the above defined configuration details to create primary databases. Server names are identified by server number and they need to be updated with the actual production DAG node names.
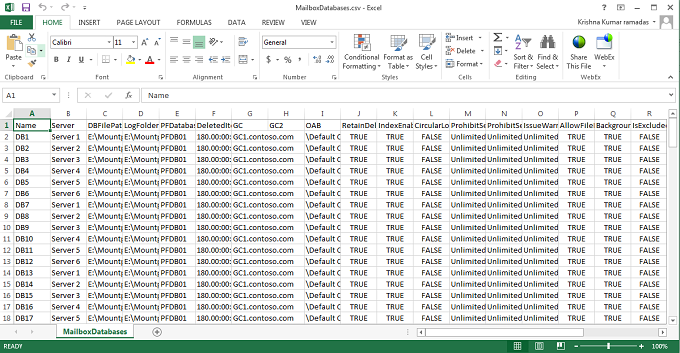
Figure 5: MailboxDatabase.csv with primary database details
Copy MailboxDatabases.csv and CreateMBDatabases.ps1 files to any of the DAG node. Start the Exchange Management Shell and execute .CreateMBDatabases.ps1, it reads through the configuration file and creates all the primary database.
The CreateMBDatabaseCopies Script
CreateMBDatabase script is used to create and configure database passive copies for all the primary database created using CreateMBDatabase script. Click on “Export Copy DB List” button on the “Distribution” worksheet to export the copy configuration file – MailboxDatabaseCopies.csv. Input the Export path, global catalog server and click on “OK”.

Figure 6: Exporting Secondary Database list
Figure 7 below (MailboxDatabasecopies.csv) illustrates all necessary configuration details to create passive database. Server names are identified by number, and they need to be edited and updated with the actual production DAG node names.
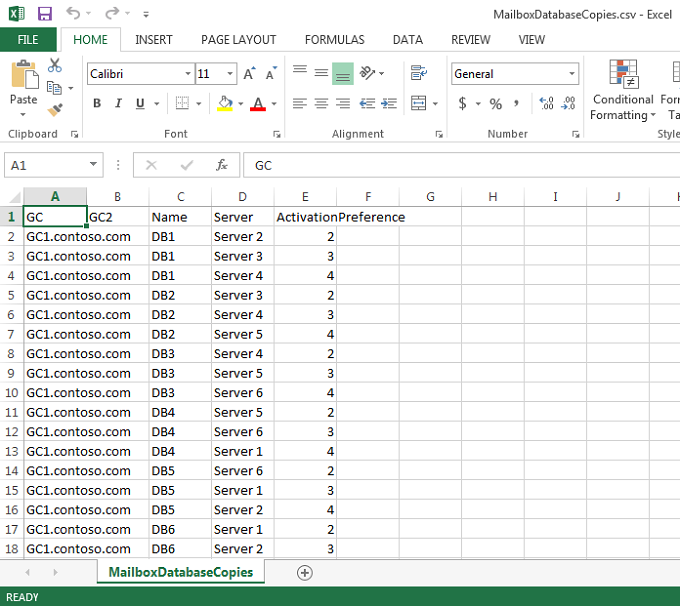
Figure 7: MailboxDatabaseCopies.csv with Mailbox Database copies details
Copy MailboxDatabasescopies.csv and CreateMBDatabasescopies.ps1 files to any of the DAG node. Start Exchange Management Shell and execute .CreateMBDatabasescopies.ps1 script, it reads through the configuration file and creates, configures all the passive database copies.
DAG scripts are great and wonderful, I would definitely recommend everyone to make use of it to create DAG database and database copies. In large organizations, with 100s of database, manual configuration can be very complex and there could be multiple errors which could take time to rectify errors; however, DAG scripts are easy to use and can be one of the most effective ways to create/configure databases. Many organizations have multiple DAG and since databases are unique within organizations, names need to be updated in the configuration file, before executing the DAG scripts.