Administrators can perform all typical registry operations using either the old-good “Regedit” user interface or the reg.exe utility. But there is another option — Windows PowerShell. PowerShell provides a large set of tools for interacting with the Microsoft Windows registry, either on the local machine or remotely.
In this article, we’ll show how to get, edit, create and delete registry keys with PowerShell, perform a search, and use PowerShell to connect to the registry from a remote computer.
Getting Registry Key Values Locally with PowerShell
To get the values of all the registry keys on a local machine, we first have to find the path to the registry. Let’s get a list of all the local drives:
get-psdrive
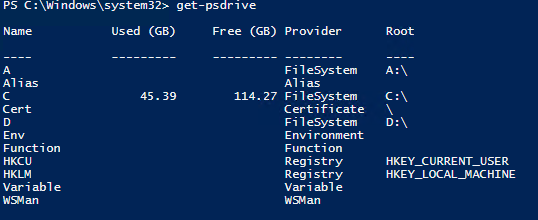
As you can see, there are two entries for the registry: HKEY_CURRENT_USER (HKCU) and HKEY_LOCAL_MACHINE (HKLM). These are two logical groups of keys, or “hives,” in the registry.
Therefore, we can navigate to the local machine registry root key by running the following command:
cd HKLM:
Alternatively, we can set our current working location to a particular path in the registry using the Set-Location cmdlet:
set-location -path HKLM:SOFTWAREMicrosoftWindowsCurrentVersion
Then we can use the Get-ChildItem cmdlet to output all the registry keys in the current hive with their properties:
Get-childitem
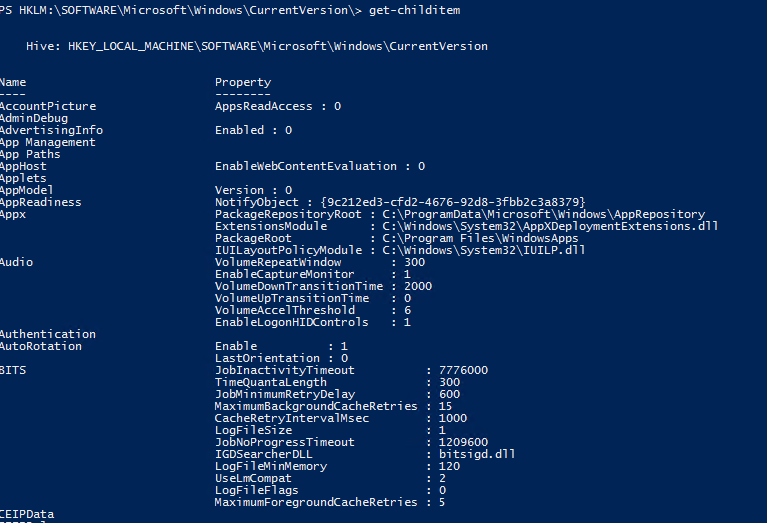
To get the parameters for a specific key (such as the Run key), we would use Get-Item cmdlet, specifying the path:
Get-Item -path HKLM:SOFTWAREMicrosoftWindowsCurrentVersionRun

Getting Registry Key Values Remotely with PowerShell
PowerShell enables you to connect to a computer’s registry remotely and view it using WinRM. To do that, you need to use the Invoke-Command cmdlet:
Invoke-Command –ComputerName dc1 –ScriptBlock { Get-ItemProperty -Path 'HKCU:SoftwareSystem' -Name WorkingDirectory}
Editing the Registry Remotely with PowerShell
To edit a registry remotely, we first need to connect to it using Enter-PSSession cmdlet:
Enter-PSSession pdc -Credential EnterpriseT.Simpson
The system will prompt you for the password for the user account you specified. After authentication, you will be able to use PowerShell commands on the remote computer.
Searching in the Registry with PowerShell
To find particular keys in the registry, use a script like the following, which searches the registry for keys that contain “Netwrix” in their name:
get-childitem -path hkcu: -recurse -ErrorAction SilentlyContinue | Where-Object {$_.Name -like "*Netwrix*"}
Editing the Registry with PowerShell
If we want to change one of the parameters for a registry key, we need to use the Set-ItemProperty cmdlet. For example, we could use the following command to set a new string value for the “VMware User Process” parameter of the “Run” key:
Set-Itemproperty -path 'HKLM:SOFTWAREMicrosoftWindowsCurrentVersionRun' -Name 'VMware User Process' -value 'C:Program FilesVMwareVMware Toolsvmtoolsd.exe'
Creating a Registry Key with PowerShell
To add a key to the registry, we need to use the New-Item cmdlet. Let’s create a new key named “NetwrixKey” in the KEY_CURRENT_USER hive:
New-Item –Path "HKCU:dummy" –Name NetwrixKey
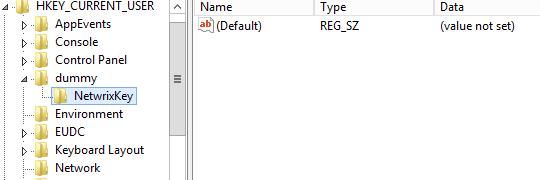
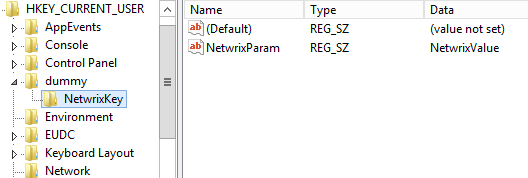
And now let’s create a parameter called “NetwrixParam” for our new key and set its value to the string “NetwrixValue”:
New-ItemProperty -Path "HKCU:dummyNetwrixKey" -Name "NetwrixParam" -Value ”NetwrixValue” -PropertyType "String"
Let’s have a look at it in the registry:
Deleting a Registry Key or Parameter with PowerShell
Now let’s delete the “NetwrixKey” parameter we just created using the Remove-ItemProperty cmdlet:
Remove-ItemProperty -Path "HKCU:dummyNetwrixKey" -Name "NetwrixParam"
And then let’s remove the key “NetwrixKey” itself:
Remove-Item -Path "HKCU:dummyNetwrixKey" -Recurse
The –Recurse parameter authorizes PowerShell to delete all the subkeys without additional confirmation (of course, we didn’t create any subkeys in this example).
If you want to delete all subkeys inside the specified key without deleting the key itself, you should add the “*” symbol at the end of the path:
Remove-Item -Path "HKCU:dummyNetwrixKey*" -Recurse
Renaming a Registry Key or Parameter with PowerShell
To rename a registry key, use the Rename-Item cmdlet:
Rename-Item -Path "HKCU:dummyNetwrixKey" NetwrixNewKey
To rename a parameter of a registry key, use the Rename –ItemProperty cmdlet:
Rename-ItemProperty -Path "HKCU:dummyNetwrixKey" -Name "NetwrixParam" -NewName "NetwrixNewParam"
Conclusion
Now you know the basic registry management capabilities of Microsoft Windows PowerShell. As you can see, registry key management is rather easy and fast — but remember, that even one little change can lead your operating system to the blue screen of death.
Therefore, before you make any changes to the registry, you should be 100% sure of what you are changing, have current backups of your system and data, and track all the changes you make. Netwrix Auditor for Windows Server can help; it tracks, reports on and alerts on changes to the Windows registry.


