The Linux operating system has come a long way since 1991 when it was first introduced by Linux Torvalds as a free operating system. Today, some form of Linux is used in everything from high-end servers and virtual machines to IoT devices and embedded devices. More often than not, common database platforms such as Oracle, PostgreSQL, MySQL, and MongoDB are deployed on servers running Linux.
One notable exception was Microsoft SQL Server. That changed when Microsoft announced support for Linux starting with SQL Server 2017. However, Microsoft does not provide a straightforward way to integrate Linux hosts into Active Directory (AD), making it harder to manage them.
Fortunately, there is an easy way to integrate Linux with AD for cloud and on-premise Windows systems — by using realmd and System Security Services Daemon (SSSD).
Read this guide to learn how to integrate Linux with Active Directory. We’ll also cover how to join AD using realmd, what using SSSD is like, and how to map Linux unique identifiers (UIDs) and group IDs (GIDs) to site identifiers (SIDs) in AD.
A Brief Summary of Linux Interaction with Active Directory
As an introduction, here’s a brief summary of how Linux interacts with AD.
The main reasons to join a Linux machine to a Lightweight Directory Access Protocol (LDAP)-based directory service like Windows AD include:
- Business policies
- Access control
- Centralized identity management
When joining a Linux host to Active Directory (AD), two components are required:
- One to manage the central identity and authentication source (Active Directory)
- One to handle domain discovery and act as a middleman between the first component and the identity source
Over the years, there have been a few configuration options to join a Linux machine to AD. Most have been inconvenient to configure and required you to manually set up (SSSD to join domains. However, the realmd suite lets you complete the task without cumbersome configuration file editing.
How to Integrate a Linux Host into a Windows AD Domain
Now let’s walk through the steps of integrating a Linux host running on CentOS 8 into a Windows Active Directory (AD) domain configured on Windows 2012 R2 Server Standard Edition. (The reason we specify the versions and types of the Linux distribution and Windows Server is because there are subtle differences between versions of Linux and Windows. For example, in CentOS/RHEL 8, Network Time Protocol (NTP) client and server activities were managed using the ntp daemon, but in CentOS/RHEL 8, it has been replaced with the chrony daemon.)
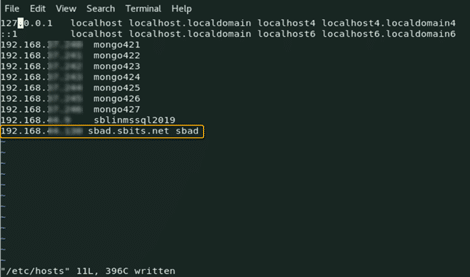
Step 1: Ensure that the hostname and FQDN are specified.
Ensure that the hostname and the fully qualified domain name (FQDN) are specified in the /etc/hosts file. The hostname cannot be localhost, as it is mapped to the loop-back adapter 127.0.0.1. If you need to change the existing hostname, use the following command to change it to the desired name. There is no need to specify the FQDN as part of the hostname.
[root@oldhostname ~]# hostnamectl set-hostname <new_host_name>

[root@newhostname~]# echo 192.168.44.9 sblinmssql2019 >> /etc/hosts
Step 2: Specify the AD domain controller.
Specify the AD domain controller (DC) in the /etc/hosts file using the following command:
[root@newhostname~]# echo 192.168.xx.x sbad.sbits.net sbad >> /etc/hosts

[root@newhostname~]# ping sbad.sbits.net
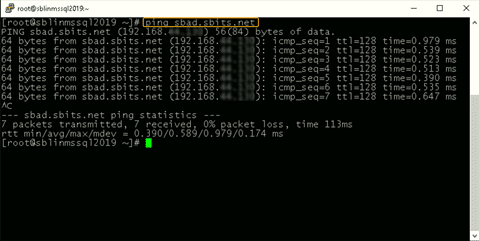
Step 3: Ping the AD domain controller.
Ping the AD domain controller that was specified in Step 2 and make sure you get a ping response.
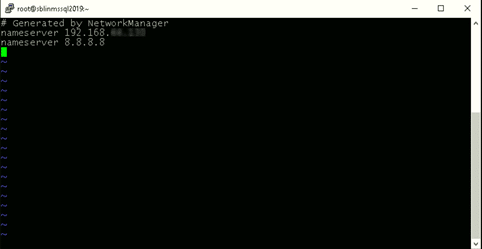
Step 4: Point the DNS server to the AD domain controller.
In my case, the DNS server needs to be pointed to the AD domain controller because my DC is also the DNS server for my domain, sbits.net.
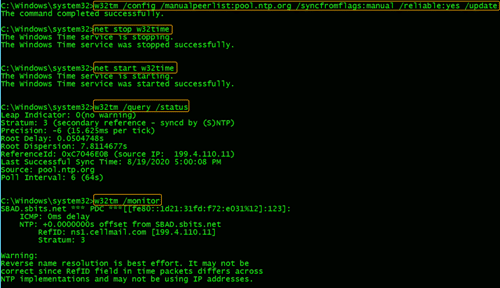
Step 5: Configure the NTP server, if necessary.
If the primary DC that you are planning to use as the NTP server does not have the NTP server configured, follow the steps in the screenshot to configure and enable the NTP server on the primary DC.
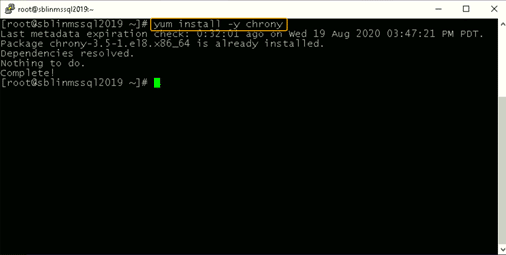
Step 6: Install chrony and configure it to use a DC.
The Linux host needs to synchronize time with one of the DCs in the AD domain. In my case, there is only one domain controller, so the Linux host will be synchronizing the time with it.
If chrony is not already installed, install it and configure it to use the DC to synchronize the time. (If it is already installed, you will get a message reporting that.)
[root@newhostname~]# vi /etc/resolv.conf

[root@newhostname~]# systemctl restart NetworkManager
[root@sblinmssql2019~]# vi /etc/chrony.conf

  [root@sblinmssql2019~]# systemctl enable chronyd

  [root@sblinmssql2019~]# systemctl restart chronyd

  [root@sblinmssql2019~]# systemctl enable chronyd
If chrony is already installed, we need to edit thechrony.conf config file and set the time server to the AD domain controller and restart the chronyd service. If the service was not preinstalled, enable it to start up on reboot and ensure that the firewall is configured to allow NTP traffic after installation.

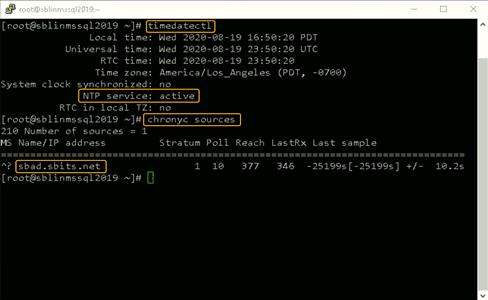
Once chronyd is configured and enabled, the timedatectl command will show whether the NTP service is active. After confirming that NTP service is active, run the chronyc sources command to confirm that it is using the domain controllers as the time server, as shown below.
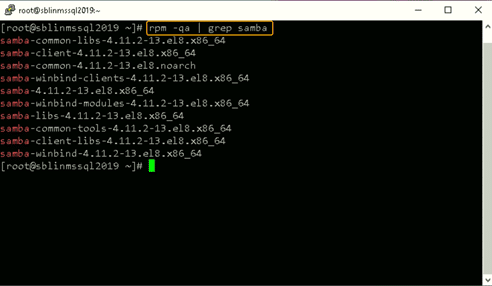
Step 7: Install the Samba suite on Linux.
Next, install the Samba suite, including winbind, on the Linux host. The winbind service enables the Linux host to interact with the AD domain like a Windows host. After installation is complete, confirm that the packages shown in the screenshot below are installed.
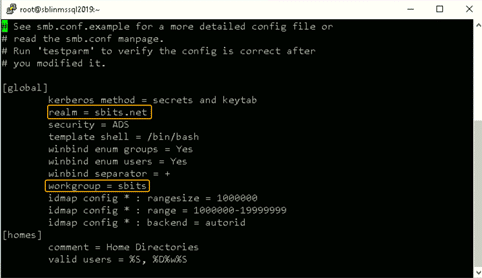
Step 8: Modify the /etc/samba/smb.conf file to reflect the realm value.
Next, modify the /etc/samba/smb.conf file to reflect the realm value to the fully qualified domain name, and change the workgroup value to the name of the domain, as shown in the screenshot below.
[root@sblinmssql2019~]# yum -y install samba samba-client

[root@sblinmssql2019~]# yum -y install samba-winbind samba-winbind-clients
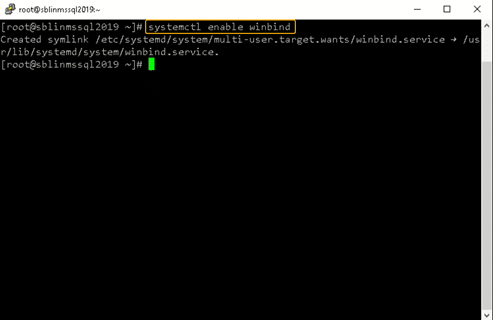
Step 9: Enable the winbind daemon on system reboot.
Enable the winbind daemon on system reboot using the systemctl command as shown in the screenshot below. Please note that there is no reason to reboot the Linux host, unlike Windows hosts.
Note: The realm parameter is the name of your domain. In this example, it is “sbits.net” and the workgroup parameter is set to “sbits”. The workgroup parameter can instead be set to the Windows default of “WORKGROUP” if you prefer. The security = ADS designates that this host is part of the AD domain. The winbind separator =+ specifies that the plus sign (+) will be used to separate the domain name and username. The traditional Windows separator is not compatible with Linux, and an escape character has to be used every time a username is specified with the domain prefix.
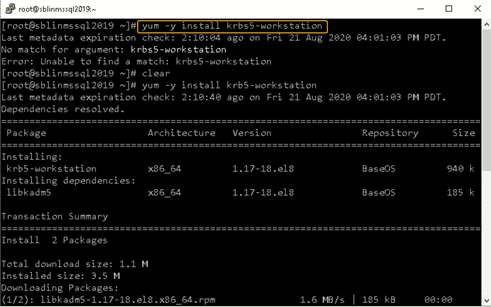
Step 10: Install the Kerberos realms package.
Install the Kerberos realms package using the yum command:
[root@sblinmssql2019~]# yum -y install krb5-workstation
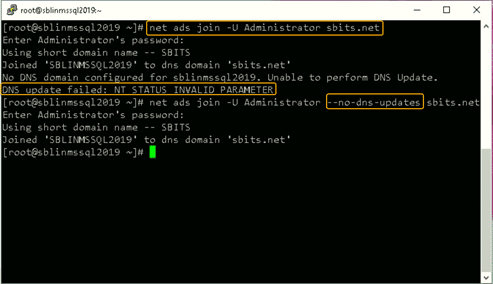
Step 11: Add the Linux host to the AD domain.
Now, add the Linux host to the AD domain using the command below. It is highly likely that you will get the error “DNS update failed: NT_STATUS_INVALID_PARAMETER”.
In my case, even though I got the error, the Linux host was added to the AD domain. I reissued the command with the –no-dns-updates flag, and the error did not pop up.
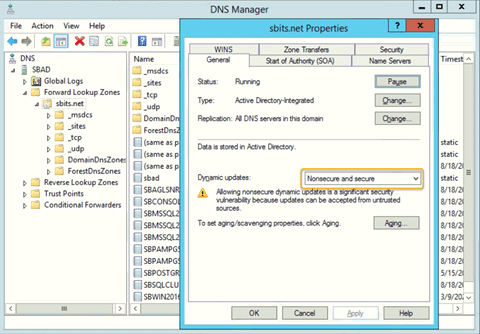
Step 12: Change the security setting using DNS Manager.
If you do not want to encounter the error and would like to have the DNS update the information about the new Linux hosts, change the security setting using DNS Manager as shown below.
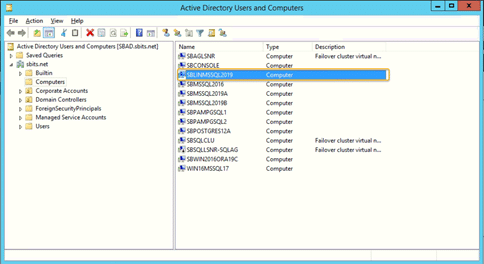
Step 13: Verify that the Linux computer object was added.
On the primary domain controller, verify that the Linux computer object was added by using the Active Directory Users and Computers tool.
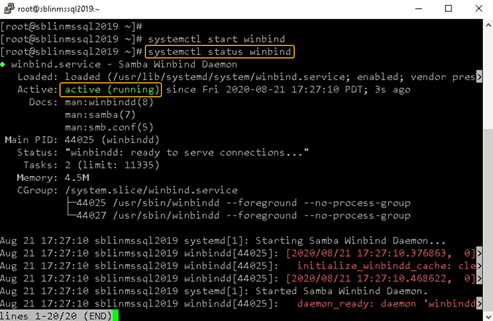
Step 14: Confirm that the winbind service is running.
Confirm that the winbind service is running on the Linux host.
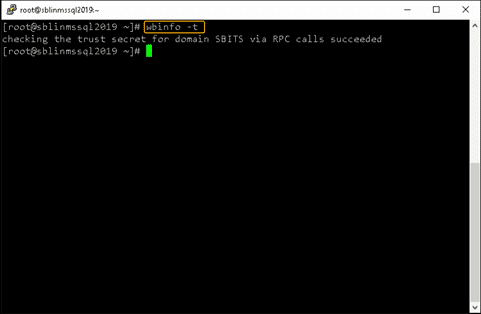
Step 15: Validate that the Linux host is part of the AD domain.
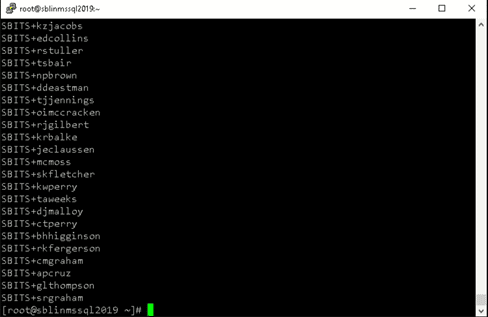
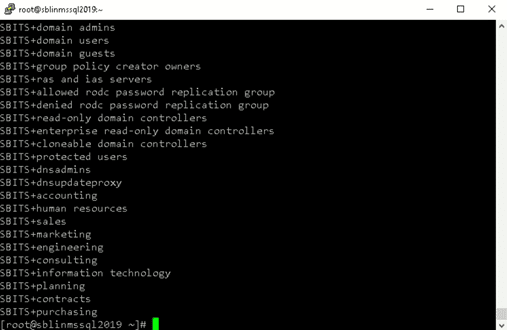
Validate that the Linux host is actually part of the AD domain and is able to communicate with the DC by using the wbinfo package to run encrypted RPC calls to the DC:
[root@sblinmssql2019~]# wbinfo -t    # verifies if encrypted RPC are supported

[root@sblinmssql2019~]# wbinfo – u  # enumerates AD the list of users

[root@sblinmssql2019~]# wbinfo – g  # enumerates AD the list of groups
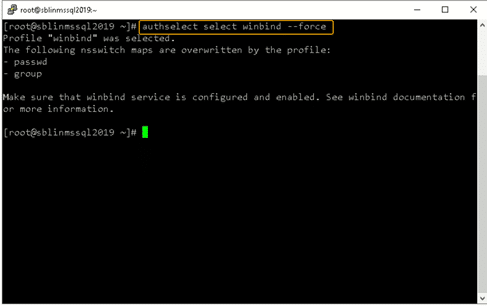
Next, we need to ensure that winbind is selected as the authorization provider by using the authselect select winbind –force command as shown below. The –force flag will overwrite the entries in the /etc/nsswitch. conffile.
Step 17: Ensure the passwd and group entries are listed to use winbind.
To ensure that Linux will use winbind for user authentication prior to local Linux authentication, make sure the passwd and group entries are listed to use winbind in the /etc/nsswitch.conffile.

Step 18: Use kinit to get a Kerberos TGT.
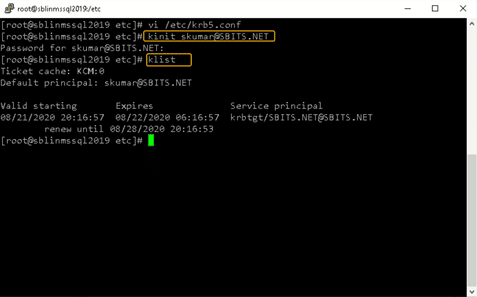
Finally, use kinit to try to get Kerberos Ticket Granting Ticket (TGT):
[root@sblinmssql2019~]# wbinfo -t    # kinit skumar@sbits.net

[root@sblinmssql2019~]# wbinfo – u  # klist
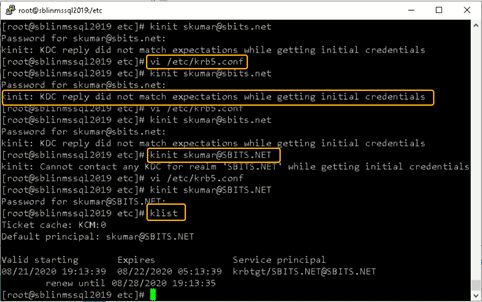
Chances are you will encounter the error shown in the screenshot above. If so, edit the /etc/krb5.conf file and change the setting as shown below:
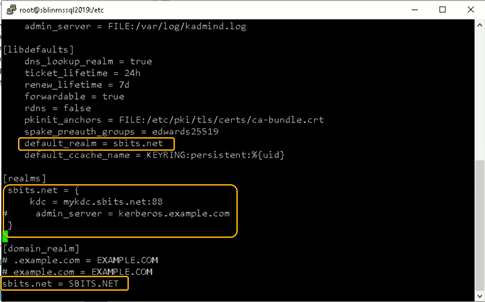
Once the file is modified, there is no reason to start any services on the Linux host, and the ticket request should work fine.
You can verify it on the AD domain controller as well, as shown below:
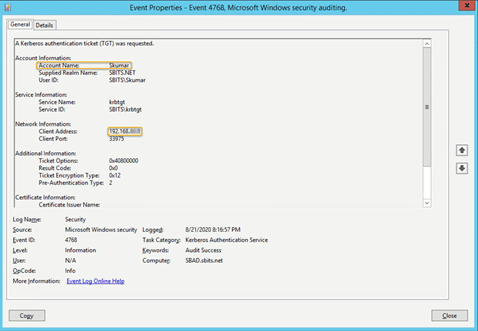
Congratulations! You have added a Linux host to a Windows AD domain.
Joining AD Domains using realmd
Now that you know how to integrate Linux with an Active Directory domain, let’s turn to joining the AD domain. There’s a quick and easy way to set up SSSD to join domains without cumbersome configuration file editing: the realmd suite. This command-line tool can be used to manage enrollment in Kerberos realms, like Active Directory domains or IPA domains. The realmd system provides a clear and simple way to discover and join identity domains to achieve direct domain integration. It’s not too much of a lift, either, as realmd handles the configuration of complex underlying Linux system services, such as SSSD or winbind.
Realmd is also a great tool for access management, event management, configuring domain membership, achieving an integrated direct domain, and network and user SSH authentication. Many enterprise cybersecurity teams use realmd to reduce the attack surface by controlling who has access to what.
Follow these steps to join the Active Directory server using the realmd Desktop Bus (D-Bus) tool. These instructions work for all Linux distributions, including Fedora and Ubuntu.
- To add Linux to an Active Directory domain, ensure that your Linux host can communicate with the DC over the network. Proper DNS and hostname resolution are essential to this process.
- Next, install realmd using root access on your computer account and check to see if we’re already a member of a domain.
sudo apt install realmd

realm list
If realmd wasn’t previously installed, the output should be empty, indicating that:
- The host isn’t joined to AD or other domain services
- We don’t have any domain membership.
If the output lists a domain you’d like to leave, run the following as the domain administrator user account originally used to join the domain:
sudo realm leave example.com -U user@example.com
3. Next, we’ll want to discover our domain:
realm discover <domain_controller_hostname_or_ip_address>
The output is a list of packages that must be installed to join the domain:
example.com

  type: kerberos

  realm-name: EXAMPLE.COM

  domain-name: example.com

  configured: no

  server-software: active-directory

  client-software: sssd

  required-package: sssd-tools

  required-package: sssd

  required-package: libnss-sss

  required-package: libpam-sss

  required-package: adcli

  required-package: samba-common-bin
Realm discovery output may differ depending on your specific host and domain controller setup.
Note that realmd uses SSSD as its default Active Directory client software. SSSD allows local services to check with local user and credential caches in SSSD, but those caches may be taken from any remote identity prover, including AD, an LDAP directory, an identity management domain or a Kerberos realm.
If you don’t want to use SSSD, you can specify winbind to use Samba Winbind.
4. Confirm that the Windows server and Linux are on the same network. If they’re not, your Linux hosts won’t be able to join Active Directory. We highly recommend having a static IP address for the domain controller.
5. Once everything has been confirmed, go ahead and install the listed required packages (shown above) and then use the realm join command. This will do several things, including setting up the local machine for use with a specific domain and creating a host keytab file at /etc/krb5.keytab. It will also join Linux to the Windows domain using credentials with AD Domain Admin permissions:
sudo apt install sssd sssd-tools libnss-sss libpam-sss adcli samba-common-bin

sudo realm join --client-software=sssd <domain_controller_hostname_or_ip> -U <domain_admin>
When specifying the Domain Admin, we can just use the username instead of using example.comuser format, since we’re already specifying a domain controller in the command.
Additionally, we can use the –computer-ou parameter to specify the organizational unit for the computer to be joined to, using distinguished name format (for example, # realm join –computer-ou=”ou=Linux Computers,dc=example,dc=com”). Specifying –computer-ou is also great for creating directory computer accounts in non-default locations.
Note that an invalid hostname error can occur if a hostname isn’t set with the proper format. To resolve this, simply set the hostname properly:
sudo hostnamectl set-hostname '<new_hostname>'
6. After joining the domain, we can run realm list again to confirm success and review the domain info:
example.com

  type: kerberos

  realm-name: EXAMPLE.COM

  domain-name: example.com

  configured: kerberos-member

  server-software: active-directory

  client-software: sssd

  required-package: sssd-tools

  required-package: sssd

  required-package: libnss-sss

  required-package: libpam-sss

  required-package: adcli

  required-package: samba-common-bin

  login-formats: %U@example.com

  login-policy: allow-realm-logins
In this case, the login-formats property indicates that domain accounts will be specified in user@example.com format on this host, rather than domainuser format.
7. Finally, restart the SSSD service and use the command below to verify the Active Directory user information. The output should show a domain user’s UID, groups and more:
sudo service sssd restart

id user@example.com
That’s all there is to it! This is by no means a comprehensive guide for all the options you can manually perform and configure along the way; however, this is the quickest route to get Linux hosts joined to Active Directory using a modern approach.
Optional Steps
Once you’ve joined AD using realmd, you can take optional steps to customize your experience, such as tweaking realmd’s behavior and managing the properties of AD objects by using various options and tools. These include:
OS-Version
The os-version and os-name settings let you specify your operation system version and name. Specifically, you can use them to control the values that are placed in the computer account’s operatingSystemVersion and operatingSystem attributes.
AD Attribute Editor
This is a built-in graphical tool for managing the properties of AD objects, such as computers, users and groups. You can use it by installing the dsa.msc snap-in, which is part of the Windows Remote Server Administration Tools (RSAT).
Deny and Permit
The realm deny command denies local login by real accounts. You can use realm permit to restrict logins to certain accounts.
Changing the Default User Configuration
The realmd system allows you to modify the default user home directory and shell POSIX attributes. You can override the default directory and attributes by specifying the following options in the [users] section in the /etc/realmd.conf file:
- Default-shell: This defines the default user shell; it accepts any supported system shell.
- Default-home: This sets a template for creating a home directory for accounts with no home directory explicitly set.
Mapping Linux UIDs/GIDs to SIDs in Active Directory
You now know how to integrate Linux with Active Directory. However, we’re not done yet. We also need to touch on how POSIX UIDs and GIDs are mapped to SIDs in Active Directory, since Linux clients don’t have a concept of SIDs like Windows does.
Benefits of using SSSD rather than Winbind
As previously mentioned, realmd uses SSSD rather than winbind by default. One big benefit of this approach is that SSSD automatically handles POSIX UID/GID generation using the SID of each Active Directory user or group. If you keep the default SSSD settings on each Linux host that you join to the domain, then these UID and GID values should be mapped consistently across Linux hosts.
For example, in my lab, this result is consistent no matter which Linux machine I run it on, as long as the machines are joined to the same domain:
user@my-linux-host:~$ id user@example.com

uid=778006423(user@example.com) gid=778001234(domain users@example.com) groups=778001234 (domain users@example.com)
Another benefit of this approach is that UIDs and GIDs generated by SSSD can also be applied to the uidNumber and gidNumber attributes in Active Directory for users and groups. This allows applications that query these AD attributes to perform mapping of the UID or GID to the SID, ultimately resulting in the same AD users or groups being referenced regardless of whether a user or group is in use on a Windows or Linux system.
Viewing and Editing the uidNumber and gidNumber Attributes
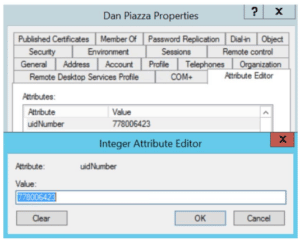
To view the uidNumber and gidNumber attributes in Active Directory Users and Computers on Windows Server, make sure you have Advanced Features enabled under the View dropdown:

You’ll then be able to view and edit those fields in the user’s or group’s Properties menu on the Attribute Editor tab:
Listing All AD Users and Groups with their UIDs and GIDs
Depending on the number of users and groups in your domain, it may take a long time to manually assign uidNumber and gidNumber values. Although methods to programmatically populate these fields will be environment-specific, we can at least list all AD users and groups, with their UIDs and GIDs, using the getent command from a Linux host joined to the domain.
By default, getent will list only the users and groups on the local machine. Luckily, this can be modified by adding a line to your /etc/sssd/sssd.conf file and restarting SSSD. However, enabling this enumeration option can cause significant stress on the Active Directory server.
Typically, I like to step through this process outside of production hours, save the results, and then disable the full enumeration. Here’s how I do that:
- First, we add enumerate = True to sssd.conf, and then we restart the SSSD service:
echo "enumerate = True" | sudo tee -a /etc/sssd/sssd.conf &> /dev/null

sudo service sssd restart
Depending on the size of your Active Directory, it can take up to 10 minutes to complete the initial enumeration into the local cache. During this period, you’ll notice domain users and groups populating in the outputs from getent passwd and getent group, respectively.
2. Once enumeration to the local credential cache is complete, we can use the following commands to format the getent output (<domain> needs to be replaced with your domain name):
getent passwd | awk -F: '{print $1 "," $3 "," $4}' | grep <domain>

getent group | awk -F: '{print $1 "," $3}' | grep <domain>
The first command outputs each domain user with their UID and their GID in comma-separated format:
user@example.com,778006423,778001234
The second outputs each domain group with its GID in comma-separated format:
domain users@example.com,778001234
3. You can redirect the output to text or CSV files for parsing into Active Directory’s uidNumber and gidNumber attributes. With the UID and GID information in CSV format, you could create a script that imports each CSV and automatically updates uidNumber and gidNumber for Active Directory users and groups. For example, the following Windows PowerShell command adds the specified UID and GID to those attributes in AD:
Set-ADUser <ad_user> -Replace @{uidNumber="<uid>"; gidNumber="<gid>"}
With this command (and Set-ADGroup), you can easily generate a script that fits your environment and speeds up the process of mapping UIDs/GIDs to uidNumber and gidNumber in AD, which ultimately map to Windows SIDs.
4. Once you’ve saved the output from the getent commands, you can remove the enumerate value from sssd.conf and restart the SSSD service to prevent the expensive LDAP enumeration from occurring in the future:
sudo sed -i '/enumerate = True/d' /etc/sssd/sssd.conf

sudo service sssd restart
Conclusion
Linux hosts are often used for critical functions, so admins need to monitor these hosts, understand how they’re used, observe who accesses them and verify how they’re secured.
Admins need to especially be careful when joining Linux hosts to Active Directory. Remember, it takes only one compromised host or user for attackers to move laterally into admin rights in your domain, by exploiting issues like over-provisioned user access, weak passwords and open SMB/NFS shares.
One of the best ways to reduce cybersecurity risks is to use the Netwrix Active Directory Security Solution. Comprehensive and user-friendly, this software makes integrating Linux with Active Directory stress-free and simple. It includes:
- Preconfigured and customizable auditing, logging, analyzing and reporting jobs on both Unix/Linux and Active Directory
- Tools for protecting other parts of your infrastructure, including Google Cloud, network devices, virtualized systems and Kubernetes containers
Interested in experiencing the Netwrix difference? Request a free trial today.
FAQ
Can you join a Linux machine to Active Directory?
Yes. You can join any distro to an AD domain by manually connecting the SSSD client or using the realm join command.
How does Linux connect to Active Directory?
System Security Services Daemon (SSSD) provides a set of daemons to manage access to remote directory services and authentication mechanisms on Linux machines.
What is realmd in Linux?
realmd is a Linux system service that allows callers to configure network authentication and domain membership via SSSD or winbind services.
What is the sudo systemctl command?
The sudo systemctl command is the main management tool for controlling the init system. You can use the start command after it to start a systemd service.
What is the sudo apt-get update command?
The sudo apt-get update command is for downloading package information from all configured sources.
What is sudoers?
Linux and Unix administrators can use the sudoers file to allocate system rights to system users. In other words, it allows administrators to control who does what. You can find this file in /etc/sudoers.