Overview of AD
Microsoft Active Directory is a directory service for Windows domain networks. Active Directory serves as a centralized database which stores information about network resources, including users, computers, and services. It plays a significant role in network management and security, providing a framework for user authentication, authorization, resource management, and policy enforcement. This allows organizations to manage permissions and access rights across the entire network efficiently. Below are some key services Active Directory providing.
Authentication
Authentication is the process of verifying the identity of a user or device attempting to access the network. Active Directory uses protocols like Kerberos and NTLM to authenticate users securely. When a user logs in, AD verifies their credentials against the stored data to ensure they are who they claim to be.
Authorization
Authorization is the process of determining what an authenticated user is allowed to do within the network. After authentication, AD checks the permissions of users based on group memberships and assigned access controls to resources such as files, folders, and applications. This ensures users can only access resources they are permitted to use, enhancing security.
Management of Permissions
Management of permissions involves setting and controlling the access rights of users and groups to different resources. AD allows administrators to define permission levels using “Access Control Lists (ACLs)” for users and groups, enabling granular access control. This is often managed through Group Policy Objects (GPOs), which applies specific settings for users and computers.
Access to Resources
AD facilitates access to resources by managing user credentials and permissions. When a user requests access to a resource, AD verifies their identity and checks their permissions, allowing access if authorized. Active Directory manages resource access using security groups and permissions.
Hierarchal Structure
Active Directory is organized in a hierarchical structure which allows for efficient organization and management of network objects. By categorizing users, computers, printers, and servers within forests, domains, and OUs, administrators can apply policies, manage permissions, and maintain security effectively. This hierarchy includes several key components as below.
Forest
A forest is the top-level container in Active Directory, consists of one or more domain trees. Each Forest shares a common schema and global catalog but may have different namespaces. It defines the security boundaries within which all domains can operate.
Domain Tree
A domain tree is a hierarchy of domains. Each domain can contain multiple objects, such as user accounts, computers, and other resources.
Domain
A domain is a logical grouping of network objects, such as user accounts, computers, and services. Each domain has its own security policies and administrative boundary, making it easier to manage user access and resources.
Domain Controller (DC)
A server that runs Active Directory Domain Services and is responsible for managing authentication and authorization within the domain.
Organizational Units (OUs)
OUs are containers within a domain which help organize objects. They allow for the grouping of users, groups, computers, and other resources for easier management and application of Group Policy Objects (GPOs). OUs can be nested, creating a hierarchical structure within the domain.
Objects
Within the domain and OUs, AD stores different objects that represent different network resources, below are common objects listed.
- User Accounts: Each user account is an object that contains attributes such as username, password, email address, and group memberships. User accounts are essential for authentication and authorization within the network.
- Groups: Collections of user accounts which simplify permissions management. Groups can be security groups (for granting permissions) or distribution groups (for email distribution).
- Computer Accounts: These represent physical or virtual machines in the network. Each computer account is used for authentication and allows the machine to communicate with AD.
- Printer Objects: Printers can be represented as objects in AD, allowing for centralized management and access control for shared printing resources.
- Server Objects: Servers are also treated as objects within AD, which allows for the management of services and access rights related to specific server roles.
Storing Information for Network Objects
Active Directory uses a structured format for storing information about these network objects, which includes below.
- Attributes: Each object in AD has attributes that store specific information. For example, a user account object includes attributes like sAMAccountName, displayName, userPrincipalName, and email.
- Schema: The schema defines the types of objects and attributes that can be created in Active Directory. It dictates the nature of the data stored in the directory and establishes rules for data validation.
- Global Catalog: This is a centralized data repository that contains a subset of attributes for every object in the AD forest. The global catalog facilitates searches across the entire directory and enables users to locate resources quickly.
Role of Email Addresses in AD
Importance of email addresses for managing user accounts and communication
Email addresses play a significant role in Active Directory by facilitating communication, identification, and management of user accounts, often used as a unique identifier for user accounts. Email addresses stored in AD enable internal and external communication within the organization. Users can send and receive emails, instant messaging, sharing of information, and collaboration on projects, using integrated email systems like Microsoft Exchange or Microsoft365, which work together with Active Directory for communication management. Email addresses can be associated with distribution groups, allowing for easy communication with multiple users. These groups can be used for sending out announcements, newsletters, or other mass communications effectively. AD allows multiple email addresses as concept of proxy addresses or aliases for a single user account or distribution groups. This is useful for using different email formats or domain names, or for managing aliases for departments that may require different addresses for different purposes while maintaining centralized control. Many applications that rely on user authentication and data retrieval can integrate with AD and use email addresses stored within AD for functionalities like account notification, password resets, and multi-factor authentication.
Integration with services like Microsoft Exchange
Microsoft Exchange provides a centralized environment for managing user mailboxes. Microsoft Exchange integrates seamlessly with Active Directory, allowing automatic synchronization of user accounts from and to Active Directory, which means that mailboxes will be created in Exchange with user accounts created in Active directory, similarly existing accounts from Active Directory can be selected for mailbox creation due to data synchronization between the two. Exchange allows the creation of distribution lists as well as mail enabled security groups, facilitating mass communication, which simplifies sending emails to multiple recipients. Exchange includes advanced security measures such as anti-malware, anti-spam filters, and encryption to protect sensitive information. Integration with Active Directory ensures that only authorized users can access mailboxes. Users can access their email and calendars on multiple devices, including desktops, laptops, smartphones, and tablets. This flexibility supports remote work and on-the-go access. Microsoft Exchange also provides Outlook Web App, a browser-based interface for users to access their emails, calendar and other features from anywhere, ensuring that communication is always available.
Understanding Email Aliases
Definition of Email Alias
Email aliases are alternative email addresses which redirect messages to a primary email account, allowing users to receive emails without the need for multiple mailboxes.
Explanation of email aliases as forwarding mechanisms
Email aliases function primarily as forwarding mechanisms, allowing emails sent to an alias to be redirected to a designated primary email account. When an email is sent to the alias address, the email server processes it and automatically redirects it to the specified primary email account. The recipient sees the email in their primary inbox. When responding to emails received via an alias, users can choose to reply from the alias itself, providing a consistent communication channel. The alias has no standalone mailbox, it simply acts as a redirect. This allows users to manage all emails from one primary account.
Example Use Cases for Email Aliases
Below can be some example uses case for email aliases.
- Team or Project Emails: Organizations can create aliases for departments or projects, such as “support@company.com” or “sales@company.com”.
- Role-Based Aliases: Aliases can be used to manage emails for specific roles, like “info@company.com” or “hr@company.com”.
- Event Registrations: For events, an alias like events@company.com can be used to gather registrations while keeping them separate from standard communications.
Benefits of Email Aliases
Email aliases offer variety of benefits for both individuals and organizations.
Managing diverse responsibilities
Email aliases allow you to create different email addresses for several roles or projects, making it easier to separate work, personal, or specific tasks and keep responsibilities distinct. You can make sure that emails related to specific tasks or projects go to the right place.
Enhancing privacy and security
By using aliases, you can protect your primary email address from spam, phishing and unauthorized access, as you can give out an alias for sign-ups or less secure sites, without compromising your main account. You can maintain a level of anonymity when communicating with unknown contacts or in public forums by using an alias instead of your primary email.
Simplifying administration
It is easier to manage multiple aliases under a single account rather than managing several email accounts, simplifying password management and reducing login hassles. Easier to manage incoming emails since you can direct messages to specific folders or labels based on the alias used, reducing clutter in your inbox. Aliases can be set up for teams or projects, enabling group messages to be received by several individuals. This ensures that important communications reach all relevant parties efficiently.
Organizing and filtering emails
Email aliases enable better organization by helping you categorize, and filter emails based on the tasks or projects they are associated with, improving your productivity. You can set up filters in your email client to automatically sort emails coming from specific aliases and keep your inbox organized.
Email Aliases in AD
Extending identity management framework
Integrating email aliases into an identity management framework such as Active Directory, enhances flexibility and control over user identities, maintaining security and communication strategies. Email aliases allow users to represent different roles or functions, this simplifies identity management by keeping all communications within a single user profile while retaining different email addresses for specific tasks. Administrators can manage email aliases centrally through the identity management framework, if a user changes roles or responsibilities, their existing alias can be easily redirected without having to create or delete multiple accounts. This ensures continuity in communication and minimizes disruptions. Email aliases can be used with other identity services which use standards like SAML (Security Assertion Markup Language) or OAuth, these can facilitate authentication processes smoother across several applications.
Use with services like Microsoft 365 for alternative email addresses without additional mailboxes
Email aliases in Microsoft 365 provide an effective way to manage alternative email addresses without the need for administrative overhead and additional mailboxes, providing benefits in cost and workflow efficiency. Like on-premises Exchange and Active directory, aliases in Microsoft 365 allow administrators and users to maintain different email addresses for several purposes e.g., support and marketing while centralizing communications in one primary inbox. Users can set aliases for specific purposes, helping to filter and organize incoming messages. Administrators can manage all aliases from a single point in the Microsoft 365 Admin Center, making it straightforward to add or remove aliases as needed. Aliases can be used in conjunction with Microsoft Teams and SharePoint, ensuring consistent communication and identity across various platforms.
Active Directory and Email Address Attributes
Active Directory uses specific attributes to manage email addresses for user accounts, particularly in environments that integrate with email systems like Microsoft Exchange or Microsoft 365. Below are key email address attributes in Active Directory.
- Mail: This attribute stores the primary email address of the user. It is typically formatted as “user@example.com”. It is used for email communication and serves as the main identifier in Exchange for mail-related functions.
- proxyAddresses: This multi-valued attribute contains additional email addresses (aliases) associated with the user. Each alias can be in the format of “SMTP:alias@domain.com” or “smtp:alias@domain.com” (the capitalization of “SMTP” indicates it is the primary address).
- mailNickname: An Active Directory attribute also known as the “alias” Microsoft Exchange uses this attribute to define the short name for the user, which is often part of their primary email address.
AD Object Attributes
Active Directory object attributes define the properties of user, group, computer, and other objects within the directory. Each AD object has large set of attributes to represent different functions and features.
Role of attributes in defining user details
Attributes are essential components that define the characteristics and properties of user accounts. Each user object consists of a variety of attributes, which provide detailed information about the user and facilitate different functionalities within the network. Below are the different roles of some of these attributes.
Identification and Authentication
- distinguishedName: This unique identifier stores the location of user within the AD hierarchy and is critical for identifying user objects.
- sAMAccountName: Often referred to as the logon name, this is used for older Windows systems and is required for user authentication.
- userPrincipalName (UPN): This email-like format (e.g., user@domain.com) serves as a modern logon identifier, simplifying user access to different services.
Personal Information
- givenName: Represents the user’s first name.
- sn (surname): Stores the last name of the user.
- displayName: A user-friendly display name.
Contact Information
- mail: This attribute holds the user’s primary email address.
- telephoneNumber: This provides user’s phone numbers.
Group Membership and Access Control
- memberOf: Identifies the groups to which the user belongs.
- groupType: Determine what level of access a user has in relation to different resources on network.
Account Management
- userAccountControl: This attribute includes flags that define account settings, such as whether the account is enabled or disabled.
- lastLogonTimeStamp: Records the last time a user logged in to AD.
Security and Compliance
- passwordLastSet: This attribute helps track when a user last changed their password, aiding in compliance with security policies requiring regular password updates.
- accountExpirationDate: Specifies the date a user account will expire, which is crucial for managing temporary user access, such as contractors or students.
Importance of the email address attribute for linking digital identity and communication
The email address attribute plays an important role in establishing and managing digital identity within organizations. The email address serves as a unique identifier for users, making it easier to manage accounts and communications. It helps prevent confusion in environments where multiple users may have similar names or roles. Email addresses are frequently used for user registration and authentication across several digital platforms. They enable users to access applications, software, and cloud services, linking their digital identity to essential tools. Email addresses are commonly used in 2FA processes, adding an extra layer of security to user accounts. Many systems use email addresses for account sign-up, verification, password resets, and recovery processes. This functionality ensures secure access to digital identities.
Integration with Microsoft Exchange
Active Directory and Microsoft Exchange work together to provide a comprehensive identity and email management system. Active Directory serves as the backbone for user management, while Microsoft Exchange facilitates email communication.
Exchange’s reliance on AD email attributes
Microsoft Exchange relies heavily on Active Directory email attributes to function effectively and manage user identities and email communications. The “mail” attribute in AD is critical as it defines a user’s primary email address. Exchange uses this attribute to route emails correctly to user mailboxes. The “proxyAddresses” attribute contains all secondary email addresses (aliases) associated with a user. Exchange uses this information to deliver emails sent to any of the aliases into the user’s mailbox. Exchange pulls information from AD, including email addresses, to populate the Global Address List. This enables users to easily find and communicate with others within the organization, any changes made to email attributes in AD are automatically reflected in the GAL, ensuring most up-to-date information. Exchange uses AD group attributes to manage distribution lists for email communications. Most importantly Exchange relies on AD for user authentication, meaning that users log in using their AD credentials.
Reflecting changes in email infrastructure when modifying addresses or adding aliases
When modifying or adding email addresses and aliases in Active Directory, several key considerations and processes come into play. Modify the relevant attributes in Active Directory e.g., mail or proxyAddresses, make sure the changes are reflected in user profiles. Adjust routing and forwarding rules in the email system to accommodate the new addresses or aliases, ensuring no emails are lost or misdirected. Changes made in Active Directory should automatically update the Global Address List in Exchange, if not then confirm that the GAL reflects these changes so users have access to the correct information. Conduct tests to verify that emails sent to the new addresses or aliases are routed correctly, and that all users can send emails from their aliases without issues.
Adding a Secondary Email Address in Active Directory
Adding a secondary email address in Active Directory involves modifying the proxyAddresses attribute of a user account, which stores all email addresses associated with a user.
Prerequisites
Before proceeding to add a secondary email address in Active Directory, it is important to make sure certain prerequisites are met.
Administrative Access
Verify that you have administrative rights within Active Directory. This level of access is required to modify user attributes, including email addresses.
Verified Primary Email Address
Before adding a secondary email address, confirm that the user’s primary email address is valid and operational. This ensures that all communications are directed properly and reduces the chances of conflicts or delivery issues.
Compliance with Organizational Email Policy
Make sure that assignment of email addresses complies with your organization’s email policies. There may be guidelines about format, usage, and even limitations on the types of secondary addresses that can be used (e.g., personal vs. professional domains). Ensuring compliance avoids potential issues in the future.
How to add an alias in active directory
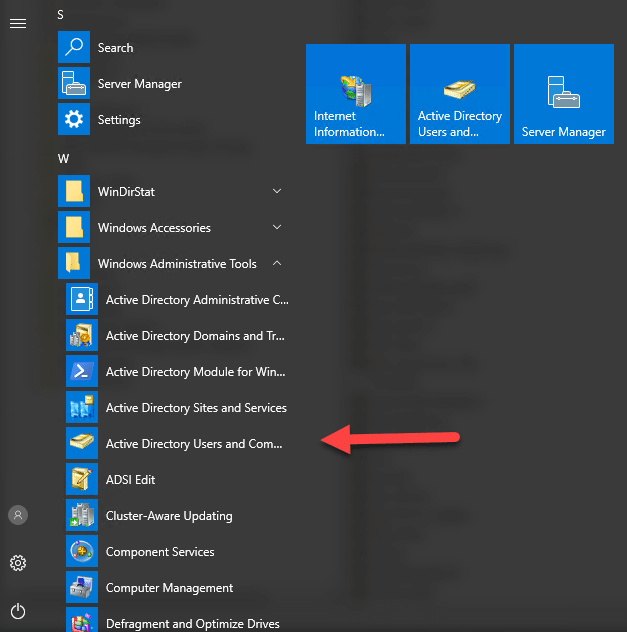
Follow the steps for adding a secondary email address in Active Directory using the Active Directory Users and Computers (ADUC) management console.
- Launch the Active Directory Users and Computers. On Windows Server, you can find it under Administrative Tools in Start menu. Alternatively, search for Active Directory Users and Computers in the Start menu, if RSAT tools are installed on your workstation.
- In the ADUC console, navigate to the Organizational Unit where the user account is located, right-click on the user, and select Properties from the context menu.
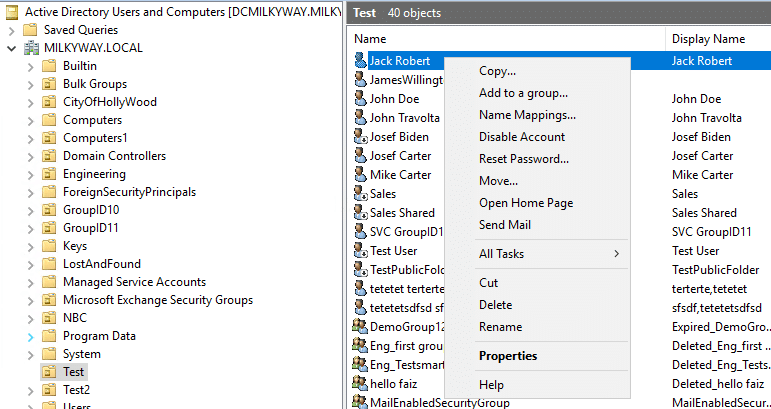
- In the Properties window of the selected user account, go to the Attribute Editor tab.

Note: If you do not see the Attribute Editor tab, you need to enable Advanced Features in ADUC, by clicking on the View menu at the top of the ADUC window. Select Advanced Features to reveal additional tabs, including Attribute Editor.
- In the Attribute Editor tab, scroll down and locate the proxyAddresses attribute. Double-click on proxyAddresses to edit it.

- In the proxyAddresses field, type a SMTP value in the format as “smtp:alias@example.com” in “Value to add:” field, then click Add to include a new email address.

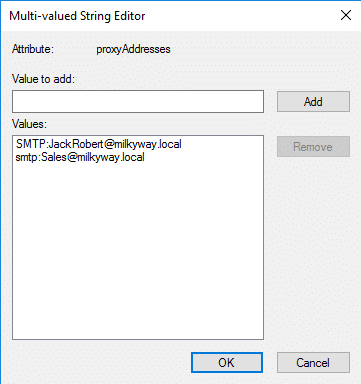
- After adding the desired alias, click OK to save the changes to the proxyAddresses attribute. Then, click Apply and OK in the user’s Properties window to apply the changes and close it.
Verification of Secondary Email Address
Waiting for Propagation
When you add a secondary email alias, the changes may not be immediately reflected across all systems. Propagation time depends on several factors, such as replication time in Active Directory, which typically occurs every 15 minutes. Email system synchronization, particularly if your organization uses Exchange or Office 365. Give it at least 15 minutes for AD replication to ensure changes are synced across domain controllers, for Microsoft Exchange or M365, make sure the changes have reflected. You can manually force replication on the domain controllers if needed but typically, you just need to allow some time for the changes to take effect. It is common for changes to reflect from a few minutes to several hours.
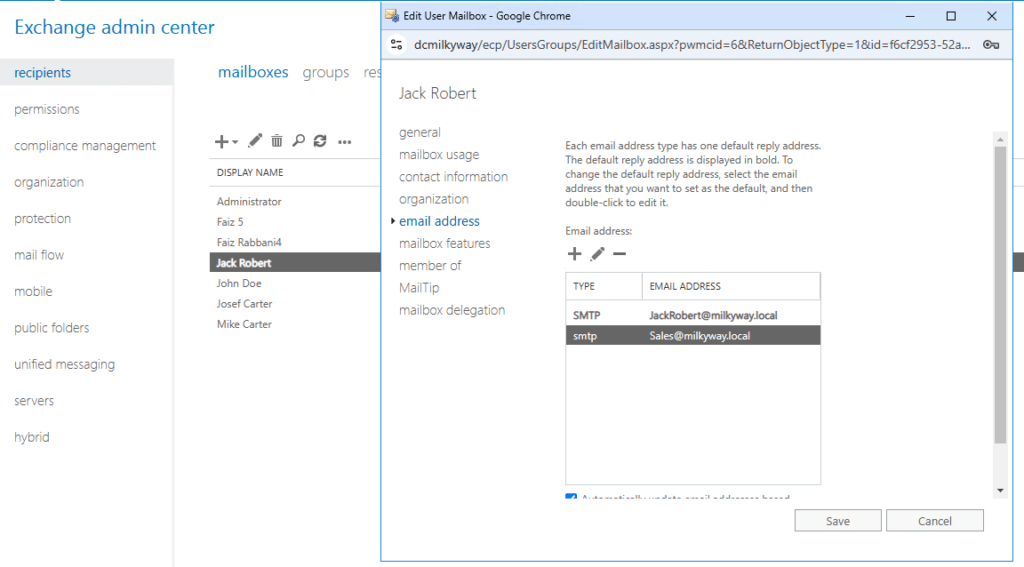
Below is an illustration of the alias we have added using Active Directory, it is reflected in on-premises Exchange server and ready to be used, in small environments, this is instant, but in large infrastructures, this could take longer.
Testing Email Delivery
Once you have given sufficient time for propagation, the next step is to thoroughly test email delivery to the newly added secondary address. Begin this process by sending a test email from an external email account, preferably one that is not associated with your organization. This test email should be clear and concise, allowing you to easily verify its arrival. After sending, check the inbox associated with the secondary address to confirm whether the test email arrived successfully.
Confirming Email Client Functionality
The final step in verifying the secondary email address involves ensuring that users can access and use the email client software effectively with the new address. Open the email client such as Microsoft Outlook, Mozilla Thunderbird, or any other application used by your organization and configure it to include the secondary email address. Conduct a series of tasks including sending, receiving, and replying to emails using this address. Pay attention to any syncing issues that may arise, such as delays in receiving emails or problems with sent items not appearing.
Considerations for Adding a Secondary Email Address
When adding a secondary email address to a user account in Active Directory, several important considerations must be considered to ensure smooth integration, security, and compliance with organizational standards.
Purpose of the Alias
Before adding an alias, define the common purposes such as role-based addresses which is useful if the user handles multiple roles or functions. A user may want an alias that is easier to remember or more relevant to a specific project or campaign, sometimes, an alias is used for public communications, and the main mailbox is used internally. Sometimes, aliases are used to forward emails to another address or distribution group for better handling of specific mail types like customer inquiries or team communications.
Email Policy Alignment
Every organization should have an email policy that governs the creation and management of email aliases. Make sure that the secondary alias complies with the organization’s naming conventions. The alias does not expose the user to security risks, such as spam and phishing, use security measures like email filtering, anti-phishing policies, or multi-factor authentication. Make sure that the email alias aligns with DLP policies to ensure sensitive information is not mistakenly sent or received through unapproved email addresses. Make sure that the alias is subject to the same compliance controls as the primary email address, such as encryption or archiving policies.
Domain Availability and Conflicts
When adding a secondary email address, you must ensure that the domain is correctly configured and that there are no conflicts with existing systems. This includes verifying domain you are adding the alias to is valid and available in your system. If using Exchange or Microsoft 365, verify that the domain is registered and correctly configured. Confirm that the alias is unique and does not conflict with another user’s alias or email address. Check proxyAddresses for any duplicates or conflicts before adding the alias.
Troubleshooting Email Alias Issues
When working with email aliases, several common issues may arise that can disrupt communication or cause confusion.
Common Issues
Keeping a clear process for checking configurations, permissions, and email flow will help ensure a smoother experience for users and maintain effective email communication within your organization.
Duplicate Alias Conflicts
If two users share the same alias, it can lead to email delivery issues. Use Active Directory or your email management console to list existing aliases. Change or remove conflicting aliases by modifying one of the user accounts to ensure each alias is unique.
Failure to Add Aliases
The system returns an error when trying to add a new alias. Insufficient permissions to modify user accounts or technical issues with the email system or directory services. Make sure you have the necessary permissions to add aliases. Contact an administrator if needed or look for specific error messages in the logs to identify the issue. Sometimes temporary issues may prevent changes, try again after a brief wait.
Missing or Incorrect Aliases
The alias appears to be missing or added incorrectly. Verify that the alias was correctly added by reviewing the “proxyAddresses” attribute in Active Directory. Remember that changes may take time to propagate, wait for a short period and check again. Ask the user to log out and back into their email client to refresh settings, as some clients may need to restart to recognize new aliases.
Alias Routing Errors
Emails sent to an alias may not reach the intended mailbox, indicating a routing issue. Check the routing rules configured in your email server to ensure that emails sent to aliases are directed to the correct mailbox. Analyze the email delivery logs to identify where the emails to the alias are being routed or if they are bouncing. This can help you pinpoint any misconfigurations.
Restarting Services and Contacting Support if Necessary
In some cases, email services such as Exchange or related services may need to be restarted for changes to be recognized. Use the appropriate service management console to restart these services safely. If issues persist after verifying settings and permissions, gather all relevant information and contact your IT support team for further assistance.
Regular AD Maintenance
Perform routine audits of Active Directory to ensure that all user accounts, aliases, and permissions are properly configured and up to date. Identify and remove any stale or inactive accounts that may be causing conflicts within the system.
Using PowerShell for Email Alias Management
PowerShell can also be used for email alias management, which can be easier instead of following multiple steps using ADUC. You can easily add, modify or remove aliases in Microsoft Exchange or Active Directory. Below are some commands for managing email aliases using PowerShell. Make sure you have the necessary permissions to manage user accounts and aliases in your environment.
Viewing Existing Aliases
To view the existing email aliases for a user using Powershell, use the following command.
Get-ADUser -Identity “JackRobert” -Properties proxyAddresses | Select-Object proxyAddresses
This command retrieves the proxyAddresses property, which lists all aliases associated with the specified user.

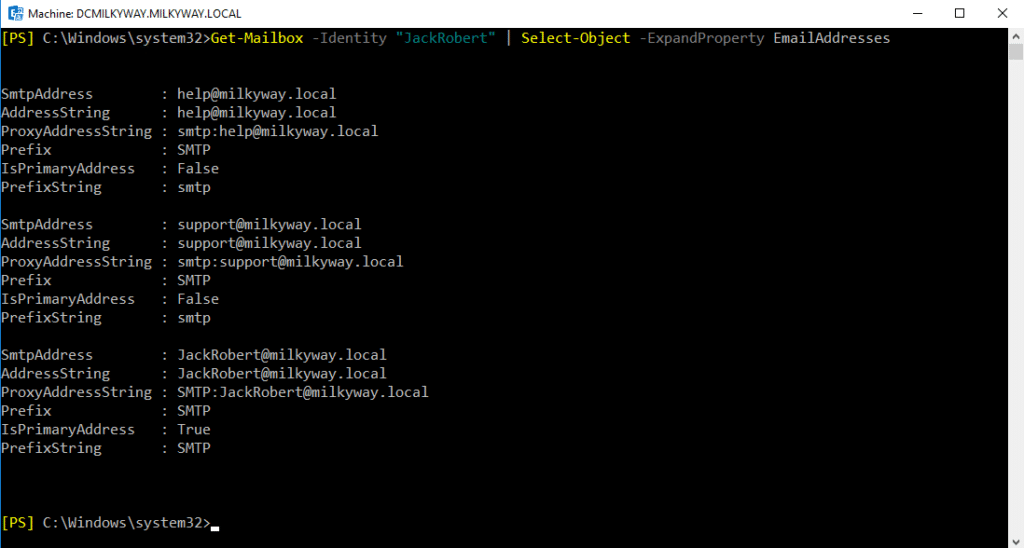
To view all aliases for a specific user using Exchange Management Shell or Microsoft 365, use below command.
Get-Mailbox -Identity “JackRobert” | Select-Object -ExpandProperty EmailAddresses
This command will output a list of all email addresses assigned to that user. You can notice in the field “IsPrimaryAddress” against all three lists and will find it true against JackRobert@milkyway.local but other two are showing false, proves that they are aliases for the user.
Adding a New Alias
To add a new email alias to a user, use the below cmdlet.
Set-ADUser -Identity “JackRobert” -Add @{proxyAddresses=”smtp:info@milkyway.local”}
Above cmdlet will not produce any output, but adds the alias in proxyAddresses attribute, to confirm the addition, you can use below cmdlet again to verify.
Get-ADUser -Identity “JackRobert” -Properties proxyAddresses | Select-Object proxyAddresses

Removing an Existing Alias
To remove an existing email alias, use below cmdlet.
Set-ADUser -Identity “JackRobert” -Remove @{proxyAddresses=”smtp:info@milkyway.local”}
This command will remove the specified alias from the user’s account, you can confirm the output using Get-ADuser cmdlet.

Process for adding aliases via Microsoft 365 admin center
Managing email aliases through the Microsoft 365 Admin Center is a straightforward process. Follow the instructions below.
- Sign In to Microsoft 365 Admin Center, https://admin.microsoft.com. Enter your admin credentials to log in.
- In the left-hand menu, click on “Users” and then “Active users”.
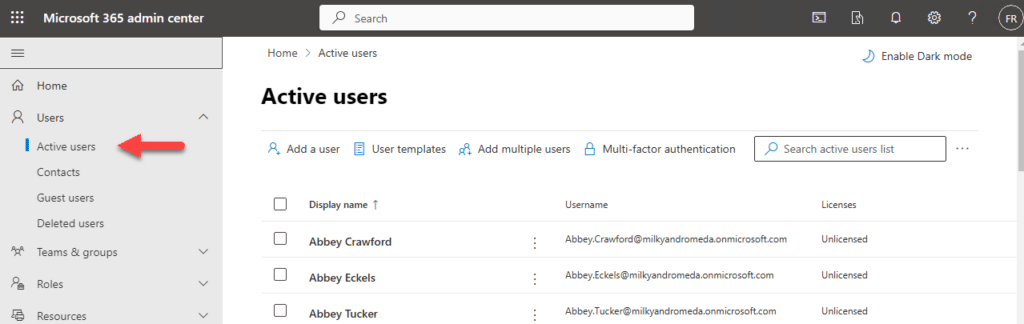
- In the Active users list, find and click on the user to whom you want to add an alias.
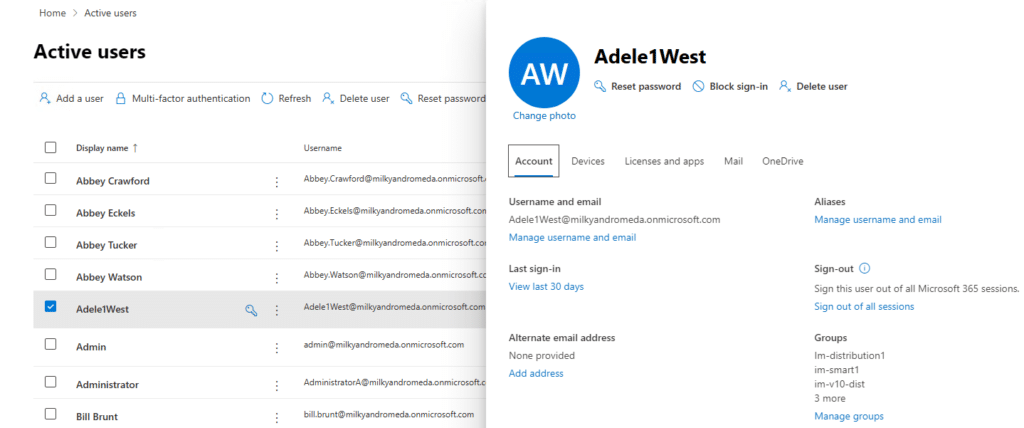
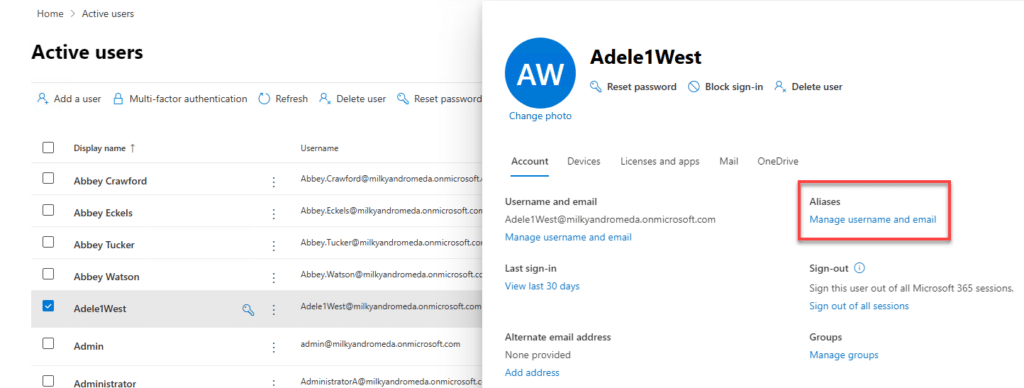
- In the user details pane, look for the “Account” section. Here, you will find an option labeled “Aliases”. Click on “Manage username and email” under Aliases.
- In the next window, you will see a field “Username” to enter a new alias. Type the desired alias name, only the alias. After typing the alias, click “Add”.

- Once you have added all desired aliases, click “Save Changes” to apply them.

- After saving and going back to main Account tab, you can double-check the email aliases under the same “Aliases” section in the user details to confirm that the aliases have been successfully added.

- It is a good practice to send test emails to ensure that emails sent to the new aliases are being properly routed to the user’s primary mailbox.
Conclusion
Creating and managing email aliases in Active Directory is important for several reasons, you can create easy to remember addresses for teams and individuals. Controlling aliases helps protect sensitive information and reduces the risk of phishing. Proper management of aliases reduces inbox clutter by directing emails to the right groups. There are several steps and considerations for adding and verifying email aliases. Determine the purpose and users for the new aliases. Adjust permissions as needed for managing aliases. After adding the alias, send email to the new alias from another account for received confirmation, if there are problems, look for any bounce-back messages indicating issues, check alias settings and permissions, mail flow routing or any duplication within the Active Directory. Adopting best practices for Active Directory management is vital for a secure and efficient IT environment. Protect sensitive data and prevent unauthorized access. Clear documentation makes problem-solving faster. Ensure adherence to industry regulations. Provide clear roles and access to shared resources.