Introduction to PowerShell
What Is PowerShell?
Microsoft PowerShell combines the functionality of a command-line interface with a scripting language. Unlike traditional command-line tools that mainly work with text-based commands, PowerShell is built on the .NET framework, which allows it to process objects instead of plain text. This makes it highly versatile for desktop and server administrators who need to automate common tasks, manage remote machines, share data between applications, manage infrastructure as code and more. Indeed, learning even a basic set of Windows PowerShell commands and core scripting capabilities can help you achieve significant automation.
This PowerShell tutorial covers PowerShell scripting basics for beginners. The article will guide you on how you can automate tasks, boost efficiency and simplify system administration, all while ensuring security, privacy and compliance.
Importance of PowerShell in Automation and Configuration
Whether you’re managing hundreds of servers, configuring cloud resources or handling routine system maintenance, PowerShell enables you to execute complex tasks with just a few lines of code. It also excels at repetitive tasks like user management, since a single script can create dozens of accounts with consistent settings. The level of consistent automation will not only save you time but also ensure that configurations are applied uniformly across your environment.
Overview of Cmdlets, Scripts and the PowerShell Environment
PowerShell is built around three key elements:
- Cmdlets are the building blocks of PowerShell. They are built-in commands that perform specific actions and return objects. They can be combined for complex operations.
- Scripts combine multiple cmdlets to accomplish more complex tasks. Scripts can be saved as a text file with a .ps1 extension, and they can be scheduled and executed remotely.
- The PowerShell environment ties everything together, providing a powerful command-line interface for efficient work.
Setting Up PowerShell
Installing PowerShell on Various Platforms
PowerShell can be used on Windows, macOS and Linux. The installation process varies slightly depending on the operating system. PowerShell is pre-installed on Windows systems as Windows PowerShell. However, you may need to install a newer version. On macOS and Linux, PowerShell can be installed via package managers such as Homebrew (macOS) or apt/yum (Linux).
Understanding the Execution Policy
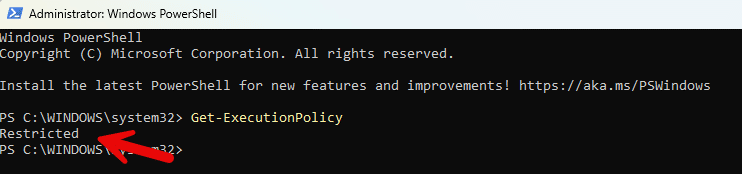
By default, PowerShell restricts the running of scripts for security reasons. You can check your policy’s setting by running the Get-ExecutionPolicy command. You will get one of the following values:
- Restricted — No PowerShell scripts may be run. This is the default setting.
- AllSigned — You can run PowerShell scripts signed by a trusted developer.
- RemoteSigned — You can run your own scripts or scripts signed by a trusted developer.
- Unrestricted — You can run any script you want.
In the example below, PowerShell is set at its default state of Restricted:
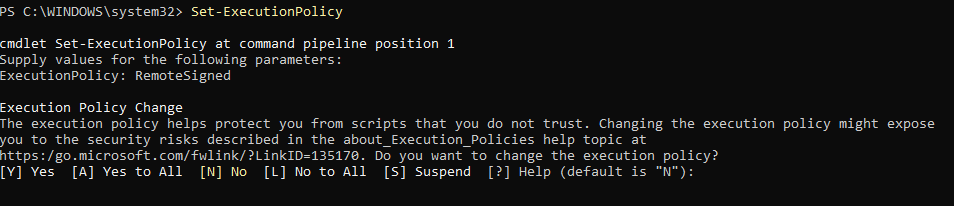
To modify the execution policy, use the Set-ExecutionPolicy cmdlet. When selecting a more permissive policy, PowerShell will ask for your confirmation to ensure you understand the potential security implications, as shown below:
Installing and Managing PowerShell Modules
Modules are collections of cmdlets, functions and scripts that extend PowerShell’s capabilities to the platforms and tools you use. Commonly used modules include:
- Active Directory
- Microsoft Exchange Server
- Office 365 (Microsoft 365)
- SQL Server
- SharePoint Server
- Internet Information Services
You can use the Get-Module -ListAvailable cmdlet to view all available modules on your system, as shown below:
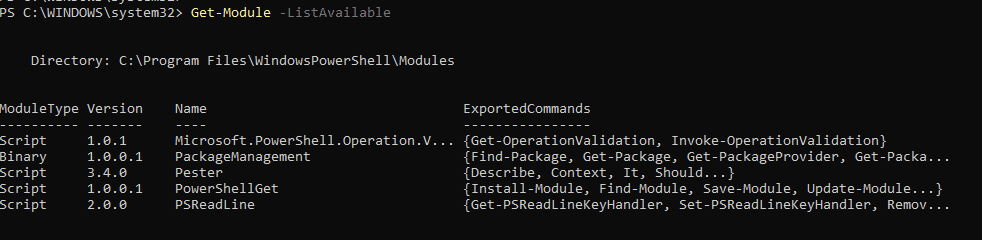
You can install any module you want directly from the PowerShell Gallery using the Install-Module cmdlet. Then you can use the cmdlets and functions defined in the module just like built-in PowerShell commands.
PowerShell Basics
Key Concepts: Cmdlets, Pipelines and Objects
Unlike traditional shells that work with text, PowerShell works with .NET objects. This object-oriented approach allows for more complex data manipulation and analysis. For example, when you run Get-Process, the output is not text but actual process objects with properties and methods.
The pipeline (|) operator allows you to take the output from one command and feed it directly into another, enabling you to create sophisticated workflows with minimal code
Basic Syntax and Commands
PowerShell commands typically follow this structure:
Verb-Noun -Parameter1 Value1 -Parameter2 Value2
If you haven’t worked with PowerShell before, here are some essential commands to get started:
- Get-Help — Provides information about cmdlets
- Get-Command — Lists available commands
- Get-Member — Shows the properties and methods of objects
Using Variables, Arrays and Operators
A variable is a named container that holds a value, such as a string, number, array or object. PowerShell variables are loosely typed, meaning you do not need to declare the data type of a variable when you assign a value to it; the data type is determined dynamically based on the assigned value. Variable names in PowerShell are comprised of the $ symbol followed by the name of the variable. Variable names are not case sensitive, so, for instance, $MyVariable and $myvariable refer to the same variable.
For example, the following code creates two variables and assign a values to each of them:
$myVariable = "Hello, World!"

$number = 42

Arrays are ordered collections of values, which can be accessed by their index (starting at 0). Here is an example:

$fruits = @("apple", "banana", "orange")

$fruits[0]  # Will output "apple"
Operators are symbols or keywords that perform operations on values and variables. PowerShell supports various types of operators:
- Arithmetic — For mathematical calculations (+, -, *, /, %)
- Comparative — For comparing values (-eq, -ne, -gt, -lt, -ge, -le)
- Logical — For combining conditions (-and, -or, -not)
Creating and Running Scripts
How to Create a PowerShell Script
A script is a text file that contains one or more PowerShell commands. Creating a PowerShell script is simple and requires only basic text editing tools. Type your PowerShell commands just as you would in the interactive console.
You can add comments to document your script by using the # symbol, as shown below:
# This script displays a message and lists running processes
Write-Host "Hello, World!"

Get-Process
Steps to Save, Modify and Execute Scripts
To use your script, first save the file with the extension .ps1, which identifies it as a PowerShell script. To modify a script, simply open the file in your text editor, make your changes and save the file. To execute a script, open PowerShell, navigate to the script’s directory and run the script.
Managing Execution Policies for Script Security
To protect your environment from potentially malicious scripts while enabling legitimate PowerShell operations, it is necessary to strike a balance between security and functionality. Here some security management tips:
- Use the Get-ExecutionPolicy -List cmdlet to view policies for all scopes.
- Use Set-ExecutionPolicy to change a policy.
- Policies can be set at different scopes (MachinePolicy, UserPolicy, Process, CurrentUser, LocalMachine). Set the appropriate scope based on your security requirements as shown here:
Set-ExecutionPolicy -ExecutionPolicy RemoteSigned -Scope LocalMachine
- Use the most restrictive policy that still allows necessary operations.
- Periodically review and update execution policies to ensure they align with current security needs.
Interactive Learning: PowerShell Integrated Scripting Environment (ISE)
The PowerShell ISE is an interactive interface that makes writing and debugging PowerShell scripts easier and more interactive than the standard PowerShell console.
Features of the PowerShell ISE
Key features of the PowerShell ISE include:
- Multi-pane interface — A GUI that features three panes:
- Script pane for writing and editing scripts
- Console pane for executing commands interactively
- Output pane that displays command results and debugging output
- Syntax highlighting — Automatically colors different elements of your code for improved readability
- IntelliSense — Provides auto-completion suggestions as you type to help you learn available cmdlets and parameters
- Debugging tools — Enable you to set breakpoints, step through code and inspect variables
- Integrated help — Provides quick access to cmdlet documentation using the F1 key
Below is a screenshot of an ISE session:

Writing, Editing and Debugging Scripts in the ISE
Start by opening the ISE from the Start menu or by typing powershell_ise in the Run dialog. Use the script pane to write your PowerShell code. The ISE’s IntelliSense will suggest cmdlets and syntax as you type, ensuring accuracy and helping you discover new commands.
To run or edit an existing script, either use File > Open or drag and drop the script file into the script pane. Use features like search and replace (Ctrl+F) to quickly modify code across large scripts.
The following tips can help you debug your scripts:
- Add breakpoints by clicking the margin next to a line of code. When the script runs, execution will pause at these breakpoints, allowing you to inspect variables and step through your code.
- Use the F8 key to test specific sections of your code. Use F5 to run the entire script.
- Step through code using F10 (step over) or F11 (step into) to execute code line by line and understand the flow of your code.
Control Flow and Error Handling
Using Loops: For, While and ForEach
By using loops in PowerShell, you can significantly reduce code redundancy and enhance script efficiency. Whether you’re dealing with a handful of items or thousands of data points, loops provide a concise and effective way to handle repetitive actions in your PowerShell scripts.
There are several loop types to choose from:
- For loop — Used when you know the exact number of iterations required. It’s commonly employed for tasks like incrementing counters or processing arrays.
- While loop — Continues executing as long as a specified condition evaluates to True. It’s ideal for scenarios where the number of iterations depends on a dynamic condition.
- ForEach loop — Designed for iterating through collections like arrays or output from commands.
In the script below, the loop will execute 5 times, but it is flexible since the condition can be changed within the loop:
$i = 0

while ($i -lt 5) {

    Write-Host "Iteration: $i"

    $i++

}
Implementing Conditional Statements: If-Else, Else-If
Conditional statements allow you to execute different code blocks based on specific conditions:
- The If-Else statement executes one block of code if a condition is true, and another if it’s false, as shown in this example:
$num = 10

if ($num -gt 5) {

    Write-Host "$num is greater than 5"

} else {

    Write-Host "$num is less than or equal to 5"

}
In this case the script will output “10 is greater than 5”.
- The Else-If statement is used in scenarios with multiple conditions, since it allows you to check additional cases as shown here:
$num = 10

if ($num -gt 10) {

    Write-Host "$num is greater than 10"

} elseif ($num -eq 10) {

    Write-Host "$num is equal to 10"

} else {

    Write-Host "$num is less than 10"

}
Here, the output will be “10 is equal to 10”.
Error-Handling Techniques for Robust Scripting
No matter how carefully you write your script, errors are inevitable, especially when you are first starting out. The good news is that PowerShell provides several tools for handling errors gracefully and preventing scripts from failing abruptly.
First, there is the Try-Catch-Finally block, which is used to handle terminating errors. The script below attempts to read a non-existent file, catches the error and executes the finally block:
try {

    # Code that might throw an error

    Get-Content -Path "C:\NonExistentFile.txt" -ErrorAction Stop

} catch {

    Write-Host "An error occurred: $_"

} finally {

    Write-Host "This code always runs, regardless of errors"

}
The $ErrorActionPreference variable controls how PowerShell responds to non-terminating errors. Setting this variable to Stop turns non-terminating errors into terminating errors so they can be caught by a Try-Catch block, as shown here:
$ErrorActionPreference = "Stop"

Get-ChildItem -Path C:\NonExistentPath
You can use the -ErrorVariable parameter to store error details in a custom variable, which allows you allows you to check for errors without stopping script execution:
Get-ChildItem -Path C:\NonExistentPath -ErrorVariable MyError

if ($MyError) {

    Write-Host "An error occurred: $MyError"

}
Advanced Scripting Techniques
Automating Administrative Tasks
As you become more comfortable with PowerShell you can leverage it to automate repetitive tasks. This not only reduces the time required for these mundane repetitive tasks but also ensures consistency and minimizes human. For example, PowerShell is often used to:
- Automate the creation of user and computer accounts in Active Directory
- Manage scheduled tasks such as backups and system updates
- Manage multiple machines simultaneously
Working with PowerShell Providers and Drives
PowerShell providers allow you to access different data stores as if they were file systems. Some common providers include:
- FileSystem — Access files and directories
- Registry — Access the Windows registry
- Certificate — Manage certificates for encryption and security.
Drives are logical representations of providers. For instance, the C: drive represents the FileSystem provider, while HKLM: and HKCU: represent registry hives. Below is an example using the Registry provider:
Set-Location HKLM:\SOFTWARE\Microsoft\Windows\CurrentVersion

Get-ItemProperty .\Run
You can create custom PowerShell drives for easier access:
New-PSDrive -Name HKU -PSProvider Registry -Root HKEY_USERS
Querying Data with Common Information Model (CIM) and WMI
CIM (Common Information Model) and WMI (Windows Management Instrumentation) provide a standardized way to access system information and perform administrative tasks. CIM is the modern replacement for WMI, offering better performance and compatibility with remote management tools. You can use these to:
- Query hardware information such as processor details and disk usage
- Monitor system performance metrics like CPU and memory usage
- Configure settings such as network adapters and firewall rules
Practical Applications of PowerShell
Managing Files, Folders and ACLs
PowerShell has cmdlets to assist in the handling of files, folders and their permissions. Here are some examples:
# Create a new directory
New-Item -Path "C:\Reports" -ItemType Directory
# Copy files with a specific extension
Copy-Item -Path "C:\OldReports\*.pdf" -Destination "C:\Reports"
You can also manage access control lists (ACLs). Use Set-Acl to modify file or folder permissions without having to open graphical tools. The script below illustrates how to create and apply a new ACL rule:
# Add a new access rule $rule = New-Object System.Security.AccessControl.FileSystemAccessRule("DOMAIN\UserGroup","ReadAndExecute","Allow") $acl.SetAccessRule($rule)

# Apply the new ACL Set-Acl -Path "C:\ConfidentialReports" -AclObject $acl
Monitoring System Logs and Event Management
PowerShell can query and analyze logs to help you identify issues, maintain performance and ensure security. The Get-EventLog cmdlet lets you retrieve logs from local or remote systems for troubleshooting or auditing purposes. You can also create scripts that look for specific error codes or warnings and alert administrators so they can respond quickly to problems.
Automating Active Directory Tasks
PowerShell integrates with Active Directory, enabling you perform a variety of AD-related tasks, including:
- Creating user accounts in bulk (New-ADUser)
- Managing group memberships (Add-ADGroupMember, Remove-ADGroupMember)
- Resetting user passwords (Set-ADAccountPassword)
- Enabling or disabling accounts (Enable-ADAccount, Disable-ADAccount)
- Querying AD for information, such as locked accounts or accounts without password expiration (Get-ADUser)
PowerShell Certification and Training
Available PowerShell Courses and Certifications
While Microsoft does not offer an official PowerShell certification, PowerShell is included in the curriculum of multiple certification programs focused on system administration and cloud management.
Microsoft does offers free, interactive tutorials covering PowerShell commands, workflows and integration with Microsoft services. You can also find an online PowerShell course on sites such as Udemy, as well as documentation you can download. As you read and practice more, you’ll find your proficiency growing steadily.
Benefits of Certifications for IT Professionals
Certification programs help professionals build targeted skillsets and keep up to date with the latest technologies. Earning a certification shows that you have a deep understanding of PowerShell and can apply it effectively in real-world scenarios. Certified professionals may have better job prospects, see faster career progression and make more money.
Overview of Advanced Training Options
There are many directions you can take in advanced PowerShell training. For instance, there are DevOps-focused courses that teach how to use PowerShell for automating CI/CD pipelines. And there are advanced security courses that cover system hardening, vulnerability detection and automated compliance checks.
PowerShell for IT Professionals
Leveraging PowerShell for System Administration
PowerShell is designed to manage and automate a wide range of administrative workloads, including:
- Active Directory management
- System health monitoring
- Disk management
- Patch management
- New computer provisioning
Below are brief examples of how you can use PowerShell to perform service management:
# Get all running services

Get-Service | Where-Object {$_.Status -eq "Running"}

# Restart a specific service

Restart-Service -Name "Spooler"
Cross-Platform Capabilities: Azure, AWS and VMware
Don’t think of PowerShell as a Windows management tool; it’s a cross-platform tool that supports cloud platforms and virtualization technologies. For example:
- The AWS Tools for PowerShell module enables administrators to interact with AWS services like EC2 instances and S3 storage directly from PowerShell.
- The VMware PowerCLI can automate tasks like virtual machine provisioning, vSphere configuration and datastore management.
Task Automation for Windows Servers and Clients
PowerShell can help you perform bulk operations and automate repetitive tasks for both Windows servers and client machines. Examples include:
- File management, such as copying, moving or renaming files and folders in bulk across systems
- Scheduled backup of critical systems
- Fast setup of new servers or workstations with predefined configurations and software installations
Below is an example of how you can use PowerShell to install software using an MSI file:
# Install software silently using MSI

Start-Process msiexec.exe -ArgumentList "/i C:\path\to\installer.msi /qn" -Wait
Troubleshooting and Debugging in PowerShell
Common Scripting Issues and Solutions
As you learn how to use PowerShell, you are bound to deal with scripting issues. Common scripting issues include the following:
- Syntax errors often occur when there is a typo or incorrect use of parentheses, braces or quotation marks. Use built-in error messages to help identify and resolve these problems.
- Incorrect variable usage, such as declaring variables with inconsistent scopes or overwriting them, can lead to unintended outcomes. Using Write-Host or Write-Debug to display variable values during script execution can help pinpoint these errors.
- Relying on modules or cmdlets that aren’t installed will cause a script to fail. Use Import-Module to ensure you have everything the script requires.
Using Debugging Tools and Breakpoints
Here is a list of great tips to assist you in debugging your scripts:
- Inspect your variables by hovering over them to see their current values.
- Use the F10 key to execute the current line and move to the next. This helps you identify where the problem is.
- Use the Set-PSBreakpoint cmdlet to pause execution at specific lines, functions or variables. This allows you to investigate the state of the script when a certain condition is met.
- Adding Write-Debug statements to your script can provide insights into variable states and execution paths during runtime.
Tips for Optimizing Script Performance
Once your script is running as expected, it’s worth it to find ways to improve its efficiency. Some good tips include:
- Minimize redundant code by avoidingunnecessary loops and redundant commands that can slow down execution.
- Use PowerShell’s built-in cmdlets instead of custom functions whenever possible, as they are optimized for performance.
- Use pipelines to pass objects directly between cmdlets instead of relying on temporary variables and intermediate steps.
Next Steps and Advanced Topics
As you become more proficient with PowerShell, you will want to enhance your scripting capabilities by incorporating modules for tasks like Active Directory management or VMware automation. You can explore advanced cmdlets for complex tasks, such as Invoke-Command for remote management or Start-Job for background tasks.
You will also want to learn how to take advantage of functions, which allow you to create reusable blocks of code. Functions simplify large scripts by breaking them into manageable pieces. The example below shows the creation of a basic function:
function Get-Greeting {

    param($name)

    Write-Output "Hello, $name!"

}
Conclusion
Now you should have an idea of what is possible with the PowerShell scripting language. While we have touched on some of the common terms and PowerShell basics in this blog, there is so much more to learn about this powerful tool. While PowerShell can seem highly technical at the beginning, like any language, its cmdlets will soon become second nature to you as you utilize PowerShell more and more for everyday tasks. With all the resources out there, you can take your PowerShell skills as far as you want to go.
FAQ
What is a PowerShell script?
A PowerShell script is a plain text file that contains one or more PowerShell commands and has a .ps1 file extension. Scripts allow you to save commands for later use and share them with others. They can range from simple single commands to extensive programs with advanced features. Using PowerShell scripts you can automate a wide range of task tasks, such as system management and account configuration.
How do I write a PowerShell script?
You can write a PowerShell script using a simple text editor. Each line of the script is a precise instruction that can define variables to store information and use built-in PowerShell commands called cmdlets to interact with your system. A script can make decisions, like checking if a service is running or filtering through processes. Once you’ve written your script, save it with a .ps1 file extension for later use.
Is PowerShell scripting easy?
While mastery of PowerShell does require an understanding of programming concepts, its approachable syntax and extensive built-in commands make it one of the easier scripting languages to learn. If you have a willingness to learn along with patience for syntax details, you will have no problem advancing your skill set. As you read and practice more, you’ll find your proficiency growing steadily.
How do I run a PowerShell script?
Here are some ways to run a PowerShell script:
- Launch Windows PowerShell as an administrator. Navigate to the script’s directory and enter .\scriptname.ps1
- Right-click the script in File Explorer and select Run with PowerShell.
- Use the Invoke-Expression cmdlet.