
I can’t tell you how many times I’ve been asked by customers if we can help them apply sensitivity labels at scale to data at rest in SharePoint Online. Unfortunately, I’ve had to tell them that there’s really only one option, and it’s not pretty. To date, there is no API that allow an end user to apply a sensitivity label directly to a file in a SharePoint Online site, so the only real option is to download the file locally, apply the label and then upload the file. I probably don’t have to go into the myriad reasons that make this approach less than ideal, such as egress costs and latency issues.
Fortunately, there is another option coming. Microsoft has released a feature in preview that allows you to assign sensitivity labels to Microsoft teams, Microsoft 365 groups and SharePoint sites. This provides the protection of the label at the container level, applying the classification and configured protection settings to the site or group. One thing worth noting up front is that today, the contents in these containers do not inherit the label for the classification or settings for files and emails. However, Tony Themelis, MIP Principal PM Manager, indicates that Microsoft is planning to add the ability for site labels to automatically label all of the files within the site.
In this blog post, I will walk you through how to apply a sensitivity label to a SharePoint Online site, both through the UI and using PowerShell.
A Brief Overview of Sensitivity Labels
Sensitivity labels have been around for quite some time, having evolved from what was once Information Rights Management to Azure Information Protection to their current home in the Microsoft 365 Security and Compliance Center. The purpose of these labels is to help ensure that only authorized people are able to view and access protected content. Labels can provide additional protection as well, including marking content, setting retention policies and disabling offline access
Your license level will determine whether labels must be applied manually by the end user, or whether they can be applied automatically based on defined sensitive information types. Read more about how to create a label and classify content based on information type in our blog post.
Before we dive into the deep end here, I think it’s worth noting that Microsoft has set a daily limit of 100 Apply label actions per app per tenant to protect customers from mistakenly applying a label to a large number of files. This limit can be adjusted but you have to open a support ticket to do so.
Applying Sensitivity Labels to Containers
In order to apply labels to containers with Microsoft 365, you will first need an administrator to enable the preview in Azure AD. This can be achieved via PowerShell using the steps below.
How to Enable AzureADPreview and Create Directory-Level Settings
- Step 1. Uninstall previous versions of the AzureADPreview module:
Uninstall-Module AzureADPreview
- Step 2. Install the AzureADPreview module:
Install-Module AzureADPreview -AllowClobberx`
Import-Module AzureADPreview
- Step 3. Connect to the Azure tenant and create the settings at the directory level. Administrator credentials are required to complete this step.
Connect-AzureAD
Get-AzureADDirectorySettingTemplate
$TemplateId = (Get-AzureADDirectorySettingTemplate | where { $_.DisplayName -eq "Group.Unified" }).Id
$Template = Get-AzureADDirectorySettingTemplate | where -Property Id -Value
$TemplateId -EQ
$Setting = $Template.CreateDirectorySetting()
$Setting["EnableMIPLabels"] = "True"
New-AzureADDirectorySetting -DirectorySetting $Setting
$Setting.Values
Additional Configuration Options Enabled
Once this has been enabled, you will see the following additional configuration options when you’re creating or editing existing sensitivity labels in the Microsoft 365 Security & Compliance Center:
- Scope: A new Groups & Sites option that allows applying the sensitivity label at the container level:

Image 1: Sensitivity Label Scope
- Protection settings: Specific protection settings that apply only to Microsoft teams, groups and sites:
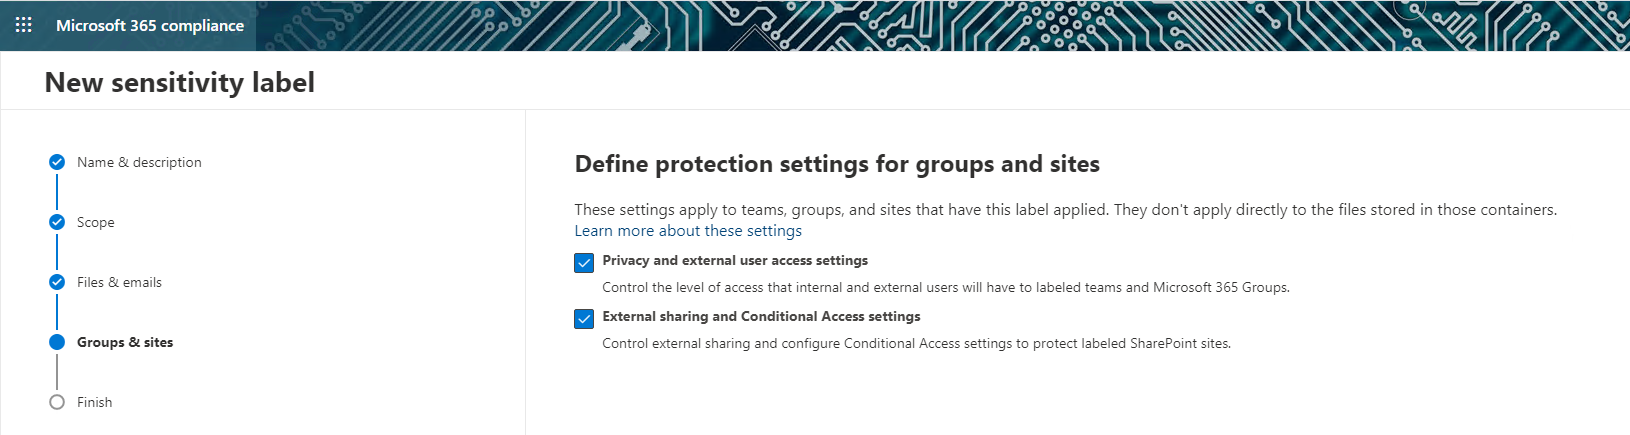
Image 2: Protection Settings for Teams, Groups and Sites
- Privacy settings: Privacy settings that apply only to labeled teams and Microsoft 365 groups:
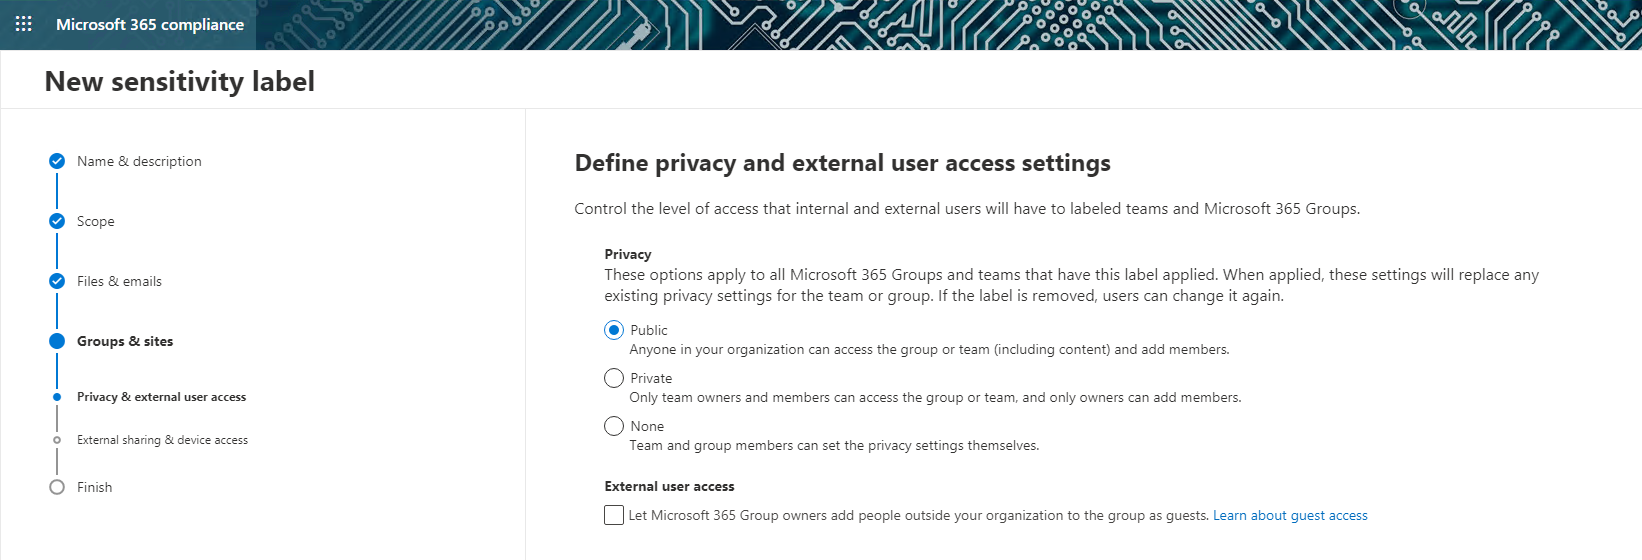
Image 3: Privacy and External User Access Settings
- Sharing settings: Specific external sharing settings that apply to labeled sites:
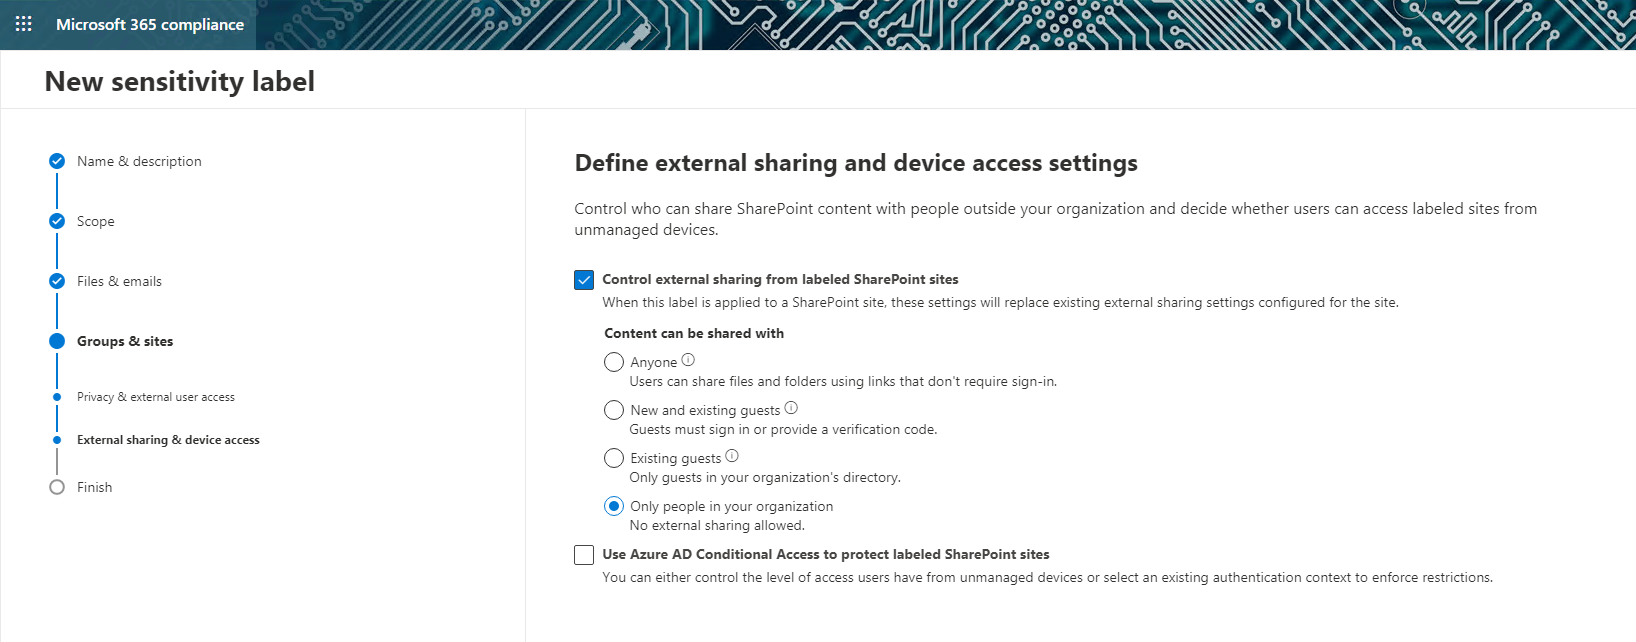
Image 4: External Sharing and Device Access Settings
Applying a Label to a Site
Applying a Label Manually
Once you have configured labels that can be applied at the container level, you can use the site settings to easily apply them to either an existing site or a new site you’re creating. The Sensitivity dropdown will display all available container-level sensitivity labels:
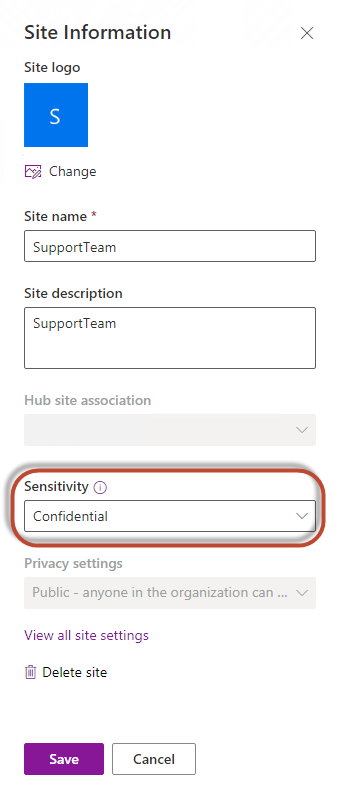
Image 5: Applying a Sensitivity Label to a Site
Applying a Label Programmatically
To apply sensitivity labels to sites programmatically using PowerShell, take these steps:
- Step 1. Connect to the SharePoint Online tenant using an administrator account:
Connect-SPOService -Url ‘https://TENANT-admin.sharepoint.com’
- Step 2. Connect to the Security and Compliance Center using an administrator account:
Connect-IPPSSession -UserPrincipalName USERNAME@TENANT.ONMICROSOFT.COM
- Step 3. Run the Get-Label command to retrieve the list of available labels:
PS C:Windowssystem32> Get-Label |ft Name, Guid, ContentType
Name                                 Guid                                 ContentType
----                                 ----                                 -----------
HIPAA                                9da4a767-6a34-4345-a2bd-a60d841bdcce File, Email
Internal Only                        78576ad9-1724-48b3-b915-00b8c9d23323 File, Email
GDPR - IP Constraint                 9085e9a5-8d63-4498-a7a8-e63ae1d3cecd File, Email
IsSensitive                          f23e934d-7df0-4964-a85e-512fa1893fad File, Email
Test                                 2ca82bb8-364a-4878-bb2b-ee6229b5a380 File, Email
Confidential                         61f58b80-cb9d-457f-a2c2-f4d870e415de File, Email, Site, UnifiedGroup
936bffcc-298b-440f-84d3-1b0f839b0a73 936bffcc-298b-440f-84d3-1b0f839b0a73 File, Email
2a341499-bcbe-47e5-ad00-de254ed4bf45 2a341499-bcbe-47e5-ad00-de254ed4bf45 File, Email
66a5a032-508e-45ee-861f-2a7887180b60 66a5a032-508e-45ee-861f-2a7887180b60 File, Email
d95145c9-3f29-4ed1-ad28-5abc75c9aa29 d95145c9-3f29-4ed1-ad28-5abc75c9aa29 File, Email
Newly created labels will have a ContentType of “File, Email, Site, UnifiedGroup”.
- Step 4. Apply the label to the site using the Label Guide:
Set-SPOSite –Identity “https://TENANT.sharepoint.com/sites/SupportTeam” –SensitivityLabel ’61f58b80-cb9d-457f-a2c2-f4d870e415de’
Be sure to use the Get-SPOSite command to validate that the sensitivity label was applied:
PS C:Windowssystem32> get-sposite "https://TENANT.sharepoint.com/teams/SupportTeam" | Select SensitivityLabel
SensitivityLabel
----------------
61f58b80-cb9d-457f-a2c2-f4d870e415de
How Labels Appear to End Users
Once a site is labeled, the label will be visible to end users as they browse the site:

Image 6: How Sensitivity Labels Are Shown to End Users
How Administrators Can Review Sites and Sensitivity Labels
You can view the list of sites and associated sensitivity labels using the Active sites page in the SharePoint admin center:
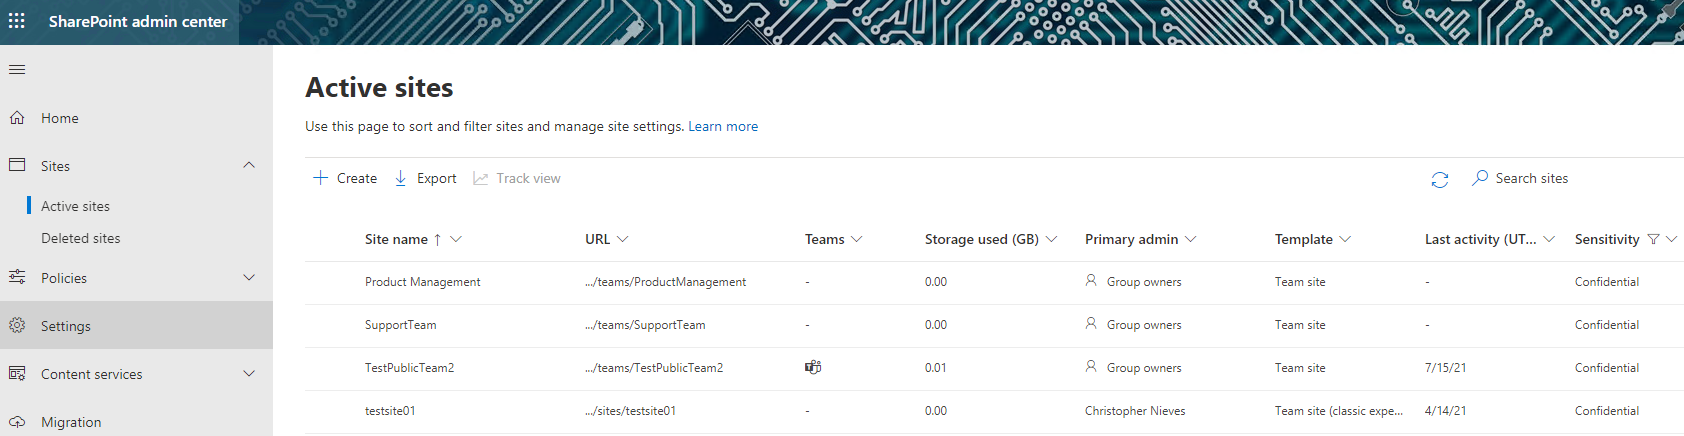
Image 7: Viewing Sites and Sensitivity Labels in the SharePoint Admin Center
Closing Thoughts
This preview functionality is a huge boon for anyone who has been struggling to classify and protect their data at rest in Microsoft 365. While the ultimate goal is to achieve protection at the file level, container-level labels enable organizations to apply classification and configure protection settings granularly to specific sites and groups in order to avoid unnecessary restrictions that could stand in the way of both productivity and security.
Organizations looking to label and protect content in SharePoint Online based on data sensitivity — especially those lacking the E5 license that provides the automatic labelling capability — should consider leveraging a platform like StealthAUDIT, which can help identify sensitive content in SharePoint and also apply appropriate sensitivity labels to sites and groups at scale.


