
This post walks you through the steps of setting up a point-to-site VPN connection from a Windows server running Netwrix Access Analyzer so you can discover and monitor all your Azure SQL databases.
Background
When you host SQL databases in the Microsoft Azure cloud, you might need to access those databases from external networks. There are two ways to set up the connectivity:
- Public endpoint— A public endpoint can be defined for each Azure SQL database that allows access by external applications. For security, this requires whitelisting the IP addresses (client addresses) of the external network address pool that needs database access.
- Virtual Private Network (VPN)— Alternatively, you can set up a VPN connection between the external network or application and the Azure environment hosting the Azure SQL databases. This option does not require defining public endpoints for the Azure SQL databases. The VPN connection can be either site-to-site or point-to-site:
- A site-to-site VPN connection enables applications running in an entire external network to seamlessly access the Azure SQL databases.
- A point-to-site VPN connection is specific to an individual client computer that is external to Azure. This is the option covered by this blog post.
Azure Point-to-Site VPN Setup
Step 1. Create a root certificate.
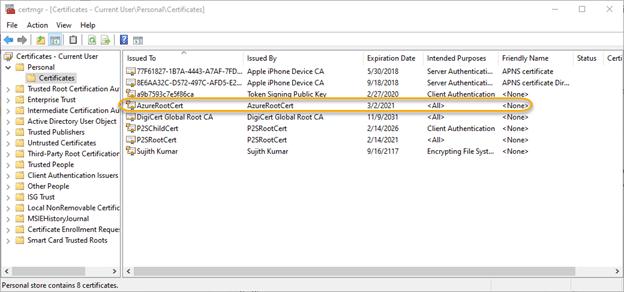
A client certificate is required for authentication when using the Azure certificate authentication, so the first step is to create and export a self-signed root certificate. Run the PowerShell script below on a computer running Windows 10 or Windows Server 2016. (Alternatively, if you have Windows 10 SDK installed, you can use the makecert utility to create a self-signed certificate.)
$cert = New-SelfSignedCertificate -Type Custom -KeySpec Signature `

-Subject “CN=AzureRootCert” -KeyExportPolicy Exportable `

-HashAlgorithm sha256 -KeyLength 2048 `

-CertStoreLocation “Cert:CurrentUserMy” -KeyUsageProperty Sign -KeyUsage CertSign
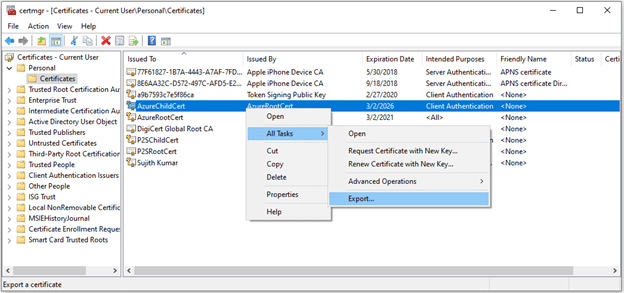
This script creates a root certificate called AzureRootCert in Certificates-Current userPersonalCertificate. It can be viewed using the Certificate Manager Tool (certmgr.exe):
Step 2. Create a client certificate.
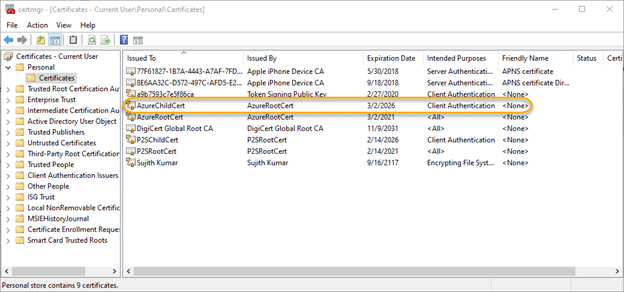
Create a client certificate using the PowerShell script below. The script will generate a key that will be valid for 6 years from the date of creation; adjust the number based on your requirements.
New-SelfSignedCertificate -Type Custom -DnsName P2SChildCert -KeySpec Signature `

-Subject “CN=AzureChildCert” -KeyExportPolicy Exportable `

-HashAlgorithm sha256 -KeyLength 2048 `

-CertStoreLocation “Cert:CurrentUserMy” `

-NotAfter (Get-Date).AddYears(6)`

-Signer $cert -TextExtension @(“2.5.29.37={text}1.3.6.1.5.5.7.3.2”)
This creates a client certificate called AzureChildCert in ‘Certificates-Current userPersonalCertificate’. It can also be viewed using the Certificate Manager Tool:
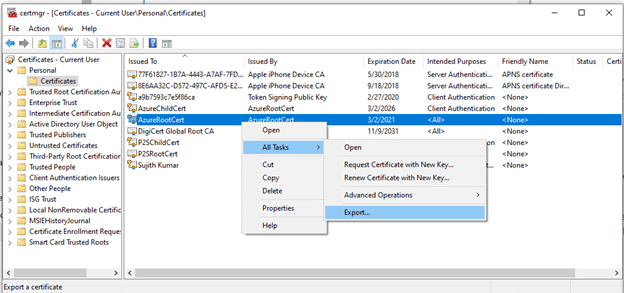
Step 3. Export the public key portion of the root certificate.
Next, we need to export the public key portion of the root certificate created in Step 1.
3.1. To begin, launch the Certificate Export Wizard as shown below:
3.2. On the welcome screen of the Certificate Export Wizard, click Next to continue.

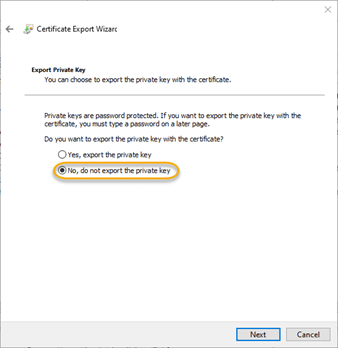
3.3. On the “Export Private Key” screen, choose the default option of “No, do not export the private key” and click Next.
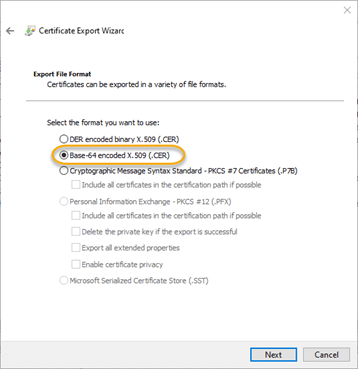
3.4. On the “Export File Format” screen, choose the Base-64 encoded X.509 (.CER) option and click Next.
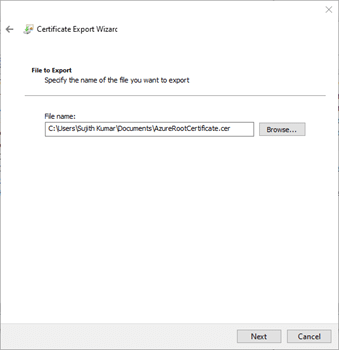
3.5. On the “File to Export” screen, browse to the location where you would like to save the certificate, specify the certificate name and click Next.
3.6. On the next screen, click Finish to export the certificate. The information from this file will be required in the subsequent steps for Azure VPN configuration.

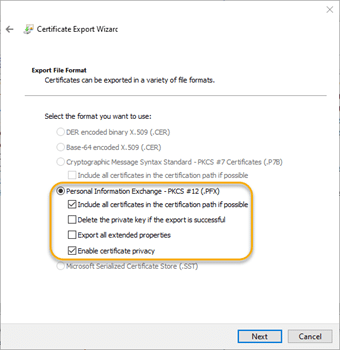
Step 4. Export the client certificate (optional).
This step is required only if you need to configure a VPN connection to Azure from servers other than the one that was used to create the certificates.
4.1. Launch the Certificate Export Wizard as shown below:
4.2. On the Welcome screen of the Certificate Export Wizard, click Next to continue.

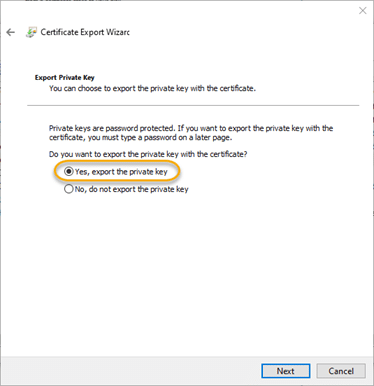
4.3. On the Export Private Key screen, choose Yes, export the private key, and then click Next.
4.4. Choose the default options on the Export File Format screen:
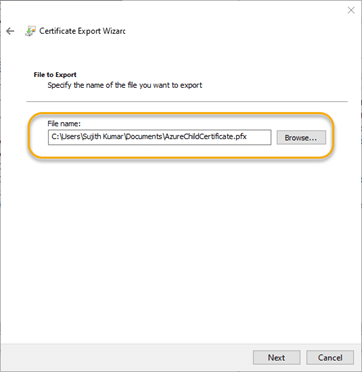
4.5. Specify a password for the client certificate. Since this certificate can be used to authenticate to the Azure VPN, be sure to protect it with a strong password.

4.6. On the File to Export wizard screen, provide a file name and click Next.
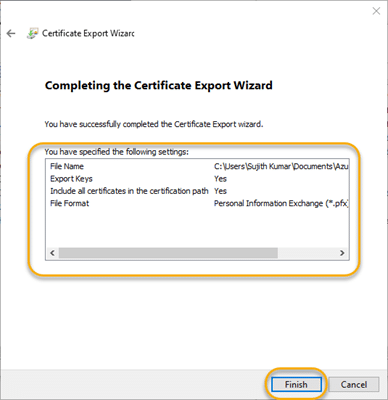
4.7. Verify your settings and click Finish to export the certificate.
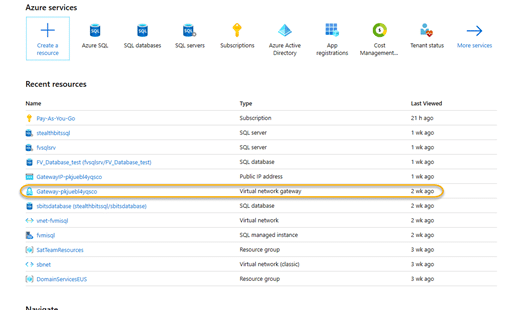
Step 5. Configure the virtual network gateway.
Next, you need to log on to the Azure portal and look for a virtual network gateway. If one does not exist, create one (refer to the Azure documentation for creating a virtual network and Gateway subnet) before proceeding.
5.1. Click the virtual network gateway hyperlink. Mine is called Gateway-pkjuebl4yqscro.
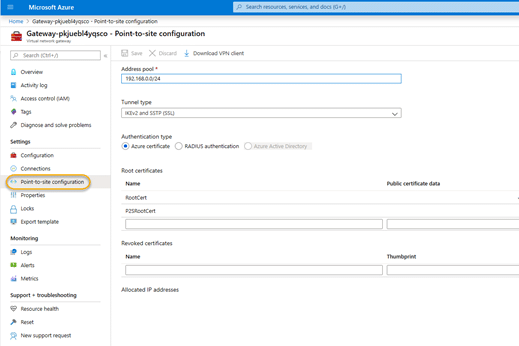
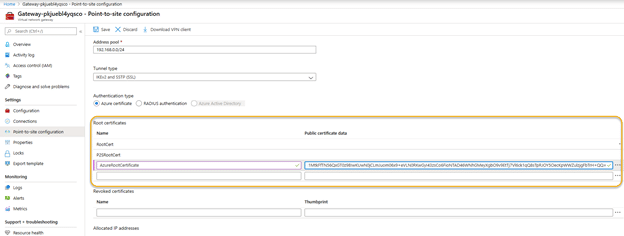
5.2. On the configuration screen, click the Point-to-site configuration link.
5.3. Locate the root certificate you exported in Step 3 and open it in a text editor of your choice. The contents of the certificate will look similar to the screenshot below. I am purposely showing the entire contents of the certificate data as I have no intention of leaving it permanently in Azure; I created it only for the purpose of writing this blog.
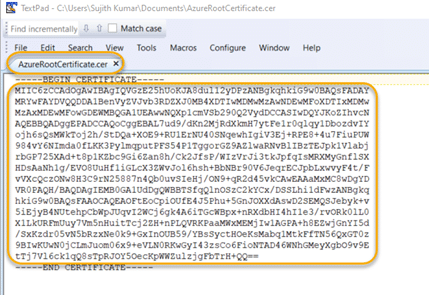
5.4. In the text editor, delete the line breaks, since Azure expects all of the certificate data to be in a single line. Take care not to delete any characters of the key! Then copy the certificate data to the clipboard.

5.5. Now head back to the virtual network gateway Point-to-Site configuration screen in the Azure portal. In the Root Certificate section of the page:
- Provide a name for the certificate.
- Paste the certificate contents from Step 5.3 into the Public certificate data
- Make sure that the Tunnel Typeis set to IKEv2 and SSTP (SSL) and the Authentication Type is set to Azure certificate.
Click Save to save the settings.
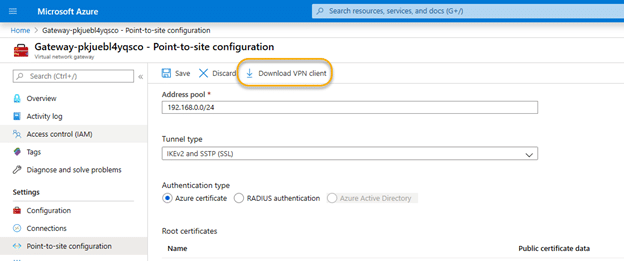
Step 6. Download and execute the VPN client package.
6.1. At this point, you should download the VPN client using the link shown in the following screenshot:
6.2. The download is a zip file with three directories. Two of them have the VPN client software setup files for 32-bit and 64-bit platforms. The third directory, called Generic, contains the VPN setup information files.
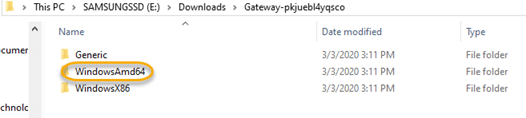
Assuming you are using a 64-bit Windows operating system, navigate to the WindowsAmd64 directory and execute the VPN client package. This will create an Azure vnet called vnet-xxxxxxx. In my case, the name was vnet-fvmisql.
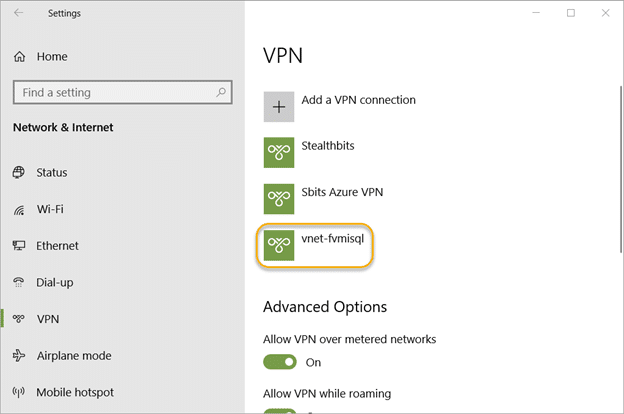
Step 7. Set up the VPN connection.
Select the new VPN connection profile and click Connect. If it works for you (and I sincerely hope it does), you are done!
However, it might not work. You might get the error “Error 798 – A certificate could not be found that can be used with this Extensible Authentication Protocol”. In that case, you will need to set up a working VPN connection manually, as detailed below.
Step 8. If necessary, set up a VPN connection manually.
If you are planning to set up the VPN connection on other computer, then you need to import the client certificate to that computer.
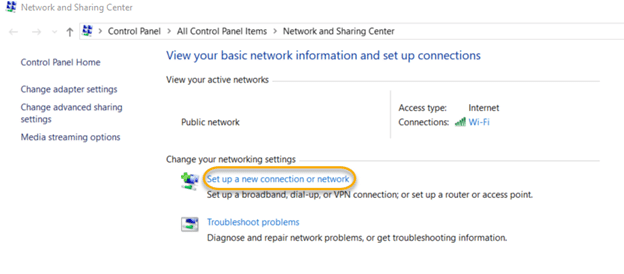
8.1. Open the Network and Sharing Center and click Set up a new connection or network.
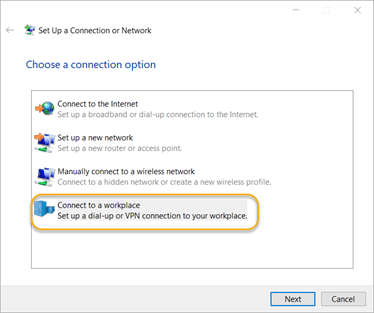
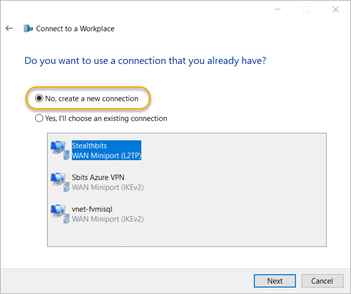
8.2. On the “Choose a connection option” screen, choose Connect to a workplace and click Next.
8.3. On the “Do you want to use a connection that you already have?” screen choose the No, create a new connection option and click Next.
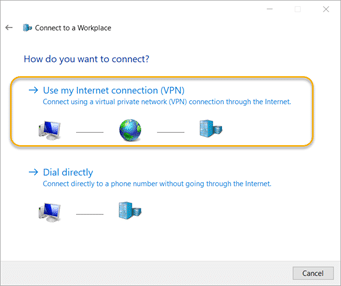
8.4. On the “How do you want to connect?” screen, click the Use my Internet connection (VPN) option
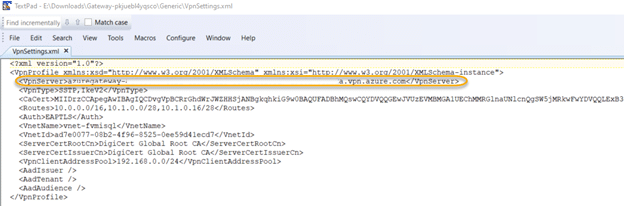
8.5. Navigate to the Generic folder of the VPN client package you downloaded from Azure. Open the VpnSettings file and copy the public name of the Azure VPN gateway.
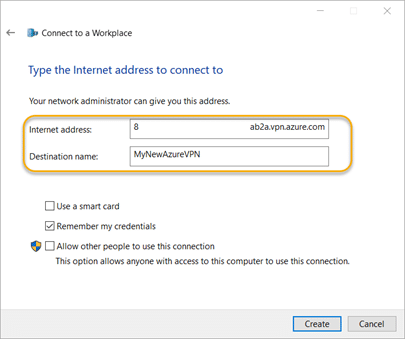
8.6. On the “Type the Internet address to connect to” screen, paste the copied text into the “Internet address” box. Provide a destination name, and leave all other options at their default settings. Click Create.
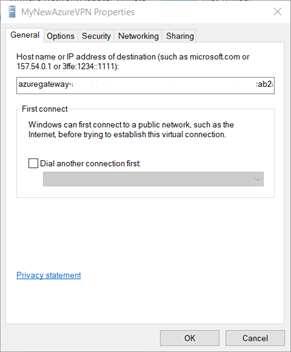
8.7. Navigate back to the Network and Sharing Center and click the Change adapter settings link. Right-click the VPN connection you set up and choose Properties. Check the VPN address or host name.
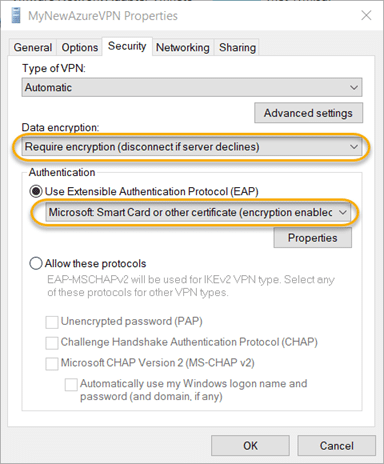
8.8. Go to the Security tab. Under “Data encryption,” choose the Require encryption (disconnect if server declines) option. For “Authentication,” choose the Microsoft Smart Card or other certificate (encryption enabled) option.
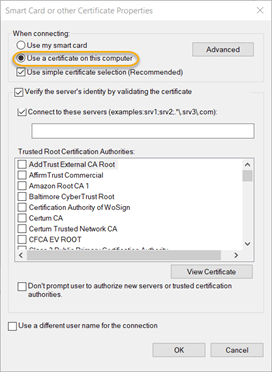
8.9. Click the Properties button in the Authentication section. Choose the Use a certificate on this computer option and click OK.
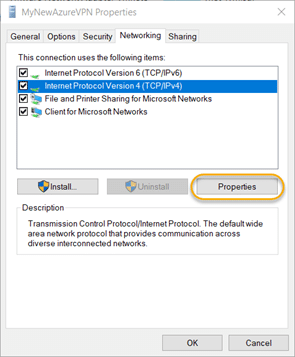
8.10. Click the Networking tab and choose the Internet Protocol Version 4 (TCP/IPv4) option. Then click the Properties button.
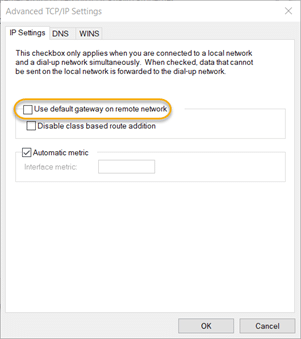
8.11. Click the Advanced button. On the IP Settings tab, uncheck the Use default gateway on remote network checkbox and click OK.
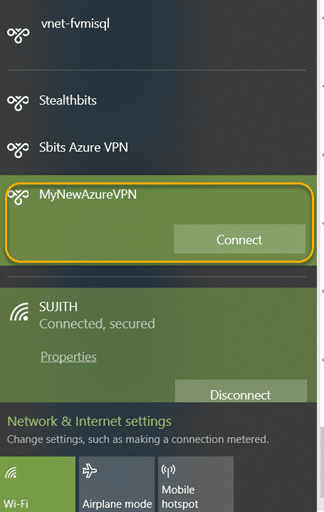
8.12. In the task bar, click the network icon. Choose the Azure VPN connection profile that you just created and click Connect.
You should now be connected to the Azure VPN gateway and able to start interacting with the Azure SQL databases using your private endpoint.
If you set up your VPN gateway on an on-premises server running Netwrix StealthAUDIT, you will be able to run the Netwrix StealthAUDIT for Azure SQL job and start auditing your Azure SQL environment.

Securing Your SQL Server Databases
SQL Server often contains very sensitive information, so it is a prime target for attackers. Since SQL database instances often spawn across the network, database administrators (DBAs) require effective tools to properly safeguard the sensitive data they contain.
Netwrix Access Analyzer can help. It can report on user permissions and database configurations, provide thorough vulnerability assessments, and discover sensitive data stored in your Azure SQL databases. It can also closely monitor user activity in your SQL databases, and even audit specific actions based on the type of SQL statement being executed or a combination of criteria such as the username, application and execution time.
FAQ
What are point-to-site VPN and site-to-site VPN?
A point-to-site VPN connection is specific to a server or desktop that is external to Azure, while a site-to-site VPN connection is for an entire network to Azure.
What VPN types are supported by Azure point-to-site?
Azure point-to-site VPN supports three types of VPN connections: Secure Socket Tunneling Protocol (SSTP), OpenVPN and IKEv2 VPN.


