Active Directory (AD) is a database and set of services that offers centralized management of IT infrastructure resources. It connects users with the resources they require to get their work done. Therefore, technicians must be able to quickly check and recover AD attributes that are modified or deleted by hardware failures, cyberattacks, scripting mistakes and other problems. Otherwise, users won’t be able to access the same resources as before, resulting in productivity losses, inefficiency, unhappy customers and a tarnished brand image.
Read this guide to learn how to restore Active Directory attributes to their last-saved configuration. This page also covers PowerShell tips and tricks for rolling back and recovering AD attributes.
When would you need to roll back or recover AD attributes?
You need to be able to roll back or recover AD attributes when:
- Someone on the IT team makes a mistake that affects the attributes of one or more AD objects. For example, suppose an IT technician accidentally uses the wrong PowerShell script. Instead of adding mailing address information to certain AD user accounts, it replaces the current value of the address attribute of every user object in the domain with an asterisk. You must roll back these changes to restore the correct addresses.
- A malicious actor gains access to your AD network and deletes or edits AD object attributes. You must roll back or recover the attributes to ensure that everything is in order.
Can you use the Active Directory Recycle Bin to recover AD attributes?
Simply put, no.
The Active Directory Recycle Bin is designed to retain certain deleted Active Directory objects for a short period of time. But the Active Directory Recycle Bin does not store AD attributes that have been modified, so it does not help with the attribute recovery process.
Technically, you could try building a process around the hope that you are able to become aware of any and all undesirable changes quickly, find a domain controller that has not yet received those changes through replication, and make its objects authoritative. However, doing so would be unrealistic — it’s like building your retirement savings plan around a napkin with “win lottery” scribbled on it.
How can you ensure you have backups of AD attributes?
Since Active Directory does not maintain a record of an object’s attribute values, the first step in ensuring you can recover or roll back attributes when you need to is finding something that does. Luckily, when it comes to Active Directory system state backups, there is no shortage of backup tools available.
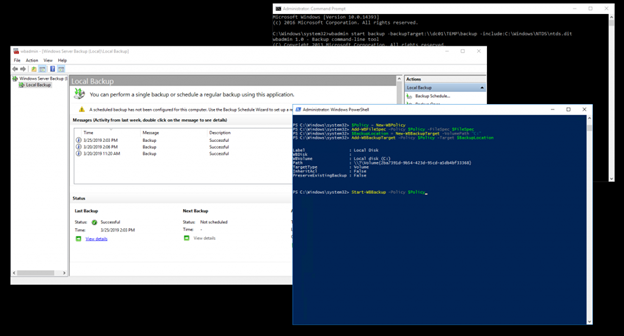
Windows Server Backup (WBAdmin)
One option is to use Microsoft Windows Server Backup (WBAdmin). Installing the Windows Server Backup tool on a computer will install the wbadmin.exe command-line tool. It also provides access to the Windows PowerShell cmdlets for Windows Server Backup and the Windows Server Backup MMC snap-in. These three options are simply different ways of leveraging a single underlying application, so a backup taken by any of them is visible to all of them.
You can access WBAdmin.exe by opening an elevated command prompt with admin permission. To do this, click Start, right-click on Command Prompt and select Run as administrator.
There is one important caveat to be aware of with WBAdmin: When configured to store backups in a specific folder, only the most recent copy of the backup is retained; subsequent backups overwrite the content of the previous backup.
To avoid this issue, the following script will create a folder named using the current date in YYYYMMDD format and then back up the Active Directory ntds.dit file to that folder using WBAdmin’s START BACKUP command:
@echo off
set backupRoot=\FILESHARENtdsBackups
set backupFolder=%date:~-4,4%%date:~-10,2%%date:~7,2%
set backupPath=%backupRoot%%backupFolder%
mkdir %backupPath%
wbadmin start backup -backuptarget:%backupPath% -include:C:WindowsNTDSntds.dit -quiet
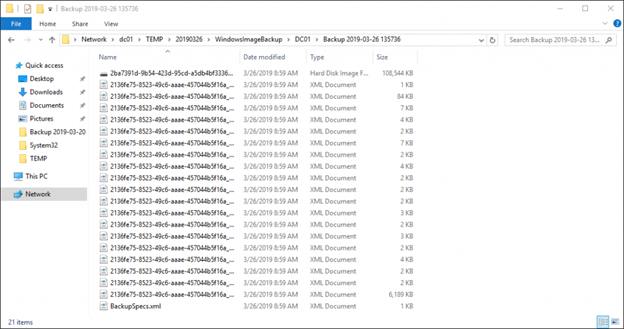
The results of this operation include a Volume Shadow Copy Service (VSS) snapshot of the ntds.dit file.
The downside of this approach is that the resulting file is considerably larger than the ntds.dit file. For example, the screenshot below shows the backup size for a 20MB ntds.dit file. This extra disk usage might not be a big deal in certain labs, but it is not going to scale well in a production environment.
Ntdsutil.exe
Another option available from Microsoft is Ntdsutil.exe, a command-line tool for accessing and managing a Windows Active Directory database. Ntdsutil is dangerously powerful, so your production environment is not the place to learn how to use it. However, that’s due in large part to the fact that it contains a suite of incredibly useful commands.
For example, Ntdsutil has the SNAPSHOT command, which captures the state of Active Directory at the time of its execution:
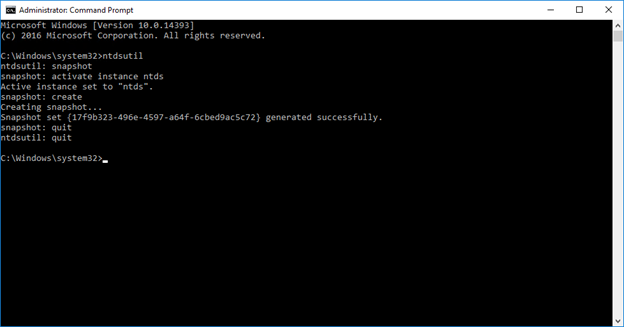
The big downside to this approach is that Ntdsutil backups are written to the volume that hosts Active Directory, which isn’t ideal.
How do I restore attributes using WBAdmin and Ntdsutil.exe?
Now, let’s step through using WBAdmin and Ntdsutil.exe. We’ll use the Active Directory Domain Services Database Mounting Tool (DSAMAIN) to mount the ntds.dit files hiding in our backups so that we can explore them using LDAP.
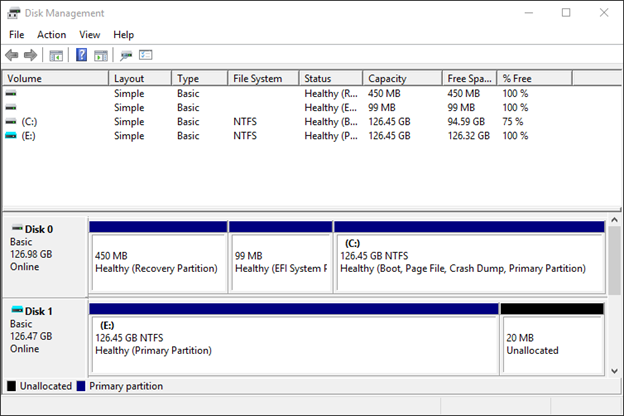
1. First, we need to find one of the VHD images created by WBAdmin, mount it and assign a drive letter to its primary partition.
2. Next, we find the path to the ntds.dit file in our mounted backup, open a command prompt as administrator and use the following command to mount the ntds.dit file:
dsamain -dbpath “E:WindowsNTDSntds.dit” -ldapport 10389
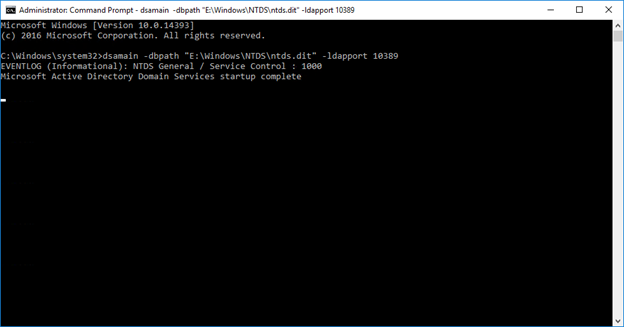
Closing the command prompt will stop DSAMAIN, so make sure to keep it open until you finish your system state restore.
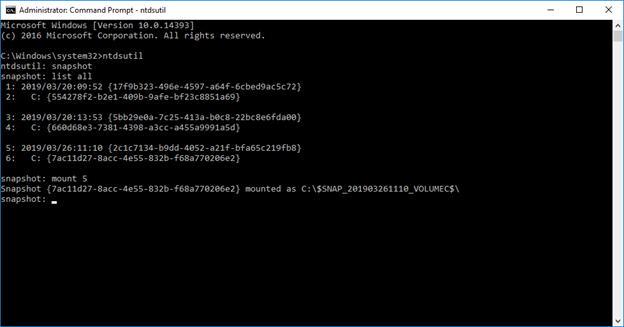
3. Now that the WBAdmin backup is mounted, we’ll mount the snapshot taken by Ntdsutil. To do this, we will open a new command prompt as administrator, use the snapshot command to list our backups, choose one to mount and copy the drive path location that is assigned by Ntdsutil:
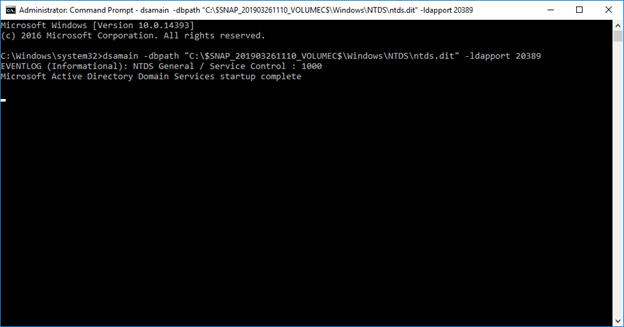
4. Next, we find the path to the ntds.dit file located below the path assigned by Ntdsutil, open yet another command prompt as administrator and use the following command to mount the ntds.dit file:
dsamain -dbpath “C:\$SNAP_201903261110_VOLUMEC$\Windows\NTDS\ntds.dit” -ldapport 20389
5. After that, we change the Description attribute of our trusty test user Delete Q. Me.
6. Now we can open PowerShell and use the Get-ADUser cmdlet to look at our test user. Active Directory listens on port 389 by default, and we mounted our backups on ports 10389 and 20389. Using the optional Server parameter will let us see what our test user looks like live and in both of our mounted backups.
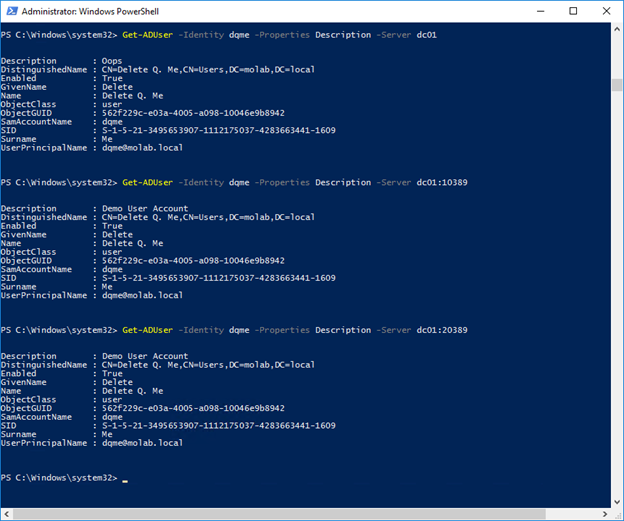
As you can see, the current value of the Description attribute is “Oops,” and both backups contain the previous value, “Demo User Account.”
7. Now we can use PowerShell’s Get-ADUser cmdlet for restoring this attribute to the value captured in one of our backups. If we grab a copy of the object from one of the mounted backups, we can use that object’s copy of the attribute to set the value of the live object’s attribute:
$UserBackup = Get-ADUser -Identity dqme -Properties Description -Server dc01:10389

Set-ADUser -Identity dqme -Description $UserBackup.Description -Server dc01:389
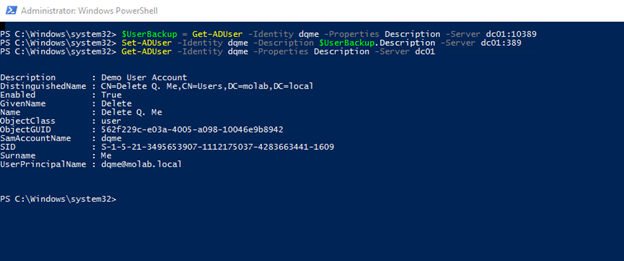
Notice that the value of the Description attribute has been restored to the value captured in the mounted backup.
This looks simple, but it was just a lab exercise involving one specific attribute change made to one specific object. We also knew which backups contained the information we needed for our restore operation. In a real-world recovery scenario, this process can get unpleasant, especially when you’re hurrying to restore service.
Recover Active Directory Attributes with Netwrix Solutions
Using tools like WBAdmin and Ntdsutil.exe to recover AD attributes can be draining, especially if you don’t have a lot of resources, time or energy.
Luckily, there’s a quick and easy way for restoring AD attributes — Netwrix’s end-to-end Active Directory Security Solution. Powerful, comprehensive and chock-full of functionalities, this tool performs speedy rollbacks from unwanted AD deletions and changes. That way, you can ensure business continuity and customer satisfaction.
FAQ
How to restore deleted Active Directory users with all attributes?
When you need to restore deleted AD users with their complete attribute set, your approach depends on whether Active Directory Recycle Bin is enabled. If it’s enabled, use PowerShell to restore the user with all original attributes intact:
Get-ADObject -Filter 'DisplayName -eq "Username"' -IncludeDeletedObjects | Restore-ADObjectThis method preserves group memberships, permissions, and custom attributes without any data loss.
When AD Recycle Bin isn’t available, you’ll need an authoritative restore using tools like Ntdsutil.exe combined with a recent system state backup. This process requires taking a domain controller offline and restoring from backup, which means some recent changes may be lost. The key is having regular backups and understanding that authoritative restores affect the entire directory, not just individual objects. Data security that starts with identity means maintaining complete user attribute integrity during restoration is critical for preserving access controls and security boundaries.
What to do when Active Directory Recycle Bin is not enabled?
Without AD Recycle Bin enabled, your restoration options become more complex but not impossible. Your primary path is performing an authoritative restore using Ntdsutil.exe with a system state backup taken before the deletion occurred. This requires booting a domain controller into Directory Services Restore Mode and restoring the AD database from backup.
The authoritative restore process overwrites newer changes with older backup data, so you’ll lose any directory modifications made after the backup. This is why proactive backup strategies matter – you can’t manage what you can’t see, and you can’t restore what you haven’t backed up. For future protection, enable AD Recycle Bin immediately using PowerShell:
Enable-ADOptionalFeature -Identity "Recycle Bin Feature" -Scope ForestOrConfigurationSetThis step transforms your recovery capabilities from complex offline procedures to straightforward PowerShell commands, reducing downtime and preserving business continuity.
How to restore AD attributes using PowerShell commands?
PowerShell provides the most efficient path for AD attribute restoration when Recycle Bin is enabled. Start by identifying deleted objects:
Get-ADObject -Filter * -IncludeDeletedObjects | Where-Object {$_.Name -like "*username*"}Once you’ve located the target object, restore it completely:
Restore-ADObject -Identity "ObjectGUID"For partial attribute restoration on existing objects, use Set-ADUser or Set-ADObject commands to rebuild specific attributes from documentation or recent exports. The practical approach combines regular AD exports using Get-ADUser -Properties * with restoration scripts that can quickly rebuild attribute sets. This method gives you granular control over what gets restored without affecting unrelated directory objects.
PowerShell’s strength lies in its precision – you can restore exactly what you need without collateral changes. Create restoration scripts that document your process and test them in non-production environments first. Effective identity management requires both visibility into what’s changed and control over how you respond to those changes.
Choose authoritative restore when you need to force specific AD changes across all domain controllers, overriding newer modifications. This method works best for recovering accidentally deleted objects or reversing unauthorized bulk changes. The authoritative process marks restored objects with higher version numbers, ensuring replication spreads your recovered data throughout the domain.
Non-authoritative restore suits disaster recovery scenarios where you’re rebuilding a failed domain controller without changing existing directory data. This approach pulls current AD information from healthy domain controllers rather than imposing backup data on the entire domain.
The decision comes down to scope and intent. Authoritative restore affects the entire forest and should be used sparingly – it’s powerful but disruptive. Non-authoritative restore affects only the local domain controller and integrates smoothly with existing infrastructure. In both cases, understanding replication topology and having recent backups determines success. Data security that starts with identity means having multiple recovery options and knowing exactly when to use each one.
How to restore computer objects in Active Directory?
Computer object restoration follows similar principles to user restoration but requires additional considerations for machine authentication and domain relationships. When AD Recycle Bin is enabled, use this command to recover the computer account with all attributes:
Get-ADObject -Filter 'Name -eq "ComputerName"' -IncludeDeletedObjects | Restore-ADObjectWithout Recycle Bin, computer restoration becomes more complex because you must rebuild machine trust relationships. After authoritative restore, the affected computers typically need to rejoin the domain since their machine account passwords may not sync properly. Plan for this additional step when restoring computer objects from backup.
The practical approach includes documenting computer object attributes before problems occur. Export computer account details regularly using PowerShell, capturing group memberships, organizational unit placement, and custom attributes. This documentation enables faster manual recreation when automated restoration isn’t possible. Computer objects represent more than just directory entries – they’re the foundation of your machine identity infrastructure, and restoring them incorrectly can break authentication across your entire environment.