Introduction
An array is a data structure that can hold more than one value at a time. Think of it as a collection or a list of items of the same or different data types. Arrays are used in many scripting and programming languages, including Windows PowerShell.
Let’s delve into how to create and use an array in PowerShell.
Creating an Array of Objects
By default, each item in an array is an object, rather than another data type like string or integer. Here is an example of how to create an array of objects by explicitly adding objects:
$people = @(

    [PSCustomObject]@{Name='Alice'; Age=30},

    [PSCustomObject]@{Name='Bob'; Age=25}
Creating an Array with Just One Element
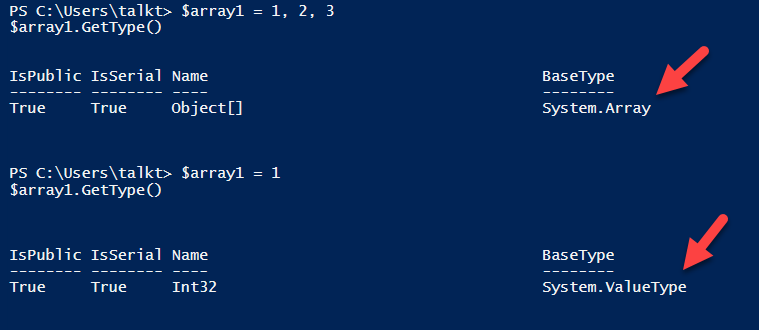
If you put just one value in a variable, then PowerShell will not create an array. To confirm this, let’s use two scripts and output their data types.
First, we will create an array in PowerShell with five elements:
$array = @(1, 2, 3, 4, 5)

$array1.GetType()
Now let’s try to use a similar script to create an array with just one element:
$array1 = 1

$array1.GetType()
As you can see from the output below, PowerShell created an array (System.Array) for the first example script but not the second.
This behavior is particularly concerning if you want to create an array by retrieving objects by executing a particular command, since you do not know in advance how many objects will be returned in the results.
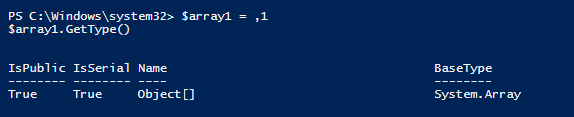
To get around this issue, you can use the , (comma) operator. If a comma is used as a binary operator, then a normal array is created; if it is used as a unary operator, the array has just one element.
For example, here is how we can get an array consisting of one element:
$array1 = ,1

$array1.GetType()
We can confirm the creation of the array with the output shown below:
Creating an Empty Array
In PowerShell, you can also create an array — including an empty array — using the operator @. If you specify @(), you get an array with no objects at all, you can create an. It is a convenient way to initialize variables as arrays and later add objects to arrays without worrying about their number.
$array3 = @()

$array3.GetType()

Creating a Strongly Typed Array
By default, the elements of an array can have different data types. But you can also create arrays that accept only values of a single designated type. Trying to add a value of a different type will produce an error. Here is how to create the most common strongly typed arrays:
Integer:
[int[]]$intArray = 1, 2, 3
String:
[string[]]$strArray = "one", "two", "three"
Date/Time:
[datetime[]]$dateArray = (Get-Date), (Get-Date).AddDays(1)
Creating a Multidimensional Array (Matrix)
By nesting arrays using commas, you can create a structured arrangement of data in rows or columns. Here we create a 3×3 matrix:
$twoDArray = @(
@(1, 2, 3),
@(4, 5, 6),
@(7, 8, 9)
)
Comparing, Grouping, Selecting and Sorting Arrays
Other useful PowerShell cmdlets for working with arrays include:
- Compare-Object — Compares two arrays and returns the differences.
- Group-Object — Groups array elements based on property values.
- Select-Object — Selects specified properties of an object or set of objects, and can also be used to select a specific number of elements from an array.
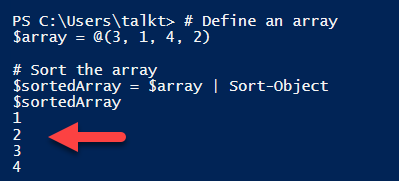
- Sort-Object — Used to sort arrays that contain only one data type, as shown below:
$array = @(3, 1, 4, 2)
$sortedArray = $array | Sort-Object
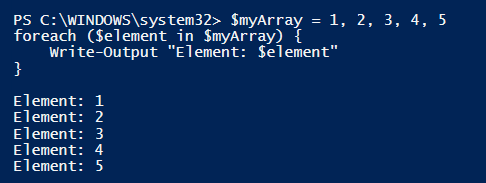
Looping through an Array
To handle each element in an array one after another, we need to make a loop using the foreach operator. For example, if we declare a string array and want to count the length of each word in the array, we should run the following script:
$array8 = @("Earth","Mercury","Venus","Jupiter","Saturn","Mars", "Neptune", "Pluto")
foreach ($array in $array8) {
 "$array = " + $array.length
}
The result will look like this:

Using a Pipeline
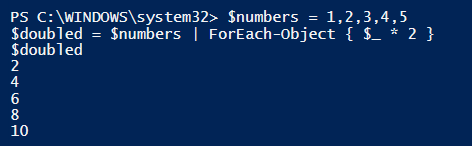
The pipeline is used in PowerShell to pass the output of one command as the input to another. When working with arrays, you can use the pipeline to process and manipulate the data in the array and assign the results to a new array or modify the existing one.
Here we will multiply each array item by 2:
$numbers = 1,2,3,4,5

$doubled = $numbers | ForEach-Object { $_ * 2 }
Adding to an Array
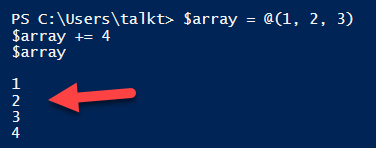
The size of an array in PowerShell is immutable once it is defined. However, the operator += enables you to create a new array by appending items to an existing array — essentially creating a new combined array.
$array = @(1, 2, 3)
$array += 4
Creating an ArrayList
For large arrays or frequent additions, use of += can be a performance concern, since every time use it, a new array is created, the old elements are copied over and the new element is added to the end. In those cases, you may want to use an ArrayList.
The size of an ArrayList is mutable, so you can add or remove items without having to recreate the entire collection. Like a standard array, an ArrayList can hold items of different data types.
Here is the cmdlet to create an ArrayList:
$array3 = New-Object System.Collections.ArrayList
Removing an Item from an Array
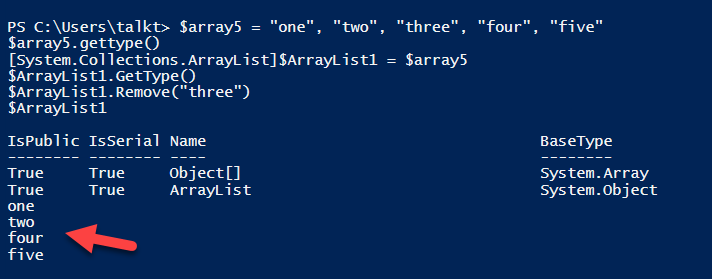
Now let’s use an ArrayList to remove an item from an array. First let’s create an array.
$array5 = "one", "two", "three", "four", "five"
$array5.gettype()
Now we will add it to an ArrayList so we can easily modify it.
[System.Collections.ArrayList]$ArrayList1 = $array5

$ArrayList1.GetType()
We will then use the .Remove command.
$ArrayList1.Remove("three")
Clearing an Array
There is no defined way to delete an array, but there are several ways to get rid of the contents of an array (clear it). One is to assign the variable $null to the array:
$array7 = $null
$array7
Here is another way to clear an array:
$array = @("element1", "element2", "element3")

$array = @()
Here is how to clear an ArrayList:
$arrayList = New-Object System.Collections.ArrayList
$arrayList.Add("element1")
$arrayList.Add("element2")
$arrayList.Clear()
Printing an Array
The easiest way to display the contents of an array is to simply reference the array variable. The example below shows how to include the text “Element:” before each item in the array:
To write to a .txt file, use the Out-File command:
$var5 | Out-File C:scriptsarray.txt
To export to a .csv file, use the Export-Csv command:
$var6 | Export-Csv -Path C:scriptsarray.csv
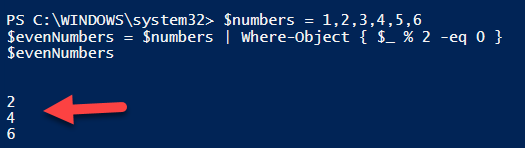
Filtering an Array
We can use the Where-Object cmdlet to retrieve only the even numbers from an array:
$numbers = 1,2,3,4,5,6

$evenNumbers = $numbers | Where-Object { $_ % 2 -eq 0 }

$evenNumbers
Alternatively, we can use the .Where() method, which it does not require a pipeline:
$numbers = 1,2,3,4,5,6

$evenNumbers = $numbers.Where({ $_ % 2 -eq 0 })

$evenNumbers
Checking the Length of an Array
To return the number of elements in array, use the .length parameter:
$array6 = 1,2,3,4,5,6
echo $array6.Length

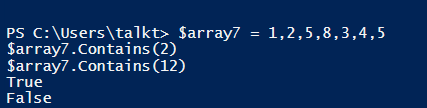
Checking Whether an Array Contains a Particular Value
If you want to see if any of the elements in an array contains a particular value, use the Contains method. This code will show whether an array contains either a 2 or a 12:
$array7 = 1,2,5,8,3,4,5
$array7.Contains(2)
$array7.Contains(12)
Accessing Items using the Array Index
As with most programming languages, each individual item in a PowerShell array can be accessed by an index. The index of an array starts at zero, so in an array of three items, the first item is at index 0, the second is at index 1, and the third is at index 2.
To access items using the array index, you need to provide the index in square brackets after the array variable. Below is an example showing how to create an array show the second element:
$colors = "Red", "Green", "Blue", "Yellow"

$secondColor = $colors[1]

Write-Output $secondColor

You can access items from the end of an array by using a negative index. -1 refers to the last item, -2 refers to the second from the last item, etc.
Using the Join Operator and the Split Operator
In PowerShell, the join operator is used to append an array of strings into a single string, optionally using a specified delimiter. Here is an example without a delimiter.
$array = "Power", "Shell"

$joined = $array -join ""

# Output: "PowerShell"
Here is what it would be with a delimiter:

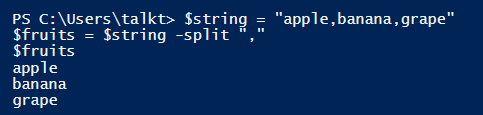
The split operator essentially does the opposite of the join operator, as shown in the example below:
$string = "apple,banana,grape"
$fruits = $string -split ","
Using the Replace Operator
The replace operator is used to replace one string with another. Here is the cmdlet structure:
<originalString> -replace <patternToFind>, <replacementString>
Here is an example that will replace “Hello World” with “PowerShell”:
$string = "Hello World"

$newString = $string -replace "World", "PowerShell"

Slicing an Array
You can create a sub-array by specifying a range, as shown here:
$array = 1,2,3,4,5,6,7,8,9

$subset = $array[3..6]
Reversing an Array
Here is an example of how to reverse the order of the elements in an array:
$numbers = 1..5

[Array]::Reverse($numbers)
Conclusion
Arrays are a fundamental data structure in most scripting and programming languages because they enable you to store, retrieve and manipulate a collection of items of various data types. Understanding arrays will enhance your ability to automate tasks using PowerShell.
Now Netwrix Can Help
Need to secure your Active Directory and Entra ID (Azure AD) environment more efficiently and effectively? Consider Netwrix Directory Manager. Its automated group and user management capabilities reduce the risk of data breaches while eliminating time-wasting manual administrative tasks.
Netwrix Directory Manager empowers you to:
- Automate user provisioning and deprovisioning from your HR information system (HRIS) to Active Directory, Entra ID and SCIM-enabled applications, thereby enabling new employees to quickly be productive and slashing the risk of adversaries taking over stale identities.
- Automatically update directory groups based on changes like an employee’s promotion or shift to another role, as recorded in your HRIS. This automation keeps access rights updated in near real time as required for security and compliance, while saving your IT team time.
- Delegate group and user management to the people who know who should have access to what. Simple workflows enable line-of-business owners to review their groups and approve or deny user access requests, reducing the risk of having over-privileged groups and users in your directory.
- Keep the directory clean and easier to manage with automated user creation, expiration and deletion.
- Maintain and prove compliance with regulations and standards with deep insight, effective automation and clear reporting on groups and members.