Introduction
Shifting a Flexible Single Master Operations (FSMO) role from one domain controller (DC) to another is normally done through a role transfer operation. But if the DC that holds an FSMO role experiences a serious failure that takes it out of service, you must instead seize its FSMO roles and reassign them to a functioning DC.
For example, you need to seize an FSMO role if the current role holder:
- Suffers an operational problem that prevents FSMO-related operations from succeeding
- Is not available at all due to a hardware problem
- Is having replication issues that prevent the role from being transferred
Important: After you seize an FSMO role from a DC, ensure that it is never reconnected to the network. Otherwise, both that DC and the new role holder will both be accountable for the duties associated with the role, which can cause serious issues in Active Directory.
Determining whether to seize particular FSMO roles
You need to seize a particular FSMO role whenever you need to make perform an operation that requires that role but the current role holder is unavailable. Here are the 5 FSMO roles and their responsibilities:
- Schema Master role — Needed to extend or make other change to the AD schema
- Domain Naming Master role — Required to add a new domain or DC
- RID Master role — Needed to create Active Directory objects because it assigns the requisite relative identifier (RID) pools to other domain controllers
- PDC Emulator role — Needed for a variety of operations, including time synchronization, password changes and updates to Group Policy
- Infrastructure Master role — Needed to resolve cross-domain object references in a multi-domain forest, unless all DCs are global catalog hosts
Privileges required to seize FSMO roles
To seize either of the forest-wide roles (Schema Master or Domain Naming Master), a user must be a member of the Enterprise Administrators group.
To seize a domain-wide role (PDC Emulator, RID Master or Infrastructure Master) from a DC, a user must be a member of the Domain Administrators group for the DC’s domain.
How to seize FSMO roles
To seize FSMO roles, you can use any of the following:
- Active Directory Users and Computers (ADUC)
- PowerShell
- ntdsutil.exe
How to seize FSMO roles using ADUC
To seize an FSMO role using the ADUC console, take the following steps:
- First, log in to the domain controller to which you want to assign the FSMO role.
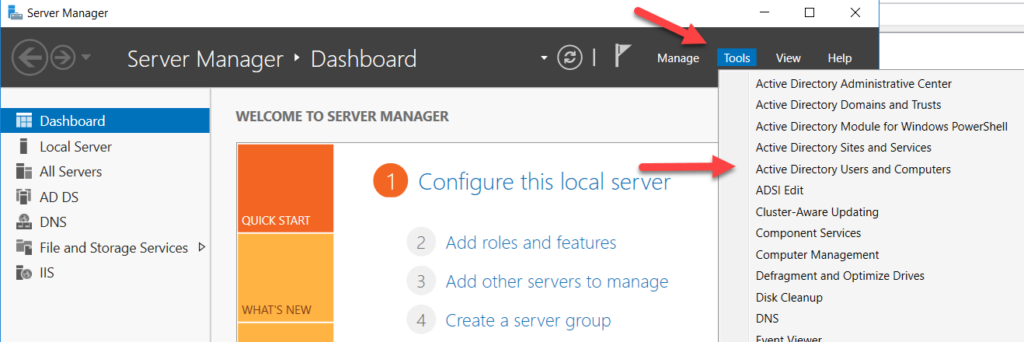
- Click the Start button and click Server Manager.

- In Server Manager, click the Tools menu select Active Directory Users and Computers.
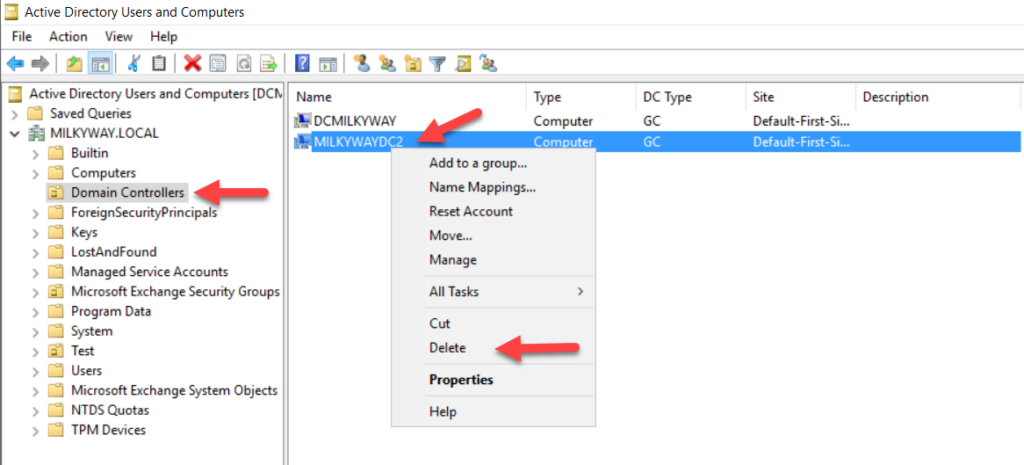
- In the list at the left, click Domain Controllers. In the resulting list on the right, locate the failed domain controller (in this example, it is MILKYWAYDC2). Right-click it and select Delete.
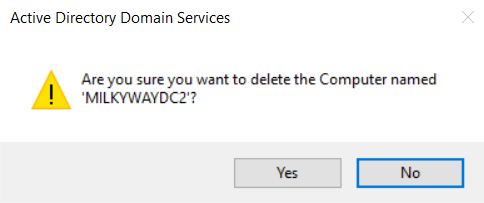
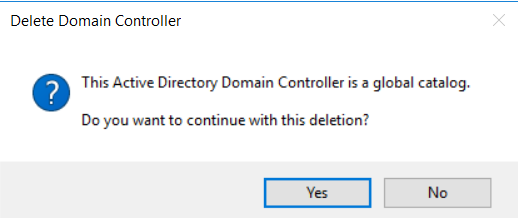
- When prompted to confirm the deletion, click Yes.
- Another warning will appear. Check the “Delete this Domain Controller anyway….” box and then click Delete.

- A third warning will appear. Click Yes.
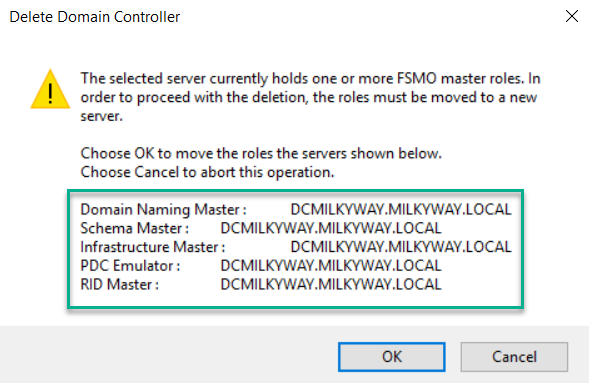
- A final warning will detail which FMSO roles will be moved to the DC you are logged on to. Click OK to reassign those FSMO roles.
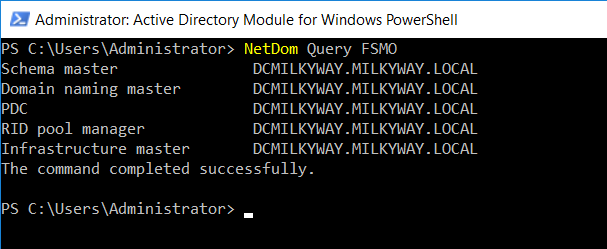
To confirm that the roles have been reassigned from the non-operational DC to the desired one, open PowerShell and enter the following command:
NetDom Query FSMO
How to seize FSMO roles using PowerShell
Alternatively, you can seize FSMO roles from the current role holder by logging on to the DC that you want to reassign the roles to and running the following PowerShell cmdlet:
Move-ADDirectoryServerOperationMasterRole -Identity <ADDirectoryServer> -OperationMasterRole <Role> -Server <ADDS or ADLDS instance>-Force
- -Identity specifies the DC you want to assign the role or roles to
- -OperationMasterRole specifies the role or roles you want to seize (specified by either the role name or the role number, as shown below)
- -Force indicates that the roles will be seized rather than transferred
Seizing the PDC Emulator role
Move-ADDirectoryServerOperationMasterRole -Identity "MilkywayDC2" -OperationMasterRole PDCEmulator -Force
Move-ADDirectoryServerOperationMasterRole -Identity "MilkywayDC2" -OperationMasterRole 0 -Force
Seizing the RID Master role
Move-ADDirectoryServerOperationMasterRole -Identity "MilkywayDC3" -OperationMasterRole RIDMaster - Force
Move-ADDirectoryServerOperationMasterRole -Identity "MilkywayDC3" -OperationMasterRole 1 -Force
Seizing the Infrastructure Master role
Move-ADDirectoryServerOperationMasterRole -Identity "MilkywayDC4" -OperationMasterRole InfrastructureMaster -Force
Move-ADDirectoryServerOperationMasterRole -Identity "MilkywayDC4" -OperationMasterRole 2 -Force
Seizing the Schema Master role
Move-ADDirectoryServerOperationMasterRole -Identity "MilkywayDC2" -OperationMasterRole SchemaMaster -Force
Move-ADDirectoryServerOperationMasterRole -Identity "MilkywayDC2" -OperationMasterRole 3 -Force
Seizing the Domain Naming Master role
Move-ADDirectoryServerOperationMasterRole -Identity "MilkywayDC3" -OperationMasterRole DomainNamingMaster -Force
Move-ADDirectoryServerOperationMasterRole -Identity "MilkywayDC3" -OperationMasterRole 4 -Force
Seizing multiple roles at once
You can seize two or more roles at once. For example, in a small environment, all 5 FSMO roles might be assigned to the same DC. If it becomes unrecoverable, you can seize all five roles using either of the following cmdlets:
Move-ADDirectoryServerOperationMasterRole -Identity "MilkywayDC2" -OperationMasterRole PDCEmulator,RIDMaster,InfrastructureMaster,SchemaMaster,DomainNamingMaster -Force
Move-ADDirectoryServerOperationMasterRole -Identity "MilkywayDC2" -OperationMasterRole 0,1,2,3,4 -Force
You will be prompted to confirm the operation, as shown below. If you press A, all roles will be seized. If you press Y, you will be asked to confirm each subsequent role seizure separately.

How to seize FSMO roles using ntdsutil.exe
To seize one or more FSMO roles the command-line program ntdsutil.exe, take the following steps:
- Log in to a member computer where AD RSAT tools installed.
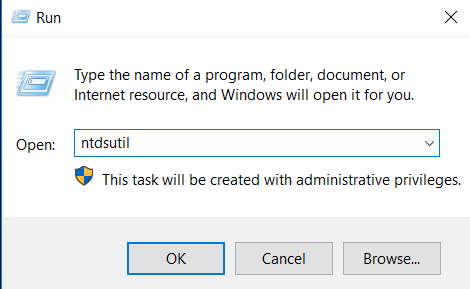
- To start ntdsutil, click Start, enter Run, type ntdsutil and then click OK.
3. At the ntdsutil prompt, type roles and press Enter.
4. AT the fsmo maintenance prompt, type connections and press Enter
5. Use the following command to connect to the domain controller to which you want to transfer the roles:
connect to server <servername>

6. At the server connections prompt, type q and then press Enter. This will bring you back to the fsmo maintenance prompt.

7. To seize a role, run the appropriate command from the list below:
- Seize naming master
- Seize infrastructure master
- Seize PDC
- Seize RID master
- Seize schema master
8. To return to the ntdsutil prompt, type q and then press Enter.
9.To quit the Ntdsutil utility, type q then press Enter.
How Netwrix can help
Seizing FSMO roles is just one of many tasks involved in managing your AD environment. With the Netwrix Active Directory security solution, you can simplify your work and secure your Active Directory from end to end. In particular, you can:
- Uncover security risks in Active Directory and prioritize your mitigation efforts.
- Harden security configurations across your IT infrastructure.
- Promptly detect and contain even advanced threats, such as DCSync and Golden Ticket attacks.
- Respond to known threats instantly with automated response options.
- Minimize business disruption and costs with fast Active Directory recovery.


