PowerShell provides a safer, more efficient alternative to regedit and reg.exe for creating, editing, and deleting registry keys and values. Cmdlets like New-Item, Set-ItemProperty, Remove-Item, and Rename-ItemProperty enable automation, remote management, and error handling. Admins should back up the registry, run PowerShell with elevated rights, and use Test-Path and try/catch to avoid misconfigurations. With proper safeguards, PowerShell streamlines both local and remote registry management.
Administrators can perform all typical Windows registry operations using either the old-good regedit user interface or the reg.exe utility. But there is another option — PowerShell. PowerShell can dramatically streamline the work of managing the registry, either on the local machine or remotely.
In this article, we’ll detail how to create, manage and delete registry keys and their values with PowerShell, as well as explain advanced operations such as using PowerShell to manage the registry on a remote computer.
What is the Windows Registry?
The Windows Registry is a hierarchical database that stores configuration settings and other critical information for the Microsoft Windows operating system and applications. For example, when a program is installed, it can create new subkeys and values within the registry to store its settings and state, and it may also modify existing entries to integrate more deeply with Windows.
The kernel, device drivers, services and Security Accounts Manager can all use the registry. User-specific settings, such as desktop settings, file associations and application preferences, are stored in the registry to provide a personalized experience for each user account on a Windows computer. The registry also allows access to counters for profiling system performance.
Registry Structure
The Windows registry has a hierarchical structure that consists of root keys, subkeys and values.
Root Keys (Hives)
Root keys are the broad categories under which all subkeys and values fall. They include:
- HKEY_CLASSES_ROOT (HKCR) — Contains information about registered applications, such as file associations and OLE object class IDs.
- HKEY_CURRENT_USER (HKCU) — Stores settings specific to the currently logged-in user, such as desktop preferences and application settings.
- HKEY_LOCAL_MACHINE (HKLM) — Holds configuration information specific to the computer, for all users. This includes system hardware settings, installed software settings and security policies.
- HKEY_USERS (HKU) — Contains all the actively loaded user profiles on the computer. HKCU is actually a subkey of HKU, pointing to the currently logged-in user.
- HKEY_CURRENT_CONFIG (HKCC) — Links to the settings of the current hardware profile, detailing system devices and settings that are frequently accessed.

Subkeys
Each root key contains several subkeys, which in turn may contain further subkeys, creating a tree-like structure. Subkeys function similarly to folders in a file system, organizing related settings into groups.
Each subkey has an associated type that determines the values (data) it can be assigned. Available types include REG_SZ (string), REG_BINARY (binary value) and REG_DWORD (32-bit number).

Caution: Back Up the Registry Before Making Any Changes
The Windows registry contains configurations and settings that are essential for the operating system and applications to run. An improper modification can lead to system instability or application errors, or even prevent Windows from starting.
Accordingly, before you edit the registry with PowerShell or any other tool, create a backup or a system restore point. This safety net enables you to restore the system to a previous state if something goes wrong. Steps for backing up and restoring the registry are provided later in this guide.
PowerShell and the Windows Registry
PowerShell provides a robust set of cmdlets for managing the Windows Registry, offering a more nuanced and powerful approach compared to traditional methods such as Regedit. You can use PowerShell to create registry keys and values, as well as modify and delete them. Managing the registry using PowerShell is particularly useful for system administrators and power users who need to manage system configurations or apply changes to multiple machines efficiently.
Benefits of PowerShell
PowerShell is a scripting language developed by Microsoft to facilitate system administration, configuration management and task automation. PowerShell is built on the .NET framework, which enables it to work with objects and .NET functions. Key benefits of PowerShell include:
- Automation and scripting— PowerShell enables the automation of repetitive tasks through scripts, making it a powerful tool for system administrators to manage numerous systems efficiently.
- Comprehensive cmdlet collection — PowerShell offers an extensive collection of predefined cmdlets for performing common system management tasks, from file operations to registry and process management.
- Pipeline support — Users can pass the output of one command as the input to another command, facilitating complex operations with minimal code.
- Broad functionality — The PowerShell scripting language supports variables, loops, conditions, and advanced functions like error handling and parallel processing.
- Local and remote management — PowerShell can access Windows Management Instrumentation (WMI) and COM (Component Object Model) objects, empowering users to perform a wide range of administrative tasks on both local and remote systems
- Extensible interface — Users and third-party vendors can extend PowerShell’s capabilities by developing custom cmdlets, modules, functions and scripts.
Role of PowerShell Providers in Registry Management
PowerShell providers enable users to access and manage the Windows registry and other data stores (such as the file system and certificate store) in a uniform manner. They make data stored in different formats accessible in a consistent way using standard PowerShell commands.
Providers enable you to traverse the hierarchical structure of the registry, similar to the way you navigate directories and files in a file system. You can move into and out of registry keys as if they were folders, making it intuitive to explore and manage registry settings.
Cmdlets for PowerShell Registry Management
PowerShell provides a suite of cmdlets designed for managing the Windows registry. For example, you can create registry key in PowerShell using the New-Item cmdlet. Here is an overview of some of the key cmdlets used for registry management:
- Get-Item — Retrieves the registry keys at a specified location
- Set-Item — Modifies the value of a registry key
- New-Item — Add a registry key with PowerShell
- Remove-Item — Deletes registry keys and their values
- Get-ItemProperty — Retrieves the properties (values) of a registry key
- Remove-ItemProperty — Deletes a value from a registry key
- Set-ItemProperty — Changes the value of a registry key
- Get-ChildItem — Lists the subkeys and values of a registry key
Setting Up PowerShell for Registry Management
Running PowerShell as an Administrator
In many cases, modifying the registry requires elevated privileges, so you must run PowerShell in elevated mode. This is also known as “running as administrator.” For example, administrative privileges are necessary for modifying system files, registry settings or configurations that affect all users on a computer, as well as for network configuration tasks like setting firewall rules or configuring IP addresses. Admin rights are also often necessary to change execution policies to run scripts, and to install, update or remove software on Windows systems.
To open PowerShell in elevated mode, follow the steps below. If you are prompted by User Account Control (UAC), click Yes to continue.
Windows 10 and Windows 11
- Click on the Start menu (Windows icon) and type PowerShell in the search bar.
- Right-click on Windows PowerShell or Windows Terminal (depending on your setup) in the search results.
- Select Run as administrator from the context menu.
Windows Server
- Open the Start Menu and navigate to Windows PowerShell or Windows Terminal in the programs list.
- Right-click on Windows PowerShell or Windows Terminal.
- Select Run as administrator.
Getting Information about Providers and Drives
To retrieve information about the providers and drives available within the current PowerShell session, you can use the Get-PSProvider and Get-PSDrive cmdlets.
Retrieve Information About Available Providers (Get-PSProvider)
To retrieve information about the PowerShell providers that are available for use, including details about capabilities they support and the drives they are associated with, use the following cmdlet:
Get-PSProvider

Retrieve Information about Available Drives (Get-PSDrive)
Drives in PowerShell are logical representations of different data stores, such as file systems, registry keys, certificates and environmental variables. To retrieve information about the drives that are available in the current PowerShell session, use the Get-PSDrive cmdlet. For drives that represent storage, such as filesystem drives, it also shows the used and free space.
Get-PSDrive

Creating, Managing and Editing Registry Keys using PowerShell
Creating New Registry Keys (New-Item)
You can use the New Item cmdlet in PowerShell to create registry keys:
New-Item -Path "HKCU:\Software\MyNewApplication"

After you create a registry key using PowerShell, you can verify the success of the operation using Get-Item:
Get-Item -Path "HKCU:\Software\MyNewApplication"

Checking whether a Registry Key Exists (Test-Path)
To avoid errors and undesired results, it’s a best practice to run the Test-Path to verify the existence of registry keys, files and other items before running commands that affect those items. Here is a simple example:
Test-Path -Path "HKCU:\Software\MyNewApplication"

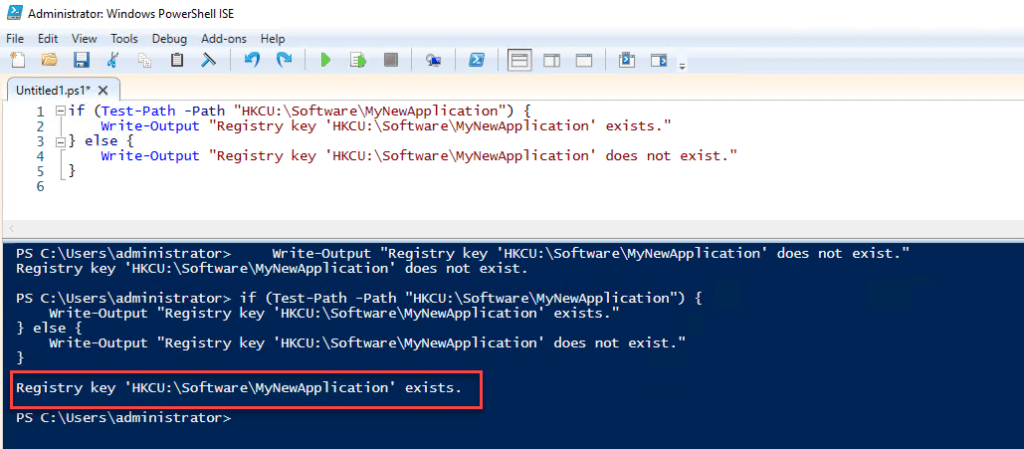
And here is a more complex script that provides more detailed output:
# Check if HKCU\Software\MyNewApplication exists

if (Test-Path -Path “HKCU:\Software\MyNewApplication”) {

    Write-Output "Registry key 'HKCU:\Software\MyNewApplication' exists."

} else {

    Write-Output "Registry key 'HKCU:\Software\MyNewApplication' does not exist."

}

Handling Common Errors
When managing the Windows registry using PowerShell, you may encounter errors. Here are some of the most common issues and how to address them:
- Access denied — This error often occurs because you attempted to modify the registry without adequate permissions. When performing operations that require elevated privileges, be sure to right-click on PowerShell and select Run as administrator.
- Incorrect path — Typos or incorrect path specifications can lead to errors. Always double-check the registry path you’re trying to access or modify. Remember, registry paths are case-sensitive.
- Cmdlet not recognized — This error can indicate you’re using an outdated version of PowerShell that doesn’t support the registry management cmdlets. Update PowerShell to the latest version available for your system.
- Script execution disabled — PowerShell might be configured to prevent script execution due to security settings. To change this, you can run Set-ExecutionPolicy RemoteSigned (or specify another policy level that suits your security requirements). Be cautious, as changing execution policies can expose your system to risks.
- Data type errors — When you create or modify registry keys, ensure you use the correct data type.
- Item does not exist — Trying to access or modify a registry key or value that doesn’t exist will result in an error. Before attempting operations, use Test-Path to verify that the registry path exists.
- Improper use of wildcards — While wildcards can be helpful in some scenarios, incorrect use can lead to broad, unintended changes or errors. Use wildcards carefully and consider using the -WhatIf parameter to preview the changes before execution.
Adding and Updating Registry Keys and Values using PowerShell
Adding New Keys and Values (New-ItemProperty)
You can use PowerShell to add registry keys and assign them values by using the New ItemProperty cmdlet. Here is the basic syntax:
New-ItemProperty -Path "HKCU:\Software\MyNewApplication" -Name "Setting_Name" -Value "Setting_Value" -PropertyType "String"
For example, the following command will create a new registry key called NewString and assign it the value Hello:
New-ItemProperty -Path "HKCU:\Software\MyNewApplication" -Name "NewString" -PropertyType String -Value "Hello"


Similarly, to create a subkey named NewDWORD with the value 1234, you would use this cmdlet:
New-ItemProperty -Path "HKCU:\Software\MyNewApplication" -Name "NewDWORD" -PropertyType DWord -Value 1234


Updating Registry Values (Set-ItemProperty)
To edit a registry key in PowerShell, use the Set-ItemProperty cmdlet:
Here is how to use PowerShell to set registry values:
Set-ItemProperty -Path "HKCU:\Software\MyApplication" -Name "Setting_Name" -Value "New_Value"
You can also use PowerShell to change registry values. For instance, to update a value for an application setting stored in the registry, you could use a command like this:
Set-ItemProperty -Path "HKCU:\Software\MyNewApplication" -Name "NewString" -Value "Hello World"
Although Set-ItemProperty is an effective way to perform PowerShell edit registry tasks, the cmdlet does not produce any output. To verify your changes, you can use Get-Item:
Get-Item -Path "HKCU:\Software\MyNewApplication"

Alternatively, you can check your changes in the Registry Editor:

Let’s walk through another example. If you wanted to change the value of a subkey named NewDWORD to 5678, you would use this cmdlet:
Set-ItemProperty -Path "HKCU:\Software\MyNewApplication" -Name "NewDWORD" -Value 5678
To verify your changes, use the Get-Item cmdlet:
Get-Item -Path "HKCU:\Software\MyNewApplication"

Deleting a Registry Value (Remove-ItemProperty)
To delete a registry value, you can use the Remove-ItemProperty cmdlet:
Remove-ItemProperty -Path "HKCU:dummyNetwrixKey" -Name "NetwrixParam"
Deleting a Registry Key (Remove-Item)
To delete a registry key, use Remove-Item as shown below. The –Recurse parameter deletes all the subkeys without additional confirmation.
Remove-Item -Path "HKCU:dummyNetwrixKey" -Recurse
To delete all subkeys inside the specified key without deleting the key itself, add the * symbol at the end of the path:
Remove-Item -Path "HKCU:dummyNetwrixKey*" -Recurse
Renaming a Registry Value (Rename ItemProperty)
To rename a value of a registry key, use the Rename ItemProperty cmdlet:
Rename-ItemProperty -Path "HKCU:dummyNetwrixKey" -Name "NetwrixParam" -NewName "NetwrixNewParam"
Renaming a Registry Key (Rename-Item)
To rename a registry key, use the Rename-Item cmdlet:
Rename-Item -Path "HKCU:dummyNetwrixKey" NetwrixNewKey
Advanced Registry Operations using PowerShell
Advanced registry operations include using the PowerShell App Deployment Toolkit and performing remote registry management with PowerShell.
Using the PowerShell App Deployment Toolkit(PSADT)
PSADT is a collection of scripts and tools for deploying and managing applications. It is commonly used for deploying complex or custom applications that require specific configurations or user interaction. It can also be used to update or patch applications by modifying deployment scripts to accommodate new versions or changes. Organizations also use PSADT to provide informative messages, prompts and feedback to users during the deployment process, enhancing user awareness and cooperation.
Key features and benefits include:
- Deployment scripts — These script allow you to define and customize the installation process of applications. They can handle tasks such as checking prerequisites, installing software, configuring settings and cleaning up after installation.
- Customizable user interface — Displaying prompts, notifications and progress bars to users during deployment helps provide feedback and manage user interaction.
- Logging capabilities — Capturing deployment activities and errors is essential for troubleshooting and auditing purposes.
- Pre-installation and post-installation tasks — You can define tasks to prepare the system before installation and perform additional configuration or cleanup tasks afterward.
- Configuration settings for applications — You can define settings to be dynamically applied during deployment. This helps in adapting the deployment process to different environments or requirements.
- Silent application installation — You can run deployments without user interaction when required.
Remote Registry Management (Enter-PSSession and Invoke-Command)
Administrators can use PowerShell to access, navigate and modify the registry of remote computers within a network. Be careful when editing a registry remotely using PowerShell, as incorrect modifications can lead to system instability or security vulnerabilities. Also make sure that you have the necessary administrative privileges and that firewalls and network settings permit remote access.
Here are the primary PowerShell commands used for remote registry management:
- Enter-PSSession is used to establish an interactive session with a single remote computer, and Exit-PSSession is used to end the session.
- Invoke-Command is used to send a single command or a script block to one or more remote computers. For instance, it can efficiently make the same registry change across multiple systems.
Enter-PSSession and Exit-PSSession
Enter-PSSession is used to start an interactive session with a single remote computer. It’s particularly useful for situations where a series of commands need to be executed interactively. Once in the session, you can perform registry operations as if you were directly logged into the remote system. Here are the steps to take:
Before using Enter-PSSession, ensure that PowerShell Remoting is enabled on the remote machine by using this command:
Enable-PSRemoting
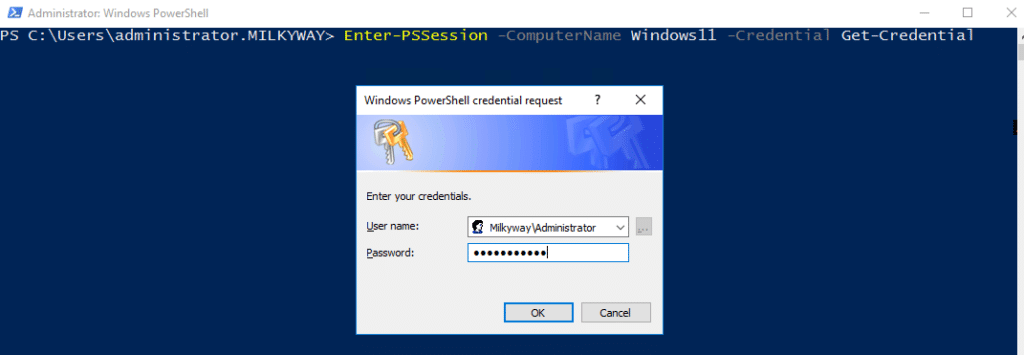
To start an interactive session, run this cmdlet:
Enter-PSSession -ComputerName Windows11 -Credential Get-Credential

To check that you are connected, look for the remote computer name before the prompt:

Once connected, you can use standard PowerShell cmdlets to manage the registry interactively. For example, you can get a registry value from the remote computer by running this cmdlet:
Get-ItemProperty -Path "HKLM:\SOFTWARE\Microsoft\Windows\CurrentVersion\BitLocker"

To exit the remote session and return to your local PowerShell prompt, use the Exit-PSSession cmdlet.
Invoke-Command
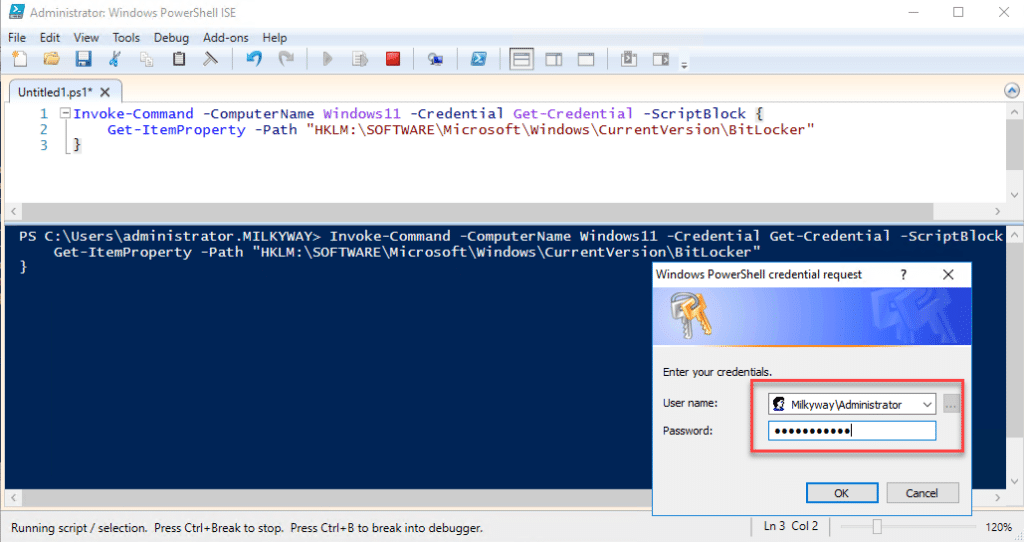
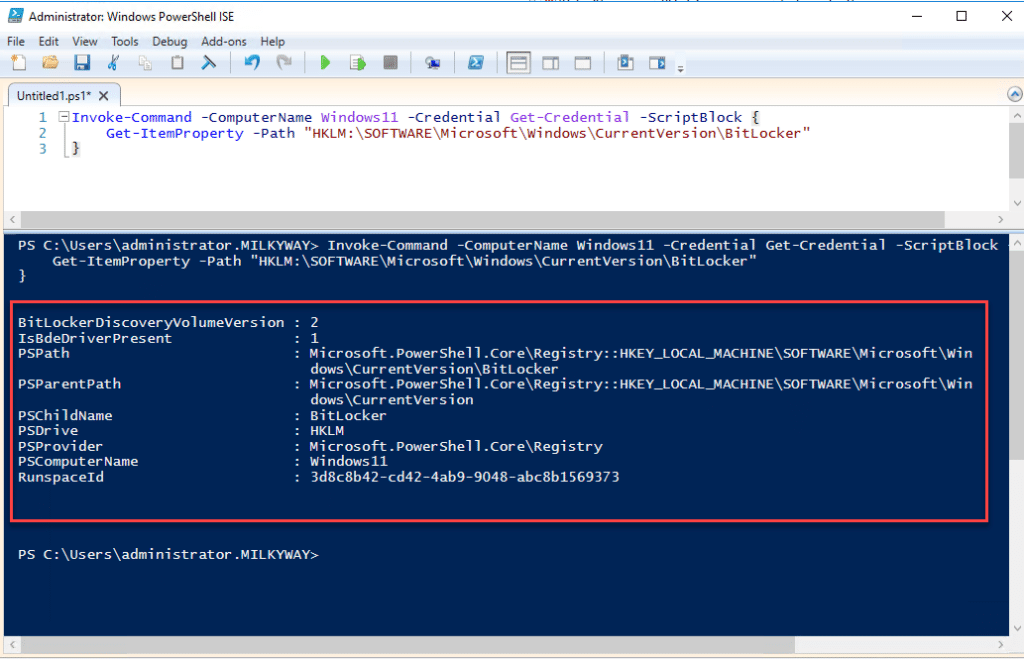
Invoke-Command allows you to execute commands on one or more remote computers. It’s useful for non-interactive tasks or when you need to run commands from a script. For example, to get a registry value from the remote computer, you could use this command:
Invoke-Command -ComputerName Windows11 -Credential Get-Credential -ScriptBlock {

    Get-ItemProperty -Path "HKLM:\SOFTWARE\Microsoft\Windows\CurrentVersion\BitLocker"

}

You can specify multiple computers as follows:

-ComputerName 'Computer1', 'Computer2'
When you run Invoke-Command, you will be prompted to provide credentials for the remote machine:

After you provide valid credentials and click OK and you will see the output of the script that you ran:

Security Considerations for Remote Registry Management
When you edit the registry remotely with PowerShell, be sure to follow these security best practices:
- Use secure authentication methods.
- Ensure all communications are encrypted by using the -UseSSL parameter with Enter-PSSession or Invoke-Command.
- Enable PowerShell remoting carefully, restricting access to trusted hosts and networks.
- Grant the minimum necessary permissions to users and processes that use PowerShell for remote access.
- Set a restrictive execution policy to prevent unauthorized scripts from running.
- Limit access with Just Enough Administration (JEA), a security technology that enables delegated administration for anything that can be managed with PowerShell.
- Configure firewall rules to restrict access to PowerShell remoting ports (by default, 5985 for HTTP or 5986 for HTTPS).
Best Practices for Managing the Registry
To manage the Windows registry effectively and securely using PowerShell, be sure to:
- Understand the registry structure. Familiarize yourself with the registry structure, especially the HKEY_LOCAL_MACHINE and HKEY_CURRENT_USER hives and their subkeys.
- Back up the registry before making changes. Always back up the registry before making any changes, especially if you are making bulk modifications or changes that could impact system stability. Backup and recovery instructions are provided in the next section.
- Run as administrator. Many registry modifications require administrative privileges. To avoid errors, ensure you’re running PowerShell with elevated rights.
- Be cautious. Because of critical role the registry plays in system operations, use care when manipulating it, especially when deleting keys or values.
- Avoid direct editing of critical keys. Incorrect changes to the registry, especially critical keys such as HKEY_LOCAL_MACHINE\System, can lead to system instability or failure.
- Use error handling. Implement try/catch blocks around your code to manage exceptions, especially in cases when registry entries might not exist.
- Avoid hardcoding paths. Whenever possible use variables and built-in PowerShell commands to resolve paths dynamically. This practice enhances script portability and readability.
- Test in a safe environment. Before applying changes to a live system, test your scripts in a controlled environment, such as a virtual machine that mirrors the target environment. Identifying and mitigating issues in a test environment helps protect the stability of production systems.
- Document your changes. Keep a detailed record of all registry changes made through PowerShell scripts. Documentation should include the purpose of the change, the original state and the expected impact. This practice is invaluable for troubleshooting and audits.
- Use transactions where supported. Use the -UseTransaction switch with supported cmdlets so you can undo the operation if something goes wrong.
- Follow cybersecurity best practices. Adhere to core security best practices like enforcing the least privilege principle and not hardcoding sensitive information.
How to Back Up and Restore Registry Settings
You can back up and restore registry settings using either PowerShell or regedit.
Note that some changes may require a restart to take effect.
Using PowerShell
To back up the registry, open PowerShell as administrator and use this command:
reg export HKCU\Software\MyNewApplication C:\registry_backup.reg

To restore the registry from a backup, use this command:
reg import c:\registry_backup.reg

Using the Registry Editor (regedit)
To back up a registry hive using the Registry Editor, follow the steps below.
- Open the Registry Editor. One method is to press Win + R, type regedit and press Enter. Another option is to search for Registry Editor in the Start menu and open it.
- Right-click on the registry hive you want to back up and select Export.

- Choose a location to save the backup file, give it the file a meaningful name and ensure the export range is set to All.
- Click Save to create the .reg file containing the exported registry settings.

To restore from a registry backup, follow these steps:
- In the Registry Editor, click File > Import.

- Navigate to the location where you saved the backup .reg file, select it and click Open.

- When the confirmation message appears, click OK to return to the Registry Editor.

Conclusion
With PowerShell, IT pros can streamline a range of registry management tasks. But remember, even one improper change can lead your operating system to the blue screen of death. Therefore, before you make any changes to the registry, you should be 100% sure of what you are changing and have a current backup. You should also carefully track all the changes you make. Netwrix Auditor for Windows Server can help; it tracks, reports on and alerts on changes to the Windows registry.
FAQ
How can I add a registry key using PowerShell to turn off Remote Desktop Services (RDS)?
To disable RDS, set the value of fDenyTSConnections to 1. Here is an example of the command to use:
Set-ItemProperty -Path "HKLM:\System\CurrentControlSet\Control\Terminal Server" -Name fDenyTSConnections -Value 1
Why do I get a ‘Type:’ prompt when trying to add a registry key with PowerShell?
The Type: prompt usually occurs because a PowerShell cmdlet has been issued without all required parameters or there’s a syntax error in the command.
What should I do if the registry path does not exist when adding a new item in PowerShell?
If a desired path does not exist, you can create it using the New-Item cmdlet:
New-Item -Path "HKCU:\Software\MyNewApplication"
To avoid this issue, before adding a new item with PowerShell, be sure to use the Test-Path cmdlet to check whether the registry path you are trying to access exists:
Test-Path -Path "HKCU:\Software\MyNewApplication"
How can I create or update a registry value in PowerShell, ensuring the key is created if it does not exist?
The following script uses the Test-Path, New-Item and Set-ItemProperty cmdlets to check whether a registry path exists and, if not, create it before setting or updating the specified registry value:
# Define registry path, key name, and value

$Path = "HKCU:\Software\MyNewApplication"

$propertyName = "Version"

$propertyValue = "829"

# Check if the registry path exists, create if not

if (-Not (Test-Path $Path)) {

    Write-Output "Registry path does not exist. Creating it"

    New-Item -Path $Path -Force | Out-Null

}

# Set registry value

Set-ItemProperty -Path $Path -Name $propertyName -Value $propertyValue
What is the equivalent PowerShell command for ‘reg add’ to add or update a registry key and value?
To create registry key and value in PowerShell or update an existing one, you can use the Set-ItemProperty cmdlet:
Set-ItemProperty -Path "HKCU:\Software\MyNewApplication" –Name “Version” -Value “839”
Why should I be cautious when using -Force with New-Item in PowerShell?
Using the Force parameter with New-Item can be risky because it can lead to unintentional overwriting of existing items and other unexpected effects. It’s a best practice to check for the existence of items before using New-Item, especially when using -Force.
What command should I use to add a registry key to a specific path in HKCU using PowerShell?
To add a registry key to a specific path in the HKCU (HKEY_CURRENT_USER) hive using PowerShell, you can use the New-Item cmdlet as shown here:
New-Item -Path "HKCU:\Software\MyNewApplication"


