What are FSMO Roles?
There are 5 Flexible Single Master Operations (FSMO) roles:
- 2 forest-wide roles: Domain Naming Master and Schema Master
- 3 domain-wide roles: PDC Emulator, RID Master and Infrastructure Master
Why Should FSMO Roles Be Transferred?
All 5 roles are initially assigned to the first domain controller (DC) created in a forest. If the forest contains multiple domains, the first DC created in each new domain owns all 3 of the domain-wide FSMO roles for that domain.
However, to ensure fault tolerance, many organizations have multiple domain controllers in each domain of the forest. In this case, they do not need to leave all operations master roles assigned to the original FSMO role holder. In fact, Microsoft recommends that FSMO roles be carefully divided, with standby DCs prepared to take over each role.
Furthermore, Microsoft suggests that the 2 forest-wide roles, Domain Naming Master and Schema Master, should be on the same DC. In a given domain, the PDC Emulator and RID Master roles should be on the same DC.
Below are some other common reasons for transferring FSMO roles to another DC:
- The operating system of a DC is being upgraded.
- The IP address of the DC is changing.
- A domain controller is being demoted.
- You are removing a DC from service for maintenance.
It is a best practice to fully document when, where and why FSMO roles are transferred.
How can FSMO Roles Be Transferred?
To move FSMO roles between DCs, you can use any of the following options:
- The Microsoft management consoles
- PowerShell
- The command-line utility ntdsutil.exe
Each of these options is explained below.
Note that in some cases, you need to seize FSMO roles rather than transfer them. For details, refer to this blog.
Privileges Required to Transfer FSMO Roles
To perform FSMO roles transfer, the user account must be a member of the appropriate administrators group, as detailed in the following table:
| To transfer this FSMO role: | A user must be a member of this group: |
| Schema Master | Enterprise Admins |
| Domain Naming Master | Enterprise Admins |
| RID Master | Domain Admins |
| PDC Emulator | Domain Admins |
| Infrastructure Master | Domain Admins |
How to Transfer FSMO Roles using the Microsoft Management Consoles
The Microsoft GUI you use to view and migrate FSMO roles depends on the role involved:
- RID Master, Infrastructure Master or PDC Emulator: ADUC (Active Directory Users and Computers)
- Domain Naming Master: ADDT (Active Directory Domains and Trusts)
- Schema Master: MMC (Microsoft Management Console)
Transferring the RID Master, Infrastructure Master or PDC Emulator Role
Using ADUC, you can see which domain controller currently holds the RID Master, Infrastructure Master or PDC Emulator role and transfer the role to a different DC. Take the following steps:
1. Using an account that is a member of Domain Admins, log on to the domain controller to which you want to transfer the role.
2. Open ADUC.
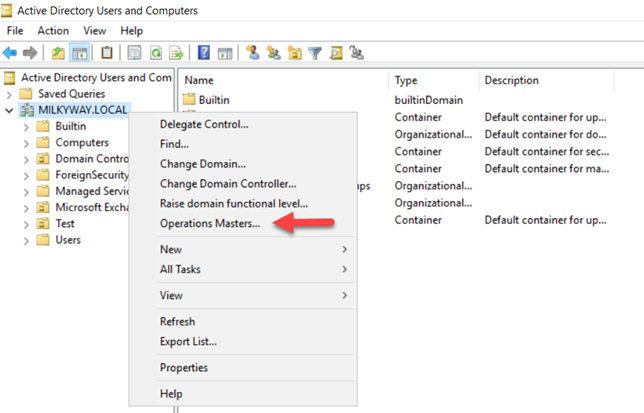
3. Right-click on the domain node and click Operations Masters, as shown below.
4. In the Operations Masters window, on the RID tab, you can see which domain controller currently holds the RID Master role, as well as the DC that you are logged on to. If you want to change the DC that holds the PDC Emulator or Infrastructure Master role, click the appropriate tab.
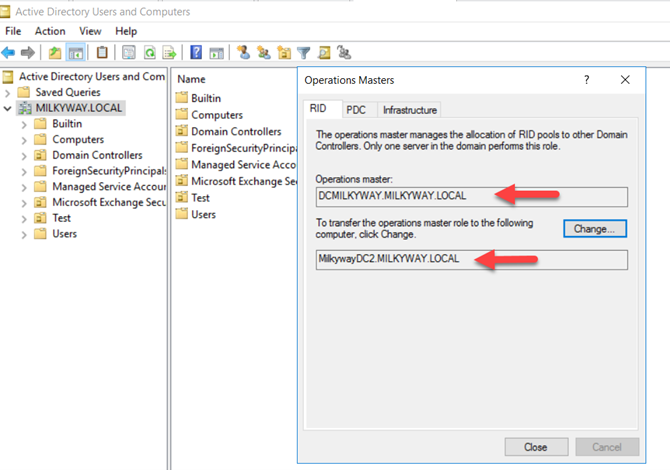
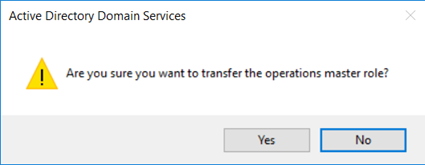
5. To proceed with the role transfer, click the Change button. Then click Yes to confirm the action, as shown below.
6. You will be returned to the Operations Masters window. If you need to transfer another domain-wide role, choose the appropriate tab and repeat step 5.
Transferring the Domain Naming Master Role
You can use ADDT to see which DC holds the Domain Naming Master role and transfer the role to a different DC. Follow the steps below.
1. Using an account that is a member of the Enterprise Admin group, log on to the DC to which you want to transfer the role.
2. Open ADDT.
3. Right-click on the Active Directory Domains and Trusts node and choose Operations Masters.
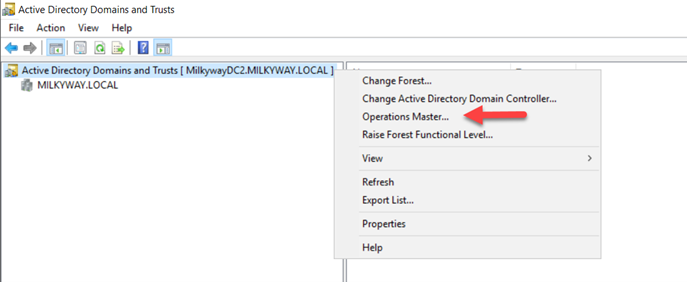
4. In the Operations Masters window, you can see the DC that currently holds the Domain Naming Master role and the DC that you are logged on to.
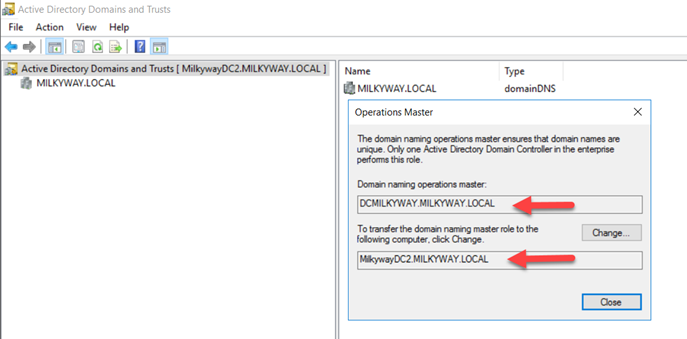
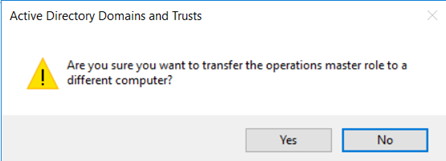
5. To transfer the role from the current DC to the target DC, click the Change button. When asked to confirm the action, click Yes.
Transferring the Schema Master Role
Before you can transfer the Schema Master role, you must add the Active Directory (AD) snap-in to MMC console and first register it in the OS.
Note that the exact options vary depending on the version of Windows Server that you are using. The example shows the process for Windows Server 2016.
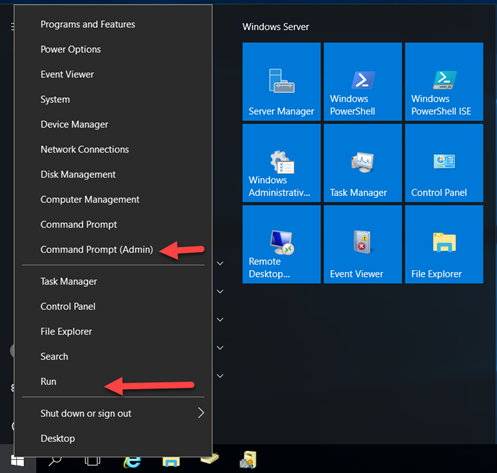
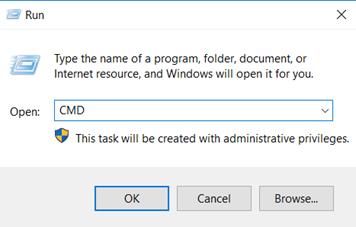
1. To open the command prompt window, do one of the following:
- Right-click on the Start button and click Command Prompt Admin.
- Click RUN, type CMD and click OK.
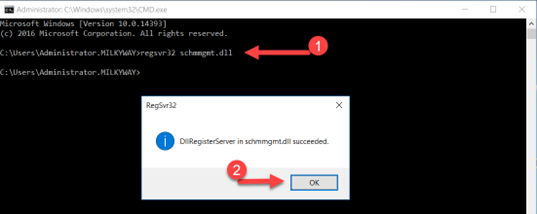
2. Type regsvr32 schmmgmt.dll and press Enter. You will receive a confirmation message that the command succeeded.
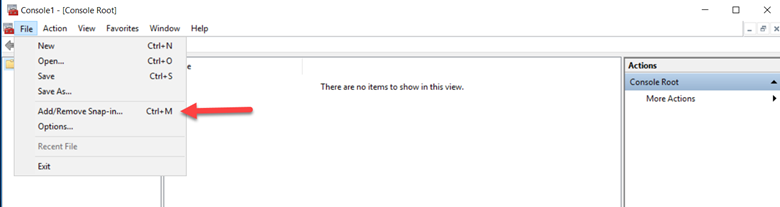
3. Open MMC by typing mmc.exe in the Run dialog box.

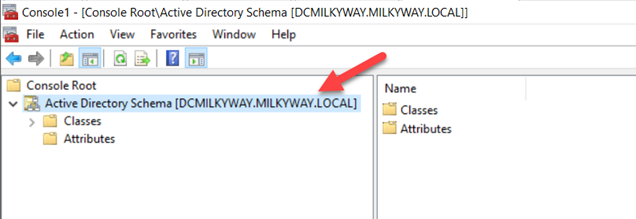
4. Next, we need to add the Active Directory Schema snap-in. Click File and then choose Add/Remove Snap-In.
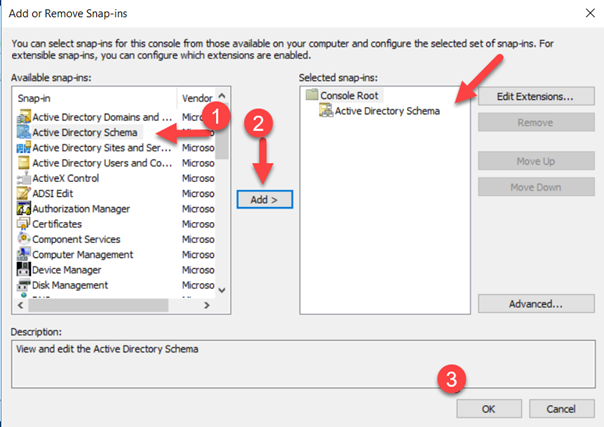
5. Click Active Directory Schema in Available snap-ins and then click the Add button. On the right, you will see that Active Directory Schema is now listed. Click OK to close the window.
6. The Active Directory Schema snap-in is not connected to the DC that currently holds the Schema Master role — but that isn’t the DC we want to transfer the role to.
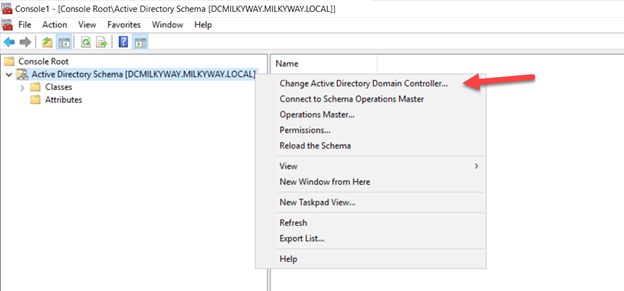
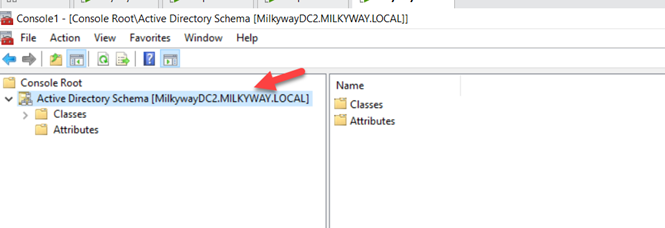
7. To connect the AD Schema snap-in to the DC that you are currently logged on to, first right-click on Active Directory Schema and click Change Active Directory Domain Controller.
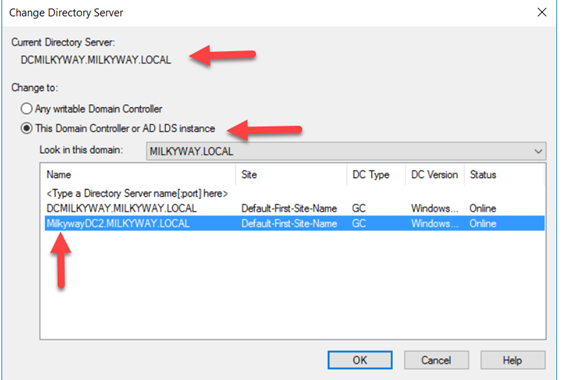
8. Select the This Domain Controller or AD LDS instance radio button and choose the correct DC. Click OK to close the window.
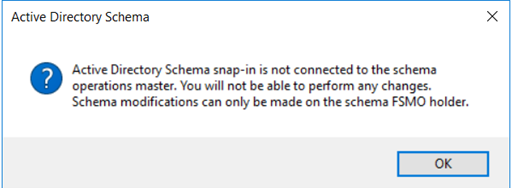
9. When the following warning message appears, click OK.
10. Verify that the DC has been changed to the one you want to transfer the role to.
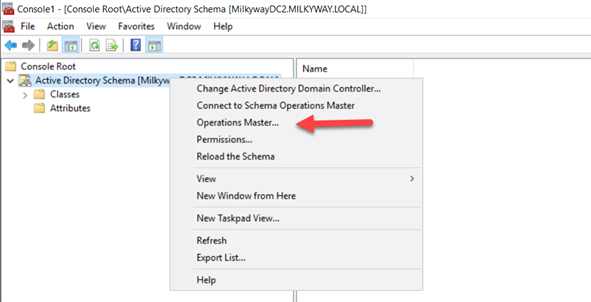
11. Right-click on Active Directory Schema and select Operations Master.
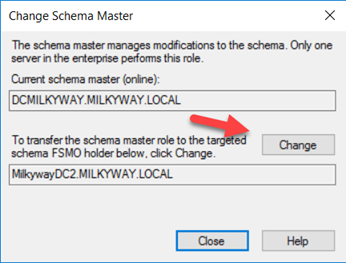
12. You will see the DC that currently holds the Schema Master role and, below it, the DC you are logged on to. To initiate the role transfer, click Change.
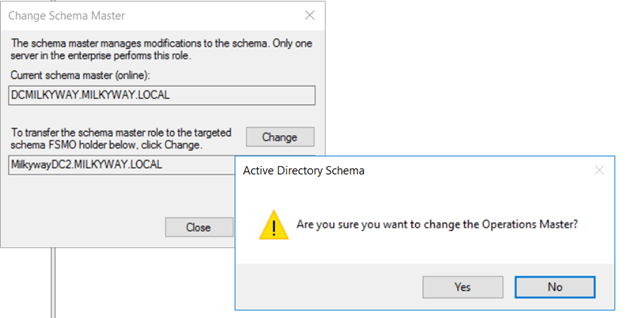
13. In the confirmation window that appears, click Yes to transfer the role.
How to Transfer FSMO Roles using PowerShell
One alternative to using the Microsoft consoles to transfer FSMO roles is to use the PowerShell cmdlet Move-ADDirectoryServerOperationMasterRole.
You can run this cmdlet on either a domain-joined server or workstation that has the Active Directory PowerShell module installed, or directly on a DC.
There are two necessary parameters that must be provided with this command:
- -Identity specifies the DC to which the role or roles are being assigned. Acceptable values are:
- Hostname
- GUID (Globally Unique Identifier)
- Fully qualified domain name (FQDN)
- -OperationMasterRole specifies the role or roles being transferred. You can specify either the appropriate string or its corresponding numeric value:
- PDCEmulator or 0
- RIDMaster or 1
- InfrastructureMaster or 2
- SchemaMaster or 3
- DomainNamingMaster or 4
This article provides examples using both string and numeric values.
Note that the current role holder does not need to be specified since the system already has that information.
Transferring the RID Master, Infrastructure Master and PDC Emulator Role
Checking the Current Role Holders
You can learn about three domain-wide role holders, including their FQDNs, by running the following cmdlet:
Get-ADDomain
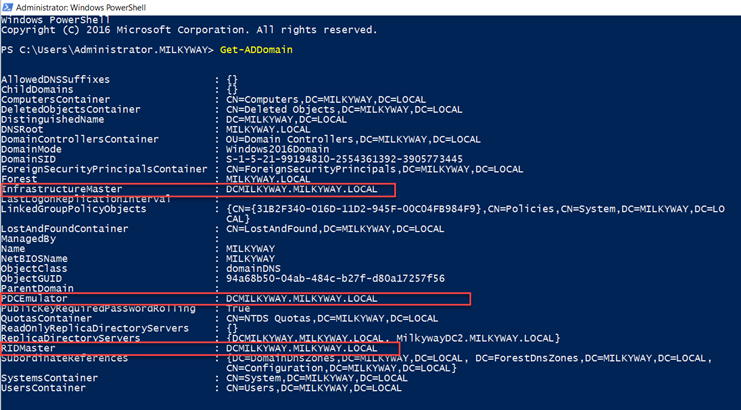
You can use the Get-ADDomain cmdlet again after transferring FSMO roles to make sure that the operation was successful.
Transferring the Roles
You can transfer a specific role or transfer all three roles at once. You will be prompted to confirm the transfers.
PDC Emulator
To transfer the PDC Emulator role, use either of the following commands:
Move-ADDirectoryServerOperationMasterRole -Identity "MilkywayDC2" -OperationMasterRole PDCEmulator
Move-ADDirectoryServerOperationMasterRole -Identity "MilkywayDC2" -OperationMasterRole 0
RID Master
To transfer the RID Master role, use either of the following commands:
Move-ADDirectoryServerOperationMasterRole -Identity "MilkywayDC3" -OperationMasterRole RIDMaster
Move-ADDirectoryServerOperationMasterRole -Identity "MilkywayDC3" -OperationMasterRole 1
Infrastructure Master
To transfer the Infrastructure Master role, use either of the following commands:
Move-ADDirectoryServerOperationMasterRole -Identity "MilkywayDC4" -OperationMasterRole InfrastructureMaster
Move-ADDirectoryServerOperationMasterRole -Identity "MilkywayDC4" -OperationMasterRole 2
All domain-wide FSMO roles at once
To transfer all 3 domain-wide FSMO roles at once, use either of the commands shown below. If you want to transfer each role to a different DC, specify the DC name using the -Identity parameter.
To confirm the role transfers, you can either enter A to confirm all of them at once, or enter Y for each transfer separately.
Move-ADDirectoryServerOperationMasterRole -Identity "MilkywayDC2" -OperationMasterRole PDCEmulator,RIDMaster,InfrastructureMaster

Move-ADDirectoryServerOperationMasterRole -Identity “MilkywayDC2” -OperationMasterRole 0,1,2

Transferring the Domain Naming Master and the Schema Master Role
Checking the Current Role Holders
To review the DCs that currently hold the forest-wide roles, use the cmdlet shown below.
Get-ADForest

Transferring the Roles
You can transfer just one of the roles or both roles at once. You will be prompted to confirm the transfers.
Schema Master
To transfer the Schema Master role, use either of the following commands:
Move-ADDirectoryServerOperationMasterRole -Identity "MilkywayDC2" -OperationMasterRole SchemaMaster
Move-ADDirectoryServerOperationMasterRole -Identity "MilkywayDC2" -OperationMasterRole 3
Domain Naming Master
To transfer the Domain Naming Master role to another DC, use either of the following commands:
Move-ADDirectoryServerOperationMasterRole -Identity "MilkywayDC3" -OperationMasterRole DomainNamingMaster
Move-ADDirectoryServerOperationMasterRole -Identity "MilkywayDC3" -OperationMasterRole 4
Both forest-wide roles at once
To transfer both forest-wide roles at once, use either of the commands shown below. If you want to transfer each role to a different DC, specify the DC name using the -Identity parameter.
To confirm the role transfers, you can either enter A to confirm all of them at once, or enter Y for each transfer separately.
Move-ADDirectoryServerOperationMasterRole -Identity "MilkywayDC2" -OperationMasterRole SchemaMaster,DomainNamingMaster

Move-ADDirectoryServerOperationMasterRole -Identity "MilkywayDC2" -OperationMasterRole 3,4

Transferring All the FSMO Roles using a Single PowerShell Cmdlet
If you have just one domain with only 2 or 3 DCs and you want to transfer all 5 of the FSMO roles, you can use either of the cmdlets shown below.
Move-ADDirectoryServerOperationMasterRole -Identity "MilkywayDC2" -OperationMasterRole PDCEmulator,RIDMaster,InfrastructureMaster,SchemaMaster,DomainNamingMaster

Move-ADDirectoryServerOperationMasterRole -Identity "MilkywayDC2" -OperationMasterRole 0,1,2,3,4

How to Transfer FSMO Roles using ntdsutil.exe
A third way to transfer FSMO roles is to use the command-line program ntdsutil.exe. Note that only experienced administrators should use this powerful tool.
Here are the steps to take:
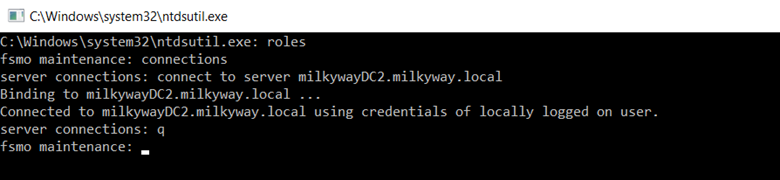
1. Log in to either a member computer where AD RSAT tools are installed or a DC located in the same forest where the Operation Master roles exist. It is recommended that you log on to the DC to which you are transferring Operation Master roles.
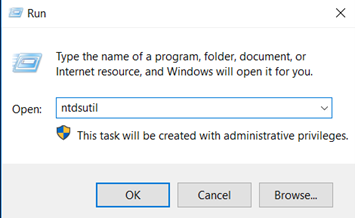
2. Click Start and type Run. In the Run dialog box, type ntdsutil and click OK.
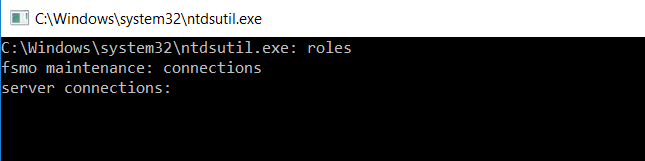
3. At the ntdsutil prompt, type roles and press Enter.
4. At the fsmo maintenance prompt, type connections and press Enter.
5. Type the command below, replacing milkywayDC2.milkyway.local with the name of the DC you want to transfer the roles to, and press Enter.
connect to server milkywayDC2.milkyway.local
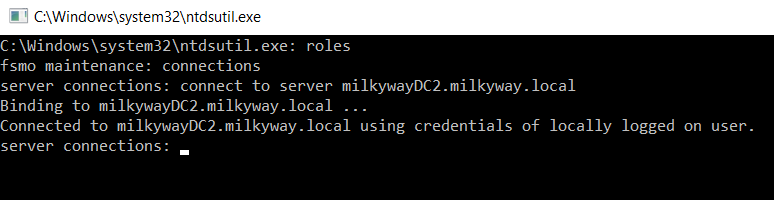
6. At the server connections prompt, type q and press Enter.
7. This will bring you back to the fsmo maintenance prompt. To see the list of roles that you can transfer and their commands, type ? and press Enter.
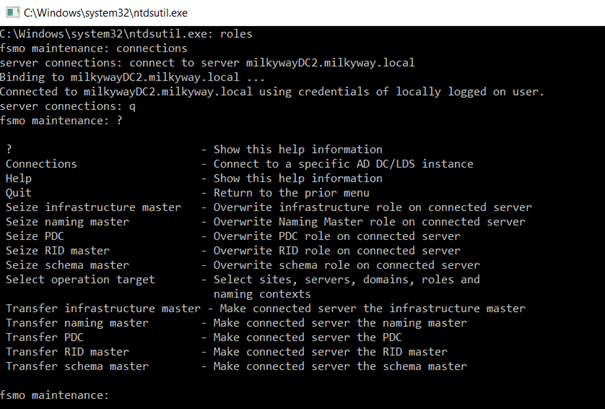
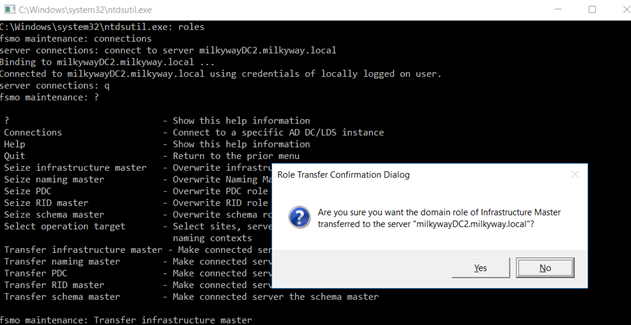
8. To transfer a role, type the corresponding command from the list below and press Enter.
Transfer domain naming master
Transfer infrastructure master
Transfer PDC
Transfer RID master
Transfer schema master
9. When a warning message appears, click Yes to confirm the transfer.
10. At the fsmo maintenance prompt, type q and press Enter to get back to the ntdsutil prompt.
11. To quit the Ntdsutil utility, type q and press Enter.
How Netwrix Can Help
Netwrix Auditor for Active Directory makes it easy to track changes to FSMO roles. Moreover, it empowers you to monitor and report on all changes made to your Active Directory infrastructure, including not just modifications to FMSO roles but any change to AD users, machines, OUs, groups and group membership, permissions, domain trusts, AD sites, AD schema, Group Policy, Exchange objects, settings, and permissions.
The solution offers pre-defined reports and alerts for common security and compliance needs, as well as the ability to create custom reports and alerts based on specific requirements. As a result, you can improve security, streamline troubleshooting, and achieve and prove compliance with regulatory requirements and industry standards.