In the previous article, we discussed the features of Client Access Server (CAS) regarding creation and configuration of certificates. In this part, we will learn, how to configure Outlook Anywhere, CAS URL and the connectors.
Outlook Anywhere Configuration
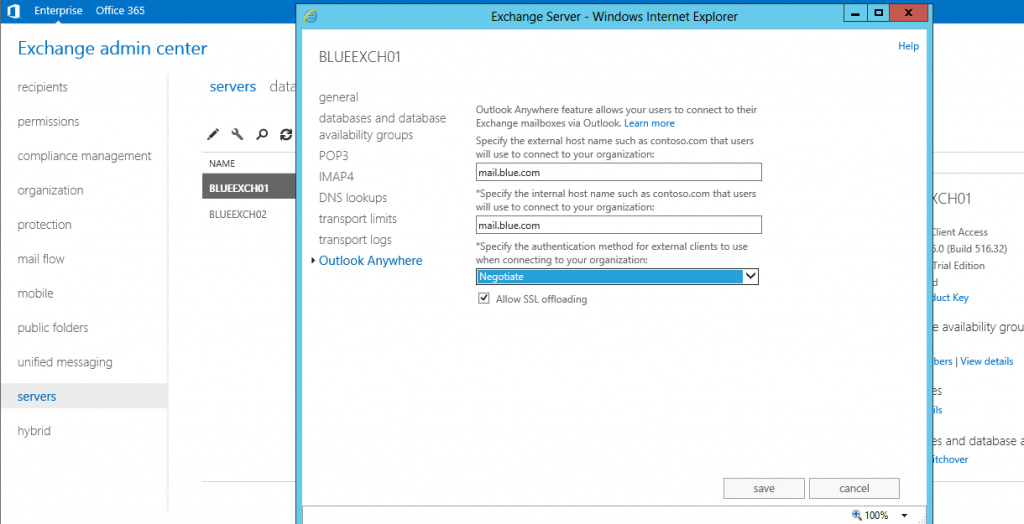
Outlook Anywhere is enabled by default across all CAS, but configuration mistakes may appear sometimes. With the architecture change, connectivity occurs through Outlook Anywhere only. Outlook Anywhere allows users to access email internally and externally without connecting to VPN. To configure the Outlook Anywhere settings, you should access Exchange Admin Center (EAC), navigate to the server properties and configure Outlook Anywhere settings. Make sure, that the external and internal host name is correct. In our case, we will configure mail.blue.com for both internal and external hostnames and leave the authentication method as ‘Negotiation’. The client will try to first authenticate through NTLM and if it fails, then it will try to use basic authentication to access emails.

Click to see full size image
CAS URL Configuration
CAS URLs configuration is very important for proper functioning of client access protocols. The CAS URLs include Auto Discover URL, ECP Virtual Directory, Exchange Web Service Virtual Directory, Offline Address Book Virtual Directory and finally Active Sync Virtual Directory. The user base is both internal and external. These URLs with authentication need to be configured separately for both internal and external. Authentication settings are configured based on the assumption that there are TMG/UAG servers on the DMZ to accept web request from the Internet.
Internal URLs:
$urlpath = Read-Host “Enter the internal Client Access FQDN starting with http:// or https://”
$Servername = Read-Host “Enter the Server FQDN to configure the URL”
Get-ClientAccessServer -Identity $Servername | Set-ClientAccessServer –AutodiscoverServiceInternalUri “$urlpath/autodiscover/autodiscover.xml”
Get-OwaVirtualDirectory -Server $Servername| Set-owavirtualdirectory –internalurl “$urlpath/owa” -FormsAuthentication $false -BasicAuthentication $false -WindowsAuthentication $true
Get-ECPVirtualDirectory -Server $Servername| Set-ecpvirtualdirectory –internalurl “$urlpath/ecp” -FormsAuthentication $false -BasicAuthentication $false -WindowsAuthentication $true
Get-webservicesvirtualdirectory -Server $Servername| Set-webservicesvirtualdirectory –internalurl “$urlpath/ews/exchange.asmx”
Get-oabvirtualdirectory -Server $Servername| Set-oabvirtualdirectory -internalurl “$urlpath/oab”
Get-ActiveSyncVirtualDirectory -Server $Servername | Set-ActiveSyncVirtualDirectory -InternalUrl “$urlpath/Microsoft-Server-ActiveSync”

Click to see full size image
External URLs:
$urlpath = Read-Host “Enter the internal Client Access FQDN starting with http:// or https://”
$Servername = Read-Host “Enter the Server FQDN to configure the URL”
Get-OwaVirtualDirectory -Server $Servername| Set-owavirtualdirectory –Externalurl “$urlpath/owa” -FormsAuthentication $false -BasicAuthentication $false -WindowsAuthentication $true
Get-ECPVirtualDirectory -Server $Servername| Set-ecpvirtualdirectory –Externalurl “$urlpath/ecp” -FormsAuthentication $false -BasicAuthentication $false -WindowsAuthentication $true
Get-webservicesvirtualdirectory -Server $Servername| Set-webservicesvirtualdirectory –Externalurl “$urlpath/ews/exchange.asmx”
Get-oabvirtualdirectory -Server $Servername| Set-oabvirtualdirectory –Externalurl “$urlpath/oab”
Get-ActiveSyncVirtualDirectory -Server $Servername | Set-ActiveSyncVirtualDirectory –Externalurl “$urlpath/Microsoft-Server-ActiveSync”

Click to see full size image
Send and Receive Connector Configuration
During the installation of every CAS role, a “Default frontend <server name>” Receive Connector is created to accept emails and configured to accept anonymous connection as well. In the existing origination Send Connector would already be in place, we just need to add Exchange 2013 mailbox server in the Send Connector and remove legacy servers. In the new environment, we need to create a new Send Connector for all the Internet domains.
Configure DNS Configuration
DNS configuration directs all client requests to Exchange 2013 servers. In our example, we have mail.blue.com, which is the point of communication for all clients to access emails from both internal and external.
CAS plays a major role in Exchange 2013 organization, though its functionality is limited. To balance the load of the traffic across multiple servers, you can use the DNS round robin or Layer 4 load balancing.
Hope this article has helped you enhance your knowledge of configuring Exchange 2013 Client Access Servers in the production environment.
Was this helpful? Please, share your experience in the comments section below!


