An organizational unit (OU) is a container in Active Directory where users, groups and computers, as well as other OUs, can be stored. Each AD domain can have its own organizational unit hierarchy.
In this article, you will learn about OU management and how to use PowerShell scripts to create, move and delete organizational units in AD; link a Group Policy to an OU; and move computer and user accounts to another OU.
PowerShell ISE is the best tool for working with PowerShell scripts. Start the PowerShell ISE tool with administrator privileges by pressing “Windows+R” and entering “runas /profile /user:Administrator PowerShell_ISE” in the Run window. Type in the administrator’s password when prompted. Alternatively, you can right-click the PowerShell ISE icon and choose the “Run as administrator” option.
To work with AD and its objects, you need to import the Active Directory module for Windows PowerShell. In Microsoft Windows Server 2008 R2, you need to enable this module by running the following command:
Import-Module ActiveDirectory
In Microsoft Windows Server 2012 and later, this module is enabled by default.
Create OUs in an Active Directory Domain with PowerShell
You can create a new organizational unit in Active Directory by using the New-ADOrganizationalUnit cmdlet and specifying the name of a new OU object. By default, PowerShell will create the OU in the domain root. The command below will create an OU named “Regions” on the DC:
New-ADOrganizationalUnit “Regions”
If you need a different OU LDAP path, specify its distinguished name using the –Path cmdlet parameter:
New-ADOrganizationalUnit “Regions” –Path “OU=Managers,DC=Enterprise,DC=com”

Move an OU to Another LDAP Address
If you need to move an OU to another location, use Move-ADObject cmdlet. Note that the target OU must not be protected from accidental deletion. If it is, use this command to remove that protection:
Set-ADOrganizationalUnit -Identity "OU=Regions,OU=Managers,DC=Enterprise,DC=Com" -ProtectedFromAccidentalDeletion $False
Now you can move the OU to another location:
Move-ADObject -Identity "OU=Regions,OU=Managers,DC=Enterprise,DC=Com" -TargetPath "OU=IT,DC=Enterprise,DC=Com"
Rename an OU
To rename an organizational unit, use the Rename-ADObject cmdlet. The -Identity parameter specifies the Active Directory object to rename and requires either its distinguished name (DN) or GUID.
This command renames the “Regions” OU to “Districts”:
Rename-ADObject -Identity "OU=Regions,OU=IT,DC=enterprise,DC=COM" -NewName Districts
Alternatively, you can use the Get-ADOrganizationalUnit cmdlet with the -Filter parameter; it does not require the whole LDAP path to the OU. However, that cmdlet will search the whole AD and the action will be applied to all OUs that contain the search term in their names:
Get-ADOrganizationalUnit -Filter "Name -eq 'Regions'" | Rename-ADObject -NewName Countries
Apply a Group Policy to an OU
To assign a Group Policy to an OU, use the New-GPLink cmdlet, which basically makes a link between the specified Group Policy object (GPO) and the OU. You can specify any of the following properties for the link:
- Enabled — If the link is enabled, the settings of the GPO are applied when Group Policy is processed for the site, domain or OU.
- Enforced — If the link is enforced, it cannot be blocked at a lower-level container.
- Order — The order specifies the precedence of the GPO settings.
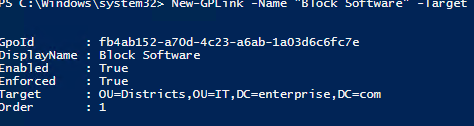
The following command links the “Block Software” GPO to the “Districts” OU with the link both enabled and enforced:
New-GPLink -Name "Block Software" -Target "OU=Districts,OU=IT,dc=enterprise,dc=com" -LinkEnabled Yes -Enforced Yes
Move Computers and Users to a New OU
Once you’ve created an OU and optionally linked it to a GPO, it’s time to fill it up with users and computers. The PowerShell Move-ADObject cmdlet moves any object or set of objects (such as a user, a computer, a group or another OU) to a different OU. The -Identity parameter specifies which Active Directory object or container to move. Note that you need to enter the full LDAP path or SID of the object; you cannot use its SamAccountName. The below example demonstrates how to move a user (John Brown) to the “Districts” OU:
Move-ADObject -Identity "CN=John Brown,CN=Users,DC=enterprise,DC=com" -TargetPath "OU=Districts,OU=IT,DC=Enterprise,DC=Com"
Use the same syntax to move computer objects. The following command will move computer “R07GF” to the “Computers” container:
Move-ADObject -Identity "CN=R07GF,OU=CEO,DC=enterprise,DC=com" -TargetPath "CN=Computers,DC=Enterprise,DC=Com
Move AD Computers and Users to Another OU Using a CSV or TXT File
If you have a predefined list of objects to move, you can save it as a CSV file and then import that file to Active Directory. The CSV list should be in the following format:
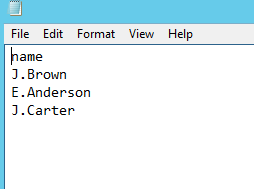
Use this PowerShell script for moving AD user accounts listed in a CSV file:
# Specify target OU. This is where users will be moved.
$TargetOU =  "OU=Districts,OU=IT,DC=enterprise,DC=com"
# Specify CSV path. Import CSV file and assign it to a variable.
$Imported_csv = Import-Csv -Path "C:tempMoveList.csv"

$Imported_csv | ForEach-Object {
     # Retrieve DN of user.
     $UserDN  = (Get-ADUser -Identity $_.Name).distinguishedName
     # Move user to target OU.
     Move-ADObject  -Identity $UserDN  -TargetPath $TargetOU

 }
To move AD computer accounts listed in a text file, use the following PowerShell script:
# Specify path to the text file with the computer account names.
$computers = Get-Content C:TempComputers.txt

# Specify the path to the OU where computers will be moved.
$TargetOU   =  "OU=Districts,OU=IT,DC=enterprise,DC=com"
ForEach( $computer in $computers){
    Get-ADComputer $computer |
    Move-ADObject -TargetPath $TargetOU

}
Remove an OU from AD
The Remove-ADOrganizationalUnit cmdlet removes an OU. The OU must not be protected from accidental deletion. You can remove the accidental deletion option for every OU that contains “Continents” in its name using the Get-ADOrganizationalUnit and Set-ADOrganizationalUnit cmdlets as follows:
Get-ADOrganizationalUnit -filter "Name -eq 'Continents'" | Set-ADOrganizationalUnit -ProtectedFromAccidentalDeletion $False
Use the following command to remove every OU that contains “Continents” in its name from AD:
Get-ADOrganizationalUnit -filter "Name -eq 'Continents'" | Remove-ADOrganizationalUnit –Recursive
You will be prompted to confirm the deletion:

Note that the -Recursive parameter removes both the OU and all of its child objects. The child objects will be deleted even if protection from deletion is on for them.
Conclusion
Now that you’ve learned how to manage OUs in Active Directory using PowerShell scripts, you can automate a variety of simple operations related to OU management. Before you try out these commands, be sure enable the Active Directory Recycle Bin feature so you can easily roll back any errant deletions. It’s also smart to carefully track all changes to your organizational units.