Before a user can log into a computer and access network and domain-based resources, that computer must be a member of the Active Directory environment. In this guide, you’ll find out how to automate daily tasks related to computer accounts, such how to easily create, rename and remove accounts.
In all, you’ll learn how to use PowerShell to perform the following computer account management tasks:
- Join a Computer to a Domain
- Join Multiple Computers to a Domain
- Remove a Computer from a Domain with PowerShell
- Create a Computer Object in AD
- Create Computer Accounts from a CSV File
- Delete a Computer from AD
- Delete Computer Accounts Using a List
- Remove Stale Computer Accounts in Active Directory with PowerShell
- Rename a Computer
- Rename a Computer and Join It to a Domain
- Disable an AD Computer Account
- Disable Computer Accounts using a List
- Reset an AD Computer Account
PowerShell ISE is the best tool for working with PowerShell scripts. Start the PowerShell ISE tool with administrator privileges by pressing “Windows+R” and entering “runas /profile /user:Administrator PowerShell_ISE” in the Run window. (Alternatively, you can right-click on the PowerShell ISE icon and choose the “Run as administrator” option.) Type in the administrator’s password when prompted.
Before you can work with AD and its objects, you need to import the Active Directory module for Windows PowerShell. In Microsoft Windows Server 2008 R2, you need to enable this module by running the following command:
Import-Module ActiveDirectory
In Microsoft Windows Server 2012 and later, this module is enabled by default.
Join a Computer to a Domain
The most common task is joining a computer to a domain controller. To join a PC to an Active Directory domain, run the following PowerShell script locally:
$dc = "ENTERPRISE" # Specify the domain to join.
$pw = "Password123" | ConvertTo-SecureString -asPlainText –Force # Specify the password for the domain admin.
$usr = "$dcT.Simpson" # Specify the domain admin account.
$creds = New-Object System.Management.Automation.PSCredential($usr,$pw)
Add-Computer -DomainName $dc -Credential $creds -restart -force -verbose # Note that the computer will be restarted automatically.
The computer will restart and then join the domain; it will be added to the default container.
To join a computer to a DC remotely, you need to enhance this script this way:
$dc = "ENTERPRISE"
$pw = "Password123" | ConvertTo-SecureString -asPlainText -Force
$usr = "$dcT.Simpson"
$pc = "R07GF" # Specify the computer that should be joined to the domain.
$creds = New-Object System.Management.Automation.PSCredential($usr,$pw)
Add-Computer -ComputerName $pc -LocalCredential $pcadmin -DomainName $dc -Credential $creds -Verbose -Restart -Force
The $pc variable and –LocalCredential parameter are used to authenticate the computer to the domain. Note that in order to use this method, you must disable the firewall on the local computer.
Join Multiple Computers to a Domain
You can add more than one computer to the domain by either specifying them in the command line as a comma-delimited list or importing their names from a text file.
Here’s how to specify the computers in a comma-delimited list:
$dc = "ENTERPRISE"
$pw = "Password123" | ConvertTo-SecureString -asPlainText -Force
$usr = "$dcT.Simpson"
$pc = "WKS034, WKS052, WKS057" # Specify the computers that should be joined to the domain.
$creds = New-Object System.Management.Automation.PSCredential($usr$pw)
Add-Computer -ComputerName $pc -LocalCredential $pcadmin -DomainName $dc -Credential $creds -Restart -Force
And here’s how to use a text file with the list of computers that should be joined:
$dc = "ENTERPRISE"
$pw = "Password123" | ConvertTo-SecureString -asPlainText -Force
$usr = "$dcT.Simpson"
$pc = Get-Content -Path C:Computers.txt # Specify the path to the computers list.
$creds = New-Object System.Management.Automation.PSCredential($usr,$pw)
Add-Computer -ComputerName $pc -LocalCredential $pcadmin -DomainName $dc -Credential $creds -Restart -Force
Remove a Computer from a Domain with PowerShell
To remove a computer from a domain remotely, use the Remove-Computer cmdlet. Here, we’re removing a computer from a domain, so no local credentials are needed and we can skip the ?LocalCredential parameter:
$dc = "ENTERPRISE"
$pw = "Password123" | ConvertTo-SecureString -asPlainText -Force
$usr = "$dcT.Simpson"
$pc = "R07GF"
$creds = New-Object System.Management.Automation.PSCredential($usr,$pw)
Remove-Computer -ComputerName $pc -Credential $creds –Verbose –Restart –Force

To remove multiple computers using a list in a TXT file, use the script above for joining computers to a DC, replacing the Add-Computer cmdlet with Remove-Computer. Note that you will still need domain admin credentials to complete this unjoin operation.
Create a Computer Object in AD
To create a computer object, use the New-ADComputer cmdlet. For example, execute the following cmdlet parameters to create a computer object with “WKS932” as its name and the default LDAP path value:
New-ADComputer –Name “WKS932” –SamAccountName “WKS932”
Create Computer Accounts from a CSV File
If you have a list of computers that should be imported into Active Directory, save the list to a CSV file with the heading “computer” and the list of computer names in the column below it. Run the following PowerShell script on your domain controller to add computers from the CSV file, making sure you have the “Path” and “File” variables set correctly:
$File="C:scriptsComputers.csv" # Specify the import CSV position.
$Path="OU=Devices,DC=enterprise,DC=com" # Specify the path to the OU.
Import-Csv -Path $File | ForEach-Object { New-ADComputer -Name $_.Computer -Path $Path -Enabled $True}
Delete a Computer from AD
To delete a computer account from AD, use the Remove-ADObject cmdlet. The -Identity parameter specifies which Active Directory computer to remove. You can specify a computer by its distinguished name, GUID, security identifier (SID) or Security Accounts Manager (SAM) account name.
Remove-ADObject -Identity "WKS932"
You will be prompted to confirm the deletion.
Delete Computer Accounts Using a List
If you have a text file with a list of old computers, you can streamline the task of removing them using PowerShell. The following script will read the computer names from a TXT file and delete the corresponding accounts via a chain of commands, or pipeline:
Get-Content C:scriptscomputersfordeletion.txt | % { Get-ADComputer -Filter { Name -eq $_ } } | Remove-ADObject -Recursive
Remove Stale Computer Accounts from Active Directory with PowerShell
Stale accounts in Active Directory can be compromised, leading to security incidents, so it is critical to keep an eye on them. This PowerShell script will query Active Directory and return all computers that have not been logged in to for the past 30 days; you can easily change this default value in the script. It also will remove those accounts to keep your AD clean.
$stale = (Get-Date).AddDays(-30) # means 30 days since last logon, can be changed to any number.

Get-ADComputer -Property Name,lastLogonDate -Filter {lastLogonDate -lt $stale} | FT Name,lastLogonDate

Get-ADComputer -Property Name,lastLogonDate -Filter {lastLogonDate -lt $stale} | Remove-ADComputer
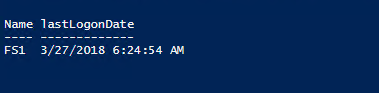
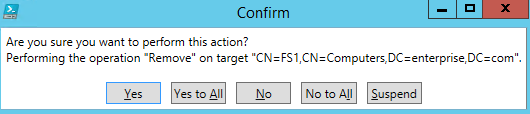
There is one computer, FS1, that has been not been logged on to for more than 30 days. The system will prompt for confirmation before deleting it from the domain:
If you want to disable, rather than delete, the inactive computer accounts, replace the Remove-ADComputer cmdlet with Set-ADComputer and -Enabled $false parameter and value.
Rename a Computer
To change a computer name, use the Rename-Computer cmdlet. Note that the computer must be online and connected to Active Directory.
Rename-Computer –ComputerName "FS1" -NewName "FS2"
If you want to run this script locally, it will look like this:
Rename-Computer -NewName "newname" -DomainCredential "DomainAdministrator"
Rename a Computer and Join It to a Domain
You can improve the renaming script by joining the computer to the domain and putting it into the specified OU simultaneously. The script should be run on the target machine, not on the domain controller.
$NewComputerName = "Server3" # Specify the new computer name.

$DC = "contoso.com" # Specify the domain to join.

$Path = "OU=TestOU,DC=contoso,DC=com" # Specify the path to the OU where to put the computer account in the domain.
Add-Computer -DomainName $DC -OUPath $Path -NewName $NewComputerName –Restart –Force
The script will prompt for the credentials of an account that has permissions to join computers to the domain, and then the computer will be renamed, restarted and joined to the domain.
Disable an AD Computer Account
Use the Disable-ADAccount cmdlet to disable Active Directory user, computer and service accounts. If you specify a computer account name, remember to append a dollar sign ($) at the end of the name; otherwise, you’ll get an error after script execution.
Disable-ADAccount -Identity fs1$
Disable Computer Accounts using a List
You can also disable computer accounts in bulk using a list in a text file:
$Pclist = Get-Content C:scriptsComputer.txt # Specify the path to the computers list.
Foreach($pc in $Pclist)
{
Disable-ADAccount -Identity "$pc"
Get-ADComputer -Identity "$pc" | Move-ADObject -TargetPath “OU=Disabled Computers,DC=enterprise,DC=com”
}
Reset an AD Computer Account
Like a user account, a computer account interacts with Active Directory using a password. But for computer accounts, a password change is initiated every 30 days by default and the password is exempted from the domain’s password policy. Password changes are driven by the client (computer), not AD.
Computer credentials usually unknown to the user because they are randomly set by the computer. But you can set your own password; here is a PowerShell script for doing so:
$pc = read-host –Prompt “Input computer name to reset“ # Specify the computer name.
$pw = read-host –Prompt “Input random characters for temp password“ –AsSecureString # Specify the password.
Get-ADComputer $pc | Set-ADAccountPassword –NewPassword:$pw -Reset:$true
Conclusion
Now you have learned how to manage Active Directory computer accounts with PowerShell. You can enhance all these scripts on your own to make them fit to your purposes.
Remember that it’s critical to closely track all changes to computer accounts, so you can quickly spot any unwanted modifications and respond appropriately.