The Active Directory GUI management tools, like Active Directory Users and Computers (ADUC), are fine for performing operations against single accounts. But when you need to deal with multiple AD accounts, PowerShell is a more flexible tool. In this post, I’ll show you how to use PowerShell to lock, unlock, enable and disable AD user and computer accounts individually and in bulk using comma-delimited files.
Before you can run the Active Directory PowerShell cmdlets, you have to have the Active Directory module for PowerShell installed on your computer. If you are using Windows 10, download the Remote Server Administration Tools (RSAT) for Windows 10 from Microsoft’s website here and then install it. Then enable the AD PowerShell module feature by opening a PowerShell prompt with local administrator privileges and running the Enable-WindowsOptionalFeature cmdlet as shown here:
Enable-WindowsOptionalFeature -Online -FeatureName RSATClient-Roles-AD-Powershell
Optionally, you can also update the help files using the Update-Help cmdlet:
Update-Help -Module ActiveDirectory -Verbose -Force
Be sure to close the PowerShell prompt, since you won’t need the elevated privileges for anything else. The instructions below can be run in the security context of any user that has permissions to perform user account operations in Active Directory, like unlocking user accounts and enabling and disabling user, computer and service accounts.
How to find locked Active Directory accounts
You can’t lock Active Directory accounts using PowerShell or the GUI; indeed, there is no reason you should want to do that. But you can search for locked out user accounts with the help of the Search-ADAccount cmdlet. Here I pipe the results of the Search-ADAccount cmdlet to the Select-Object cmdlet to display just the Name and SamAccountName attributes of each locked account:
Search-ADAccount -LockedOut -UsersOnly | Select-Object Name, SamAccountName
How to unlock Active Directory accounts
You can easily unlock user accounts using the Unlock-ADAccount cmdlet. Use the -Identity parameter to specify which account to unlock; you can supply its distinguished name, security identifier (SID), globally unique identifier (GUID) or Security Account Manager (SAM) account name. Here I’m unlocking the account RussellS:
Unlock-ADAccount -Identity RussellS
How to enable Active Directory accounts
If an account object has been disabled for whatever reason, you can enable it using the Enable-ADAccount cmdlet:
Enable-ADAccount -Identity RussellS
How to disable Active Directory accounts
Similarly, the Disable-ADAccount cmdlet is used to disable AD accounts:
Disable-ADAccount -Identity RussellS
Disabling users from a CSV file
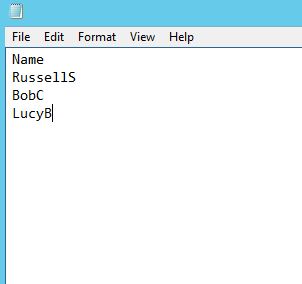
You can also disable all Active Directory user accounts listed in a comma-delimited (.csv) text file. The file must contain a header and then a list of user names, one in each row. My CSV file has only one column (with the header “Name”), so my comma-delimited file has no commas! If your CSV file has more than one column, those additional columns will simply be ignored by the script.

I start by importing the CSV file’s contents as an object ($users), and then I use a ForEach loop to disable the user on each line of the text file. Here’s the PowerShell script:
$users=Import-CSV c:tempusers.csv
ForEach ($user in $users)
{
     Disable-ADAccount -Identity $($user.name)
}
To check the results, use the Search-ADAccount cmdlet:
Search-ADAccount -AccountDisabled -UsersOnly | Select-Object Name, SamAccountName
Disabling computer accounts from a CSV file
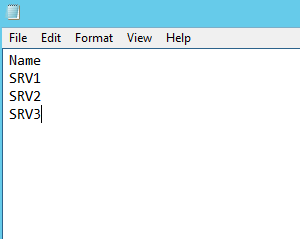
The PowerShell script for disabling computer accounts listed in a CSV file is almost identical. The main difference is that I have to add a dollar sign ($) to the end of the -Identity parameter value to designate that I want to disable a computer object and not a user account object. I also change the variable and file names to more appropriate for computer accounts.
The CSV file looks like this:

And here is the script:
$computers=Import-CSV c:tempcomputers.csv
ForEach ($computer in $computers)
{
     Disable-ADAccount -Identity "$($computer.name)$"
}
To check the results, use the Search-ADAccount cmdlet:
Search-ADAccount –AccountDisabled –ComputersOnly | Select-Object Name, SamAccountName
Disabling inactive users
The Search-ADAccount and Disable-ADAccount cmdlets can be used together to disable inactive user accounts. I’ll give two examples. First, I’ll create a new timespan object ($timespan) and set it to ninety days, and then I’ll use it as the value of the -TimeSpan parameter to disable accounts that have not been active for the past three months. The -AccountInactive parameter requires that the domain functional level be Windows Server 2003 or higher.
$timespan = New-Timespan -Days 90
Search-ADAccount -UsersOnly -AccountInactive -TimeSpan $timespan | Disable-ADAccount
Another option is to use the -DateTime parameter to return accounts that have been inactive since a given date. This script disables all accounts not active since June 3, 2018:
Search-ADAccount -UsersOnly -AccountInactive -DateTime ‘6/3/2018’ | Disable-ADAccount
It’s worth noting that because of the way Active Directory synchronizes the LastLogOnDate attribute, results returned when specifying the –AccountInactive parameter with the Search-ADAccount cmdlet can be inaccurate by as much as 9–14 days.
As you can see, managing the status of Active Directory accounts with PowerShell is straightforward. Because PowerShell is object-oriented, it is easy to create objects that contain the data you want to process and then pass them on to other cmdlets that perform the required actions.


