Using Windows PowerShell to manage Office 365 may seem odd at first. After all, cloud solutions promise simplicity and ease of use — adjectives rarely used in connection with Windows PowerShell. But bear with me. In this article, I’ll show you the ten most useful Office 365 PowerShell cmdlets for system administrators. Perhaps after reading these instructions, you’ll agree that PowerShell can be a valuable tool, even for cloud-based systems.
1. Connecting to an Office 365 instance with PowerShell
First, we need to install the Office 365 module for Windows PowerShell and connect to the Office 365 instance. Take the following steps:
1. Download and install the Microsoft Online Services Sign-In Assistant for IT Professionals RTW.
2. Import the Online Services PowerShell module for Microsoft Azure Active Directory and Office 365:
Install-Module -Name AzureAD
Install-Module -Name MSOnline
3. Enter your Office 365 admin credentials:
$Cred = Get-Credential
4. Create a remote PowerShell session:
$O365 = New-PSSession -ConfigurationName Microsoft.Exchange -ConnectionUri https://outlook.office365.com/powershell-liveid/ -Credential $Cred -Authentication Basic -AllowRedirection
5. Import the session commands into the local Windows PowerShell session:
Import-PSSession $O365
6. Connect to all Office 365 services:
Connect-MsolService –Credential $O365
Once we have imported the modules for Windows PowerShell, we are ready to manage our Office 365 instance.
We can also connect to Microsoft Exchange Online and Microsoft SharePoint Online separately. Connecting to Exchange Online with PowerShell is basically the same as connecting to Office 365:
$Cred = Get-Credential

$Session = New-PSSession -ConfigurationName Microsoft.Exchange -ConnectionUri https://outlook.office365.com/powershell-liveid/ -Credential $Cred -Authentication Basic –AllowRedirection
Connecting to SharePoint Online is a little bit different. In order to manage your SharePoint Online tenant, you first need to download and install the SharePoint Online Management Shell feature. Then run the following PowerShell script:
$admin="Admin@enterprise.onmicrosoft.com"
$orgname="enterprise"
$userCred = Get-Credential -UserName $admin -Message "Type the password."
Connect-SPOService -Url https://$orgname-admin.sharepoint.com -Credential $userCred
3. Getting a list of available Office 365 PowerShell cmdlets
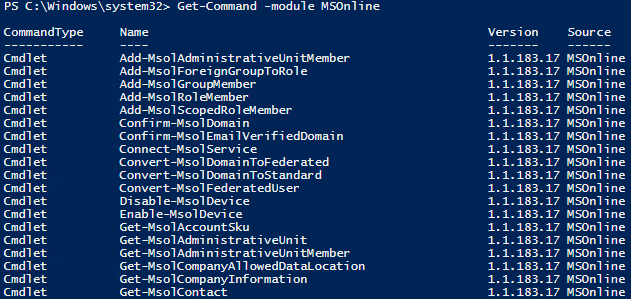
To get a list of all available Office 365 PowerShell commands, we need to run the Get-Command cmdlet:
Get-Command -module MSOnline

We can also get the list of cmdlets for Azure Active Directory:
Get-Command -module AzureAD
4. Getting a list of all Office 365 users with PowerShell
If you need to provide a list of Office 365 users and licenses, use the Get-MsolUser cmdlet. It’ll retrieve all users with a valid license in the Office 365 tenant, along with the DisplayName, City, Department and ObjectID parameters.
Get-MsolUser | Select DisplayName, City, Department, ObjectID
To see the number of account licenses, you need to run the following cmdlet:
Get-MsolAccountSku
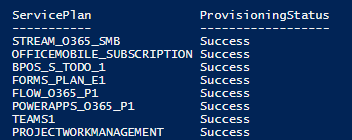
To list the available services, run the following script:
Get-MsolAccountSku | select -ExpandProperty ServiceStatus

5. Creating a new user in Office 365 with PowerShell
To create a new user, we use the New-MsolUser command:
New-MsolUser -UserPrincipalName JSmith@enterprise.onmicrosoft.com -DisplayName "John Smith" -FirstName “John” -LastName “Smith”
The system will output the user’s password and license status data.
6. Removing a user from all sites with PowerShell
To remove a user from all sites at once, we use the following command:
Get-SPOSite | ForEach {Remove-SPOUser -Site $_.Url -LoginName " JSmith@enterprise.onmicrosoft.com"}
7. Changing a password in Office 365 with PowerShell
If you need to change the password for an account, use the Set-MsolUserPassword cmdlet. You can either specify a new password as in the example below, or omit the -NewPassword parameter to have the system automatically generate a random password.
Set-MsolUserPassword -UserPrincipalName JSmith@Netwrixqcspa.onmicrosoft.com -NewPassword P@SSw0rd!
8. Managing group membership in Office 365 with PowerShell
We can also manage Office 365 groups using PowerShell cmdlets. To retrieve a list of all groups in Office 365, simply use the command Get-MsolGroup. To add users to a group, use the Add-MsolGroupMember command:
Add-MsolGroupMember -GroupObjectId 5b61d9e1-a13f-4a2d-b5ba-773cebc08eec -GroupMemberObjectId a56cae92-a8b9-4fd0-acfc-6773a5c1c767 -GroupMembertype user
GroupObjectId is the hexadecimal ID of the group, which you can get from the Get-MsolGroup command. GroupMemberObejctId is the user object ID, which you can find by running this command:
Get-MsolUser | Select ObjectID.
To remove a user from a group, use the Remove-MsoGroupMember cmdlet.
We can also create a SharePoint site collection using PowerShell:
New-SPOSite -Url "https://enterprise.sharepoint.com/sites/NewSite" -Owner "JSmith@enterprise.onmicrosoft.com" -StorageQuota "100" -Title "New Site"
10. Creating reports in Office 365 with PowerShell
PowerShell is a great tool for making different reports. Here are some useful Office 365 reports done via PowerShell:
- Details about all mailboxes:
Get-mailbox | get-MailboxStatistics
- A list of all mailboxes that haven’t been logged into during the last 30 days:
Get-Mailbox –RecipientType 'UserMailbox' | Get-MailboxStatistics | Sort-Object LastLogonTime | Where {$_.LastLogonTime –lt ([DateTime]::Now).AddDays(-30) } | Format-Table DisplayName, LastLogonTime
- A report on the highest volume senders and recipients:
Get-MailTrafficTopReport
- A report on all groups and their members:
function Get-AllO365Members
{
    Try
    {
     $O365Groups=Get-UnifiedGroup
        foreach ($O365Group in $O365Groups)
        {
            Write-Host "Group Membership: " $O365Group.DisplayName -ForegroundColor Green
            Get-UnifiedGroupLinks –Identity $O365Group.Identity –LinkType Members
            Write-Host
        }
    }
    catch [System.Exception]
    {
        Write-Host -ForegroundColor Red $_.Exception.ToString()
    }
}
Get-AllO365Members
Note that most of the reporting cmdlets were deprecated in January 2018 and replaced by the new MS Graph Reporting API. Therefore, some reports are now available only in the Office 365 Security & Compliance Center.
As you can see, Office 365 management with PowerShell is fast and easy, as it is in Microsoft Windows Server. Don’t forget to audit all the changes you make to your Office 365 environment; it will help you troubleshoot and recover from issues faster. To learn how to configure native auditing in your Office 365 environment, take a look at our Exchange Online Auditing Quick Reference Guide and Exchange Online Mailbox Auditing Quick Reference Guide. If you want actionable intelligence about what’s going on in your Office 365 environment, along with flexible reporting, proactive alerting Google-like search and much more, request a free trial of Netwrix Auditor for Office 365.


