PowerShell variables act as containers for data that can be created, modified, and used in scripts or sessions. They support multiple types, including strings, integers, arrays, and hashtables, and can be scoped as local, global, or script-based. Administrators can set descriptions, visibility, and options, list or clear variables, and export their contents. Proper use of variables simplifies automation and scripting efficiency.
Introduction
A variable in PowerShell is a container that is assigned a value. holds. Think of them as named boxes where you can place information to use later. The value of a variable can be accessed simply by referencing the variable, and it can be changed at any time by reassigning the variable with a new value. Variables are very handy for keeping track of data in scripts or during a PowerShell session.
PowerShell Variable Examples
Let’s dive into some of the most useful ways to use variables in PowerShell.
Create and Set Variables in PowerShell
Variable names in PowerShell begin with a dollar sign ($), and they are not case-sensitive, so, for instance $VAR and $var refer to the same variable. A variable name can contain letters, numbers and underscores. While they can contain spaces and other special characters, it is best to avoid those.
Once you have chosen a name for a variable in PowerShell, you can create it and assign it a value in one command. For example, if you want create a variable named $Greeting and assign it the string value Hello, World, you would use this command:
$Greeting = "Hello, World"
After this command, whenever you type $Greeting, PowerShell will substitute the value you assigned to that variable, as shown below.

The double quotes (“ ”) in the previous example indicate that the value is a string. Here is how you can create a variable and assign it integer value:
$var1 = 75

$var2 = 25
You can perform arithmetic operations with number variables, as shown here:

You can also combine strings using the plus-sign (+) operator:
$var10 = “Complete”

$var11 = “Visibility

$var12 = $var10 + $var11

If you add a number to a string, the number automatically becomes a string:
$var1 = “Netwrix”

$var2 = 2023

Set or Check a Variable’s Type
Variables in PowerShell can store multiple data types, including strings, integers and more complex objects like arrays. When you assign a value to a variable, PowerShell automatically determines the data type based on the value. This is known as dynamic typing. As noted above, strings require quotes.
Here are some examples:
$var1 = "Hello"   # The type of $var1 is String

$var2 = 25        # The type of $var2 is Integer

$var3 = Get-Date # The type of $var3 is DateTime
To find out what type a variable is, we use the GetType parameter:
$var5 = “Netwrix”
$var5.GetType () .FullName

The most common variable types include the following:
- String: Text (you can declare a string by enclosing text within quotation marks)
- Integer: A whole number
- Double: A number that includes a decimal point
- Boolean: A truth value, either $True or $False
- DateTime: A date and time
- Array: A data structure that holds a collection of items of the same or different types. The items are stored sequentially and can be accessed by an index. Here is an example of how to declare an array:
$myArray = "apple", "orange", "cherry"
- HashTable: A data structure that comprises an unordered collection of key-value pairs. It’s like a dictionary where you use a unique key to store and retrieve each value. This makes hashtables excellent for lookups and scenarios where you need to easily search for values. To create a hashtable, you use @{}. Inside the curly brackets, you specify each pair as the key followed by an equal sign (=) and then the value, as illustrated in this example:
$myHashtable = @{

    "Fruit1" = "Apple"

    "Fruit2" = "Orange"

    "Fruit3" = "Cherry"

}
Define a Variable’s Scope
Scope is the visibility and accessibility of a variable. PowerShell has several different scopes:
- Local — The current scope
- Global —The scope that’s in effect when PowerShell starts or when you create a new session or runspace
- Script — The scope that’s created while a script runs
Variables are specified in PowerShell as follows:
$global:Var1 = "Global Variable"

$script:Var2 = "Script Variable"

$local:Var3 = "Local Variable"
Public vs. Private Variables
The Visibility property of a variable is related to scope; it determines whether you can see the item outside the script in which it was created. The Visibility property can have a value of Public or Private. Private variables can be viewed and changed only in the scope in which they’re created. Public variables are accessible from any scope.
List (Get) Variables in Current Scope
You can list all current variables in a PowerShell session by using the Get-Variable cmdlet, which retrieves all variables in the current scope. The example below lists some of the variables used in earlier examples.

Print a Variable
You can output a variable a .txt, .csv or HTML file.
To write to a .txt file, use the Out-File command:
$var5 = “Hello World”

$var5 | Out-File c:scriptsHello_World.txt
To export data to a .csv file, use the Export-Csv command:
$var6 = Get-Process

$var6 | SELECT Name, Path | Export-Csv -Path c:scriptsprocesses.csv

And to write to an HTML file, use the ConvertTo-Html command:
$var6 = Get-Process

$var6 | ConvertTo-HTML -Property Name, Path>C:scriptprocesses.html
To read a file that you exported, use the Get-Content cmdlet:
Get-Content c:\scripts\processes.csv

Clear a Variable
The Clear-Variable cmdlet is used to remove the value from a variable but leaves the variable object itself. When a variable is cleared, the variable still exists, but its value is $null. In the example below, a variable is created and then cleared, with each action confirmed.

Remove a Variable
The Remove-Variable cmdlet is used to delete a variable and its value.
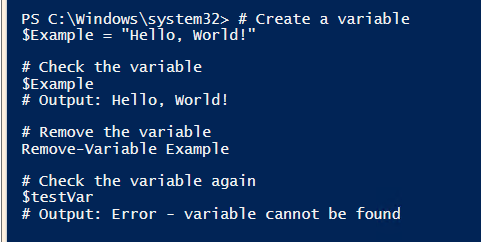
In the example below, a variable called Example is created and assigned the string “Hello World!”. The variable is then deleted by the Remove-Variable cmdlet. Then the script checks the variable and returns an error because it no longer exists.

Note that the Remove-Variable cmdlet removes only the variable in the current scope. If there is a variable with the same name in a parent scope, that variable will not be affected. Similarly, Remove-Variable does not affect any child scopes that might contain a variable with the same name.
The difference between the Clear-Variable and the Remove-Variable commands is that clearing the variable deletes only the value of the variable, while removing it deletes the variable itself.
Parameters
The cmdlets discussed above take various parameters. Let’s review the most useful parameters and how they function.
Description
PowerShell variables have a Description property that you can set using the Set-Variable cmdlet with the Description parameter:
Set-Variable -Name "myVariable" -Description "This is my sample variable"
Exclude
To exclude certain variables when you are using the Get-Variable cmdlet, use the Exclude parameter and specify the names variables to exclude. In the example below, we create 4 variables. We then used the Get-Variable -Exclude command to exclude two of them.
$Var1 = "Test1"

$Var2 = "Test2"

$Var3 = "Test3"

$OtherVar = "Other"

Get-Variable -Exclude Var1, OtherVar
(To include only specific variables, use the Name parameter as described below.)
Force
You can use the Force parameter with some commands, such as Set-Variable and Remove-Variable, to override any restrictions that might prevent the command from completing.
For example, normally any attempt to change the value of a read-only variable will result in an error, as shown below:

However, you can override this behavior with the Force parameter:

Name
You can use the Name parameter to refer to a variable by its name without the dollar sign. In particular, you can use it to get only variables whose names match a certain pattern. For instance, using the cmdlet below, you can retrieve only variables whose names start with “Net”:
Get-Variable -Name "NET*"
The asterisk (*) is a wildcard character that stands for any number of additional characters.
Option
You can specify the Option parameter with the Set-Variable cmdlet. Available values for this parameter include:
- None (default): The variable behaves as a normal variable.
- ReadOnly: The variable cannot be changed or deleted.
- Constant: The variable cannot be changed or deleted, even with the Force parameter.
- Private: The variable is available only in the current scope.
- AllScope: The variable is copied to any new scopes that are created.
An example of the ReadOnly option is shown here:

PassThru
By default, most cmdlets that perform an action (like Set-Variable, New-Item and Remove-Item) don’t output anything; they just silently complete the action. However, if you use the PassThru parameter, the cmdlet will output an object that represents the item that you manipulated with the cmdlet.
Here is an example of using PassThru with Set-Variable:

WhatIf
You can use the WhatIf parameter cmdlets that make changes, such as Set-Variable, Remove-Variable or Clear-Variable, to see what would happen if you were to run the cmdlet, without making any actual changes. This is useful if you’re uncertain about what a cmdlet would do. An example is shown below:

Conclusion
With a solid understanding of how PowerShell variables can be created and manipulated, you can create PowerShell scripts to assist you in task automation, system administration, software development and more.
How Netwrix Can Help
Need to secure your Active Directory and Entra ID (Azure AD) environment more efficiently and effectively? Consider Netwrix Directory Manager. Its automated group and user management capabilities reduce the risk of data breaches while eliminating time-wasting manual administrative tasks.
Netwrix Directory Manager empowers you to:
- Automate user provisioning and deprovisioningfromyour HR information system (HRIS) to Active Directory, Entra ID and SCIM-enabled applications, thereby enabling new employees to quickly be productive and slashing the risk of adversaries taking over stale identities.
- Automatically update directory groups based on changes like an employee’s promotion or shift to another role, as recorded in your HRIS. This automation keeps access rights updated in near real time as required for security and compliance, while saving your IT team time.
- Delegate group and user management to the people who know who should have access to what. Simple workflows enable line-of-business owners to review their groups and approve or deny user access requests, reducing the risk of having over-privileged groups and users in your directory.
- Keep the directory clean and easier to manage with automated user creation, expiration and deletion.
- Maintain and prove compliance with regulations and standards with deep insight, effective automation and clear reporting on groups and members.


