Auditing Microsoft SQL Server is critical to identifying security issues and breaches. In addition, auditing SQL Server is a requirement for compliance with regulations like PCI DSS and HIPAA.
The first step is to define what to audit. For example, you might audit user logins, server configuration, schema changes and audit data modifications. Next, you have choose which security auditing features to use. Useful features include the following:
- C2 Auditing
- Common Compliance Criteria
- Login Auditing
- SQL Server Auditing
- SQL Trace
- Extended Events
- Change Data Capture
- DML, DDL, and Logon Triggers
This article is for database administrators (DBAs) who are looking at using C2 auditing, Common Compliance Criteria and SQL Server Auditing. We will not be looking at any third-party auditing tools, though they can be of great help, especially for larger environments and in regulated industries.
Enabling C2 Auditing and Common Criteria Compliance
If you aren’t currently auditing your SQL Server, the easiest place to start is by enabling C2 auditing. C2 auditing is an internationally accepted standard that can be turned on in SQL Server. It audits events like user logins, stored procedures, and the creation and removal of objects. But it is all or nothing — you can’t choose what it audits, and it can generate a lot of data. Furthermore, C2 auditing is in maintenance mode, so it will likely be removed in a future version of SQL Server.
Common Criteria Compliance is a newer standard that supersedes C2 auditing. It was developed by the European Union and can be enabled in Enterprise and Datacenter editions of SQL Server 2008 R2 and later. But it can cause performance issues if your server isn’t sufficiently spec’d to cope with the extra overhead.
Here’s how to enable C2 auditing in SQL Server 2017:
1. Open the SQL Server Management Studio.
2. Connect to the database engine for which you want to enable C2 auditing. In the Connect to Server dialog, make sure that Server type is set to Database Engine and then click Connect.
3. In the Object Explorer panel on the left, right-click your SQL Server instance at the top and select Properties from the menu.
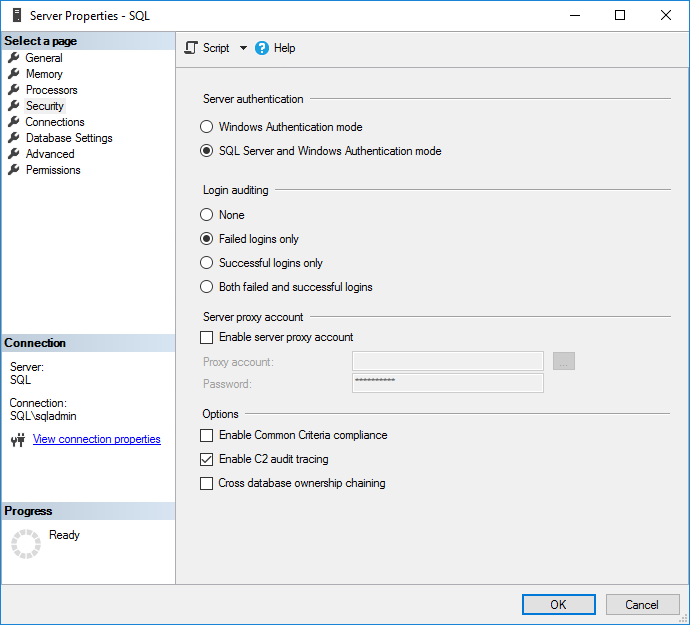
4. In the Server Properties window, click Security under Select a page.
5. On the Security page, you can configure login monitoring. By default, only failed logins are recorded. Alternatively, you can audit just successful logins, or both failed and successful logins.

Figure 1. Configuring access auditing
6. Check Enable C2 audit tracing under Options.
7. If you want to enable C2 Common Criteria Compliance auditing, check Enable Common Criteria compliance.
Common Criteria (CC) Compliance is a flexible standard that can be implemented with different Evaluation Assurance Levels (EALs), from 1 to 7. Higher EALs have a more demanding verification process. When you check Enable Common Criteria compliance in SQL Server, you are enabling CC Compliance EAL1. It is possible to configure SQL Server manually for EAL4+.
Enabling CC Compliance changes SQL Server behavior. For example, table-level DENY permissions will take precedence over column-level GRANTs, and both successful and failed logins will be audited. In addition, Residual Information Protection (RIP) is enabled, which over-writes memory allocations with a pattern of bits before they are used by a new resource.
8. Click OK.
9. Based on the selected options, you might be prompted to restart SQL Server. If you get this message, click OK in the warning dialog. If you enabled C2 Common Criteria Compliance, reboot the server. Otherwise, right-click your SQL Server instance in Object Explorer again and select Restart from the menu. In the warning dialog, click Yes to confirm that you want to restart SQL Server.
Enabling SQL Server Audit
SQL Server auditing can be enabled instead of C2 auditing; you can also choose to enable both. SQL Server Audit objects can be configured to collect events at the server level or the SQL Server database level.
Create Server Audit Object
Let’s create a server-level SQL Server audit object:
1. In the Object Explorer panel on the left, expand Security.
2. Right-click Audits and select New Audit… from the menu. This will create a new SQL Server Audit object for server-level auditing.
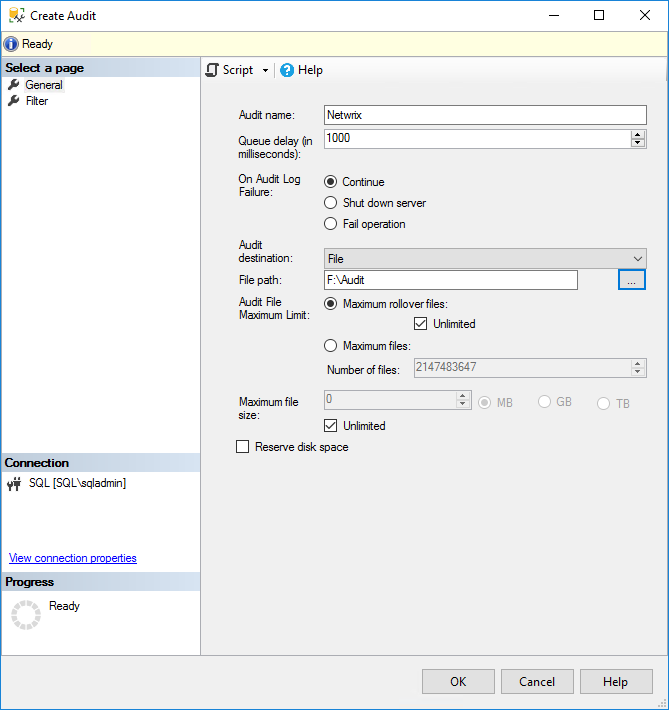
3. In the Create Audit window, give the audit settings a name in the Audit name
4. Specify what should happen if SQL Server auditing fails using the On Audit Log Failure You can choose Continue or choose to shut down the server or stop database operations that are audited. If you select Fail operation, database operations that are not audited will continue to work.

Figure 2. Creating a server-level SQL Server audit object
5. In the Audit destination dropdown menu, you can choose to write the SQL audit trail to a file or to audit events in the Windows Security log or Application event log. If you choose a file, you must specify a path for the file.
Note that if you want to write to the Windows Security event log, SQL Server will need to be given permission. For the sake of simplicity, select the Application event log. Additionally, you can include a filter as part of the audit object to provide a narrow set of results; filters must be written in Transact-SQL (T-SQL).
6. Click OK.
7. You will now find the new audit configuration in Object Explorer below Audits. Right-click the new audit configuration and select Enable Audit from the menu.
8. Click Close in the Enable Audit dialog.
Create Database Audit Object
To create a SQL Server audit object for database-level auditing, the process is a little different and you need to create at least one server-level audit object first.
1. Expand Databases in Object Explorer and expand the database on which you want to configure auditing.
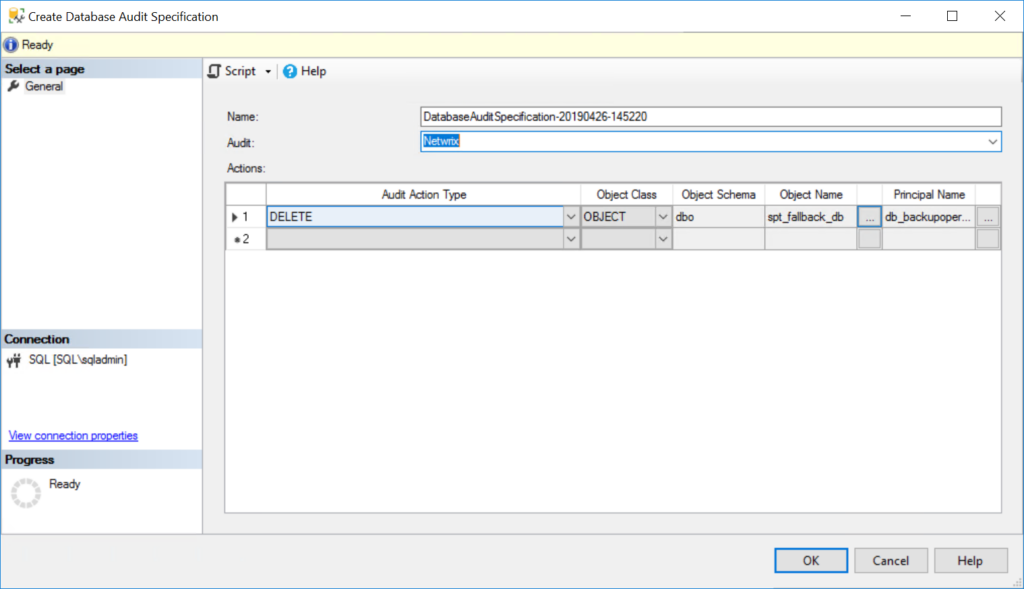
2. Expand the Security folder, right click Database Audit Specifications and select New Database Audit Specification… from the menu.

Figure 3. Creating a server audit specification for database-level auditing
3. In the Properties window under Actions, use the dropdown menus to configure one or more audit action types, selecting the statements you want to audit (such as DELETE or INSERT), the object class on which the action is performed, and so on.
4. When you’re done, click OK and then enable the audit object by right-clicking it and selecting Enable Database Audit Specification.
Viewing SQL Server Audit Logs
C2 Audit SQL Server audit logs are stored in the default data directory of the SQL Server instance. Each log file can be a maximum of 200 megabytes. A new file is automatically created when the limit is reached.
A native solution that is recommended to view SQL Server audit logs called Log File Viewer. To use it, take the following steps:
1. In SQL Server Management Studio, in the Object Explorer panel, expand Security and
2. Right-click the audit object that you want to view and select View Audit Logs from the menu.
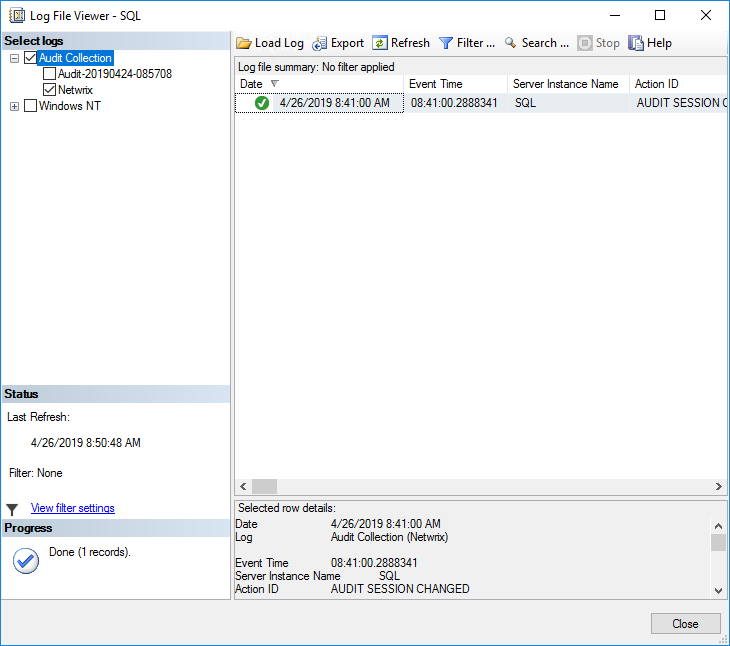
3. In the Log File Viewer, the logs will be displayed on the right side. Regardless of whether the logs are written to a file or to the Windows Event Log, Log File Viewer will display the logs.
4. At the top of Log File Viewer, you can click Filter to customize which log entries are displayed. SQL Server file logs are saved in .sqlaudit format and are not readable, so Log File Explorer allows you to click Export to save logs to a comma-delimited .log file format.

Figure 4. Reviewing SQL Server audit logging in the Log File Viewer
FAQ
How to check if SQL Server audit is enabled?
To verify if SQL Server audit is enabled, query the sys.dm_server_audit_status dynamic management view or check the SQL Server Management Studio (SSMS) Security folder. In SSMS, expand Security > Audits to see all configured audits and their current status – enabled audits will show a green icon, while disabled ones appear with a red icon. You can also run this query to programmatically check audit status:
SELECT name, is_state_enabled FROM sys.server_auditsRemember that both the server audit and database audit specification must be enabled for complete audit coverage. Data security that starts with identity requires comprehensive visibility into who’s accessing what data, and SQL Server audit provides that foundation when properly configured and verified.
Why is my SQL Server audit file growing so large?
Excessive audit file growth typically occurs when you’re auditing too many events or haven’t configured proper file management settings. The most common culprits are enabling ALL audit action groups, auditing SELECT statements on high-traffic tables, or setting unlimited file growth without rotation. To control growth, focus on auditing only the events you actually need for compliance – typically LOGIN_CHANGE_PASSWORD_GROUP, DATABASE_PERMISSION_CHANGE_GROUP, and specific DML operations on sensitive tables. Configure maximum file size limits and enable file rollover with MAXSIZE and MAX_ROLLOVER_FILES options. For high-volume environments, consider using the APPLICATION_LOG target instead of FILE target, or implement audit filtering with WHERE clauses to reduce unnecessary event capture. Smart auditing means tracking what matters without drowning in data noise.
How to troubleshoot SQL Server audit won’t start?
When SQL Server audit fails to start, the issue is usually related to file permissions, path accessibility, or configuration conflicts. First, verify that the SQL Server service account has write permissions to the audit file directory – this is the most common cause of startup failures. Check the SQL Server error log for specific error messages, which typically provide clear guidance on the problem. Ensure the target directory exists and is accessible from the SQL Server instance, especially in clustered environments where shared storage paths must be valid on all nodes. If using Windows Application Log as the target, verify that the service account has appropriate event log write permissions. Configuration errors such as duplicate audit names or invalid file paths will also prevent startup. The key is methodical troubleshooting: check permissions first, then paths, then configuration syntax. Netwrix simplifies this complexity by providing centralized audit management that eliminates these common pitfalls.
What’s the performance impact of SQL Server auditing?
SQL Server auditing has minimal performance impact when configured correctly, typically adding 2-5% overhead in most environments. The actual impact depends on three key factors: which events you audit, how frequently they occur, and your storage subsystem’s performance. Auditing high-frequency operations such as SELECT statements on busy OLTP systems will create more overhead than focusing on security-relevant events such as logins, permission changes, and DML operations on sensitive tables. Asynchronous audit targets (the default) provide better performance than synchronous options but with slightly delayed event recording. To minimize impact, use audit filtering with WHERE clauses, avoid auditing unnecessary system operations, and ensure your audit file storage has adequate I/O capacity. Extended Events generally have lower overhead than SQL Server Audit for high-volume scenarios, but SQL Server Audit provides superior compliance features and easier management. Smart audit design focuses on security value over comprehensive logging – you want visibility that protects without paralyzing performance.
SQL Server audit vs SQL Trace: which should I use?
SQL Server Audit is the modern choice for new implementations, while SQL Trace is deprecated and should be avoided for new projects. SQL Server Audit provides better security, performance, and management capabilities compared to the legacy SQL Trace functionality. Unlike SQL Trace, SQL Server Audit events cannot be modified or deleted by users (including sysadmins), ensuring audit integrity for compliance requirements. The audit framework offers asynchronous processing for better performance, built-in filtering capabilities, and integration with the Windows Security Event Log. SQL Trace requires manual coding with stored procedures and has been marked for removal in future SQL Server versions. Extended Events is the recommended replacement for SQL Trace’s diagnostic capabilities, while SQL Server Audit handles security and compliance monitoring. If you’re currently using SQL Trace for security auditing, migrate to SQL Server Audit immediately – it provides the tamper-proof audit trail that true data security demands. Netwrix solutions build on these native audit capabilities to provide centralized visibility across your entire data environment.


