What is Active Directory Administrative Center (ADAC)?
Active Directory Administrative Center (ADAC) is a Microsoft tool that admins can use to manage objects in Active Directory. ADAC is available in Windows Server 2008 R2 and higher.
ADAC is a graphical interface on top of Windows PowerShell. This means that every time an action is carried out through ADAC, Windows PowerShell cmdlets are executed in the background.
How is ADAC Different from Active Directory Users And Computers (ADUC)?
ADAC is superior to ADUC in many ways:
- ADAC is more task-oriented than ADUC, so it helps admins manage Active Directory tasks in fewer and simpler steps.
- ADAC supports enhanced management features that simplify the handling of multiple domains across the forest for administrators. For instance, ADUC does not allow admins to configure all user attributes when creating a new account, but with ADAC, admins can create users and add all their properties in one go.
- In ADAC, frequently used tasks like password reset and object search are available right on the landing page. These tasks are more tedious in ADUC; for example, to reset a password, you will have to locate the object, right-click it, select the password reset option and then type the new password.
How do I Install ADAC?
To install the Active Directory management tools on Windows Server 2019, take these steps:
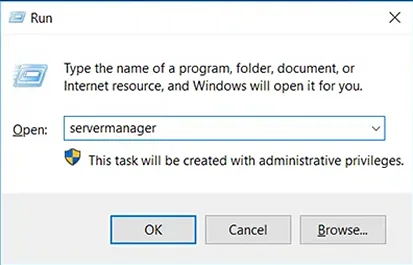
- Launch Server Manager: Press the Windows + R keys to launch the Run dialog box, type servermanager in the Open box and click OK.

- On the Server Manager dashboard, in the Quick Start panel, click Add Roles and Features.

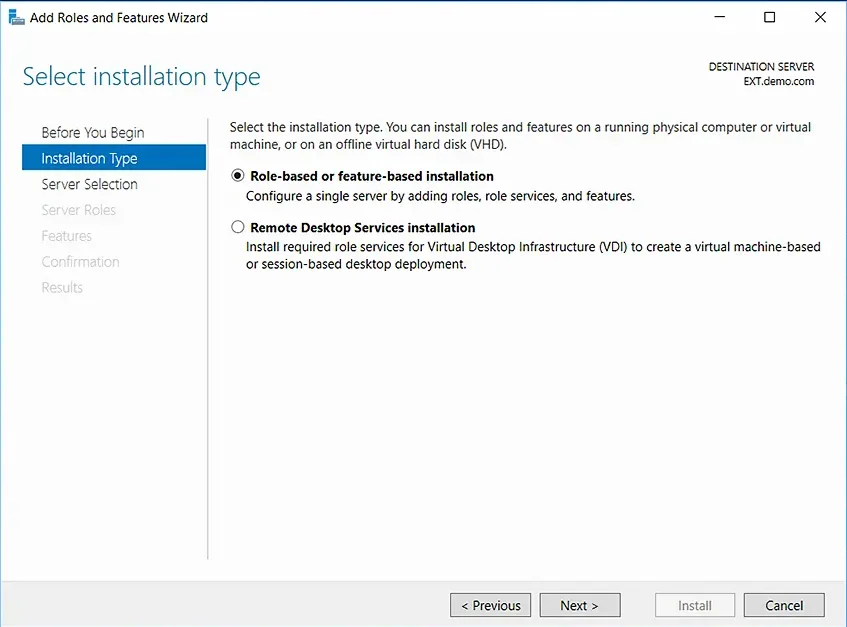
- In the Add Roles and Features wizard, go to the Installation Type panel on the left and select Role-based or feature-based installation. Then click Next.

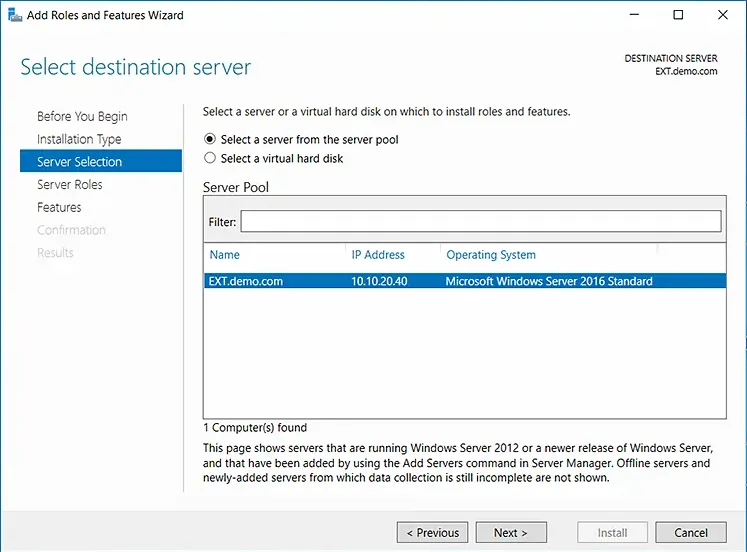
- On the Server Selection step, choose the Select a server from the server pool option. Then select the server on which you want to install the Active Directory management tools and click Next.

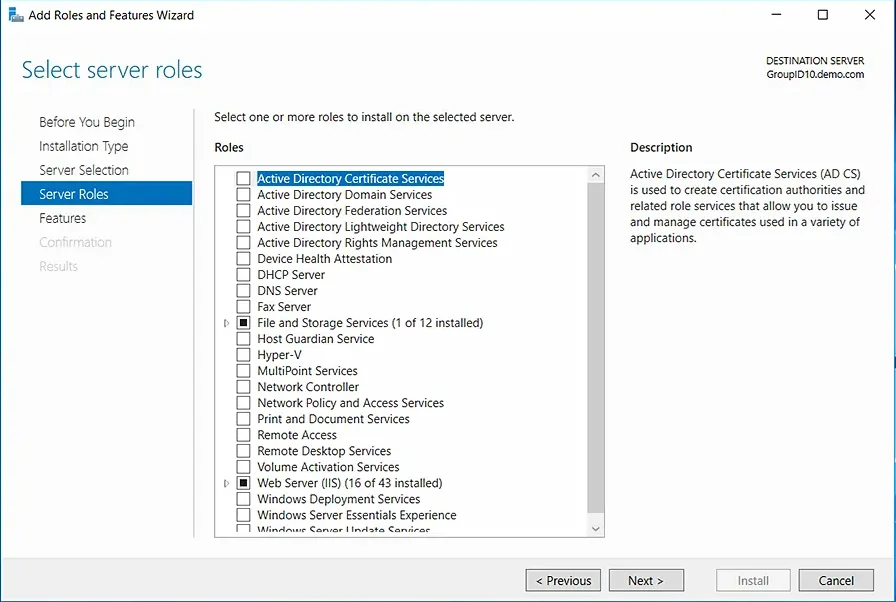
- On the Server Roles step, leave the settings at their defaults and click Next.

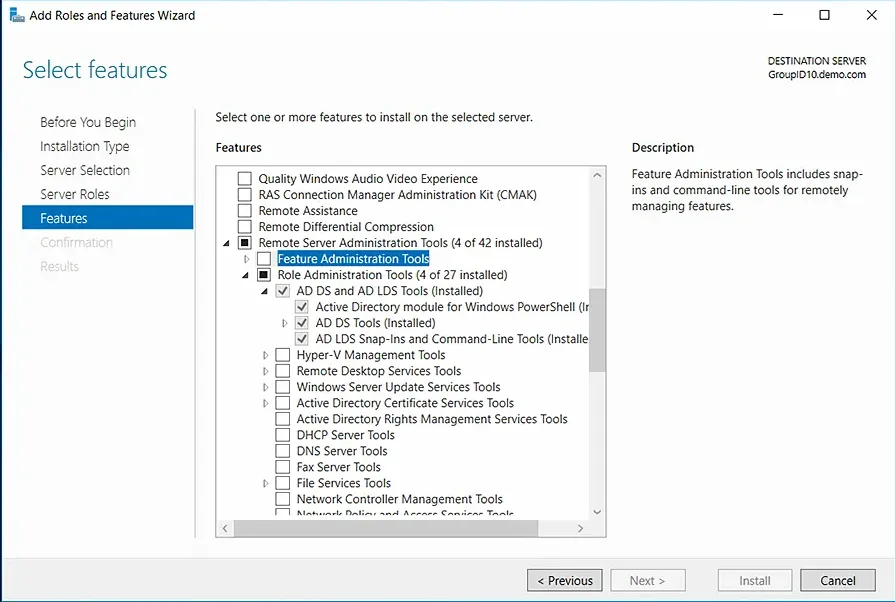
- In the Select Features step, expand Remote Server Administration Tools, then expand Role Administration Tools, and select the AD DS and AD LDS Tools checkbox. Click Next. If you are prompted to install any supporting roles, accept the defaults and continue with the installation.

- On the Confirmation step, review your selections and click Install to start the installation process.

You can monitor installation progress in the Results panel on the left.

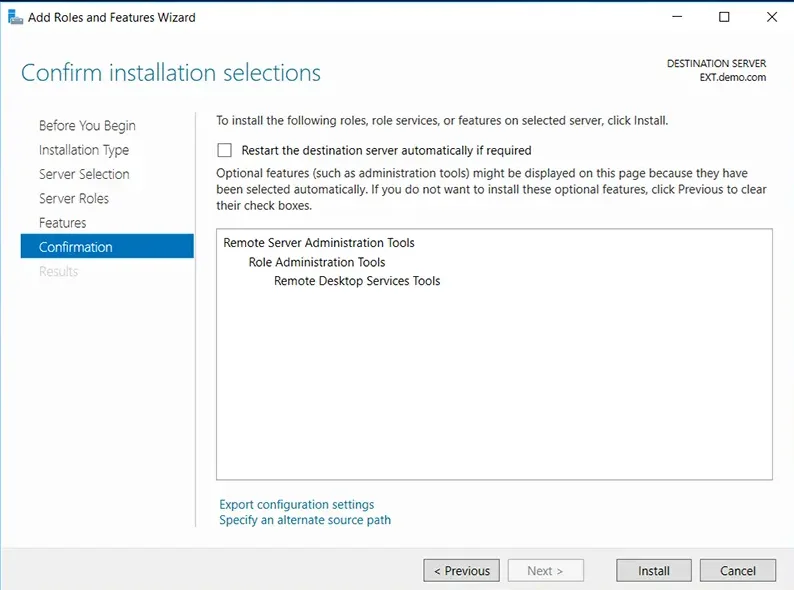
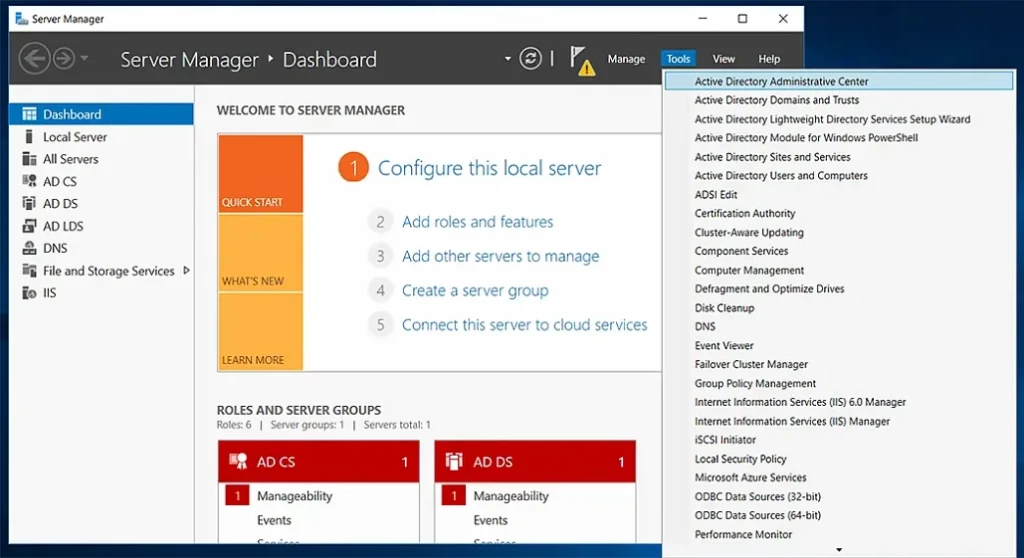
You do not need to restart the server after the installation is complete. You can see the Active Directory management tools under the Tools menu in Server Manager.
What features were introduced in ADAC?
ADAC introduced three management features:
- Active Directory Recycle Bin
- Fine-grained password policy
- Windows PowerShell History Viewer
Active Directory Recycle Bin
In Windows Server 2003, you could recover Active Directory deleted objects through tombstone reanimation. However, the attributes associated with the reanimated objects, like group memberships, could not be recovered. Therefore, IT administrators could not rely on tombstone reanimation for accidently deleted objects.
The Recycle Bin in ADAC is an enhanced version of the tombstone reanimation that enables admins to preserve as well as recover deleted objects in Active Directory. When you enable the Recycle Bin feature, all attributes of deleted objects are restored in the same logical state as they were before deletion. For example, when you restore users from the Active Directory Recycle Bin, they will automatically regain all the group memberships and access rights that they had before being deleted from the directory.
Fine-Grained Password Policy
Prior to Windows Server 2008, admins could set only one type of password and account lockout policy for all the users in the domain. The policy was specified in the Default Domain Policy for the domain. If an organization wanted to have different password and account lockout policies for different users, it would either have to create a password filter or deploy multiple domains, both of which are costly options.
With ADAC, admins can apply different password and account lockout policies for different users. For instance, you can apply strict policies for highly privileged accounts and set less stringent policies for less privileged user accounts, thereby balancing productivity and security.
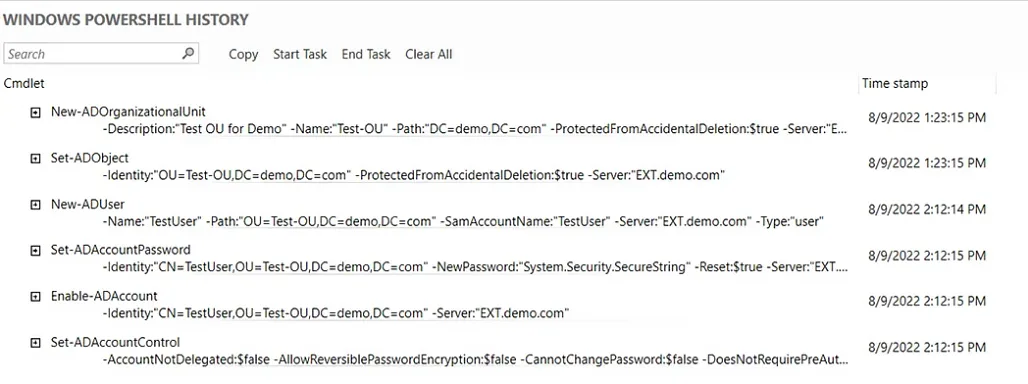
Windows Powershell History Viewer
Since ADAC is built on Windows PowerShell, every action that is executed in its user interface generates a PowerShell script that is shown in the Windows PowerShell History Viewer. IT administrators can use this feature to learn scripts, create automated commands and reduce repetitive tasks while increasing productivity.
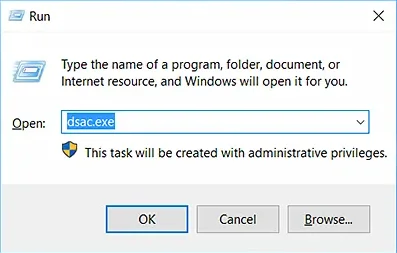
How Do I Access ADAC?
To access ADAC, do the following:
- Launch the Run dialog box by pressing the Windows + R keys.
- Type dsac.exe in the Open box.
- Click OK.

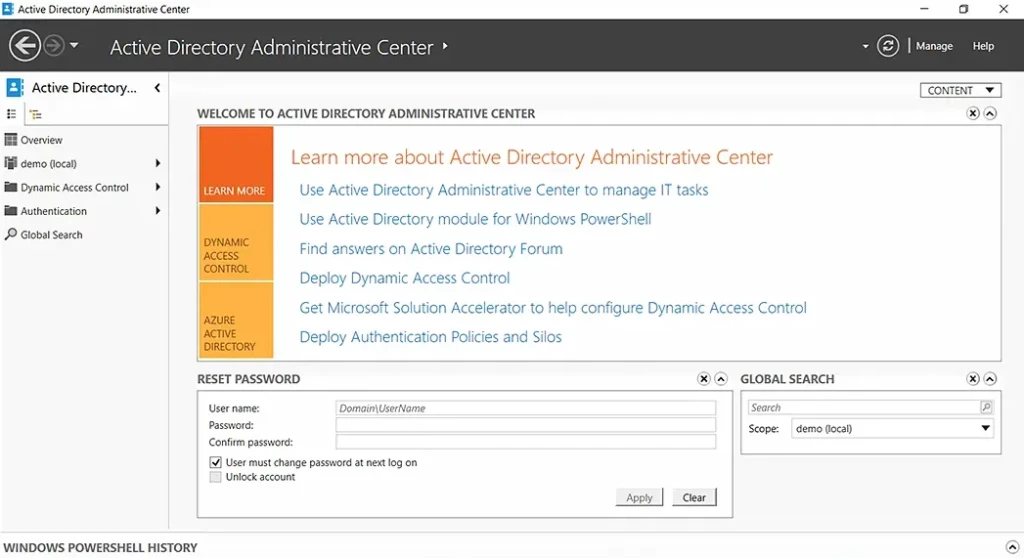
How Do I Use ADAC?
ADAC enables you to perform a variety of routine Active Directory tasks in an advanced and efficient way. When you launch the ADAC console, you will see the two most common tasks, Reset Password and Global Search, readily available on the lower part of the landing page.
You can perform the following actions through ADAC:
- Create an organizational unit (OU)
- Create a user in a particular OU
- Reset a user’s password
- Enable the Recycle Bin
- Delete a user from the directory
- Restore a deleted AD object
- View PowerShell history
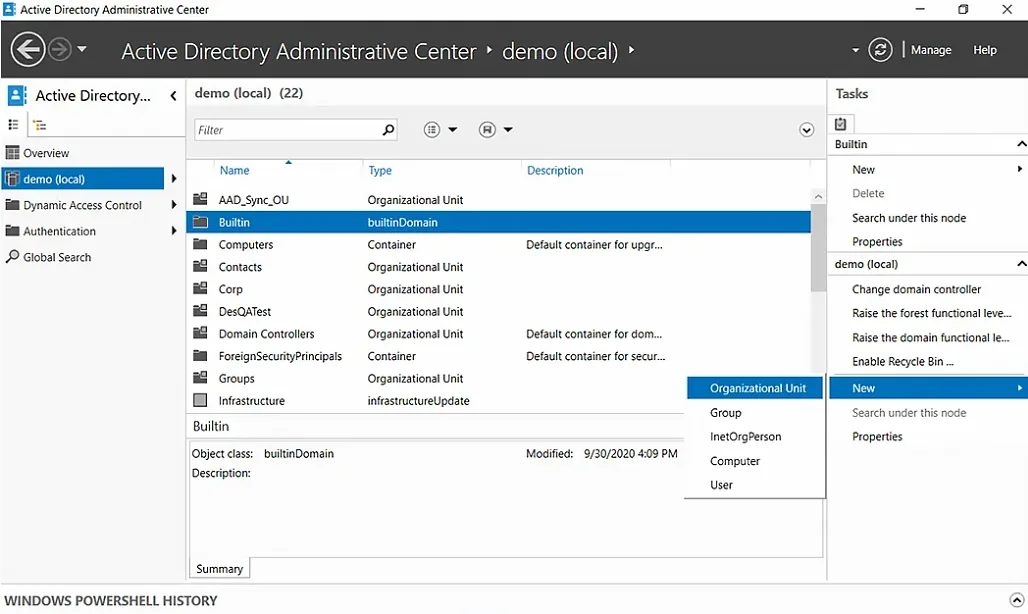
Create an OU
An organizational unit (OU) is a container in Active Directory that can hold users, computers, groups, and other AD objects. OUs help keep the directory neat and well-structured.
To create an organizational unit using ADAC, follow these instructions:
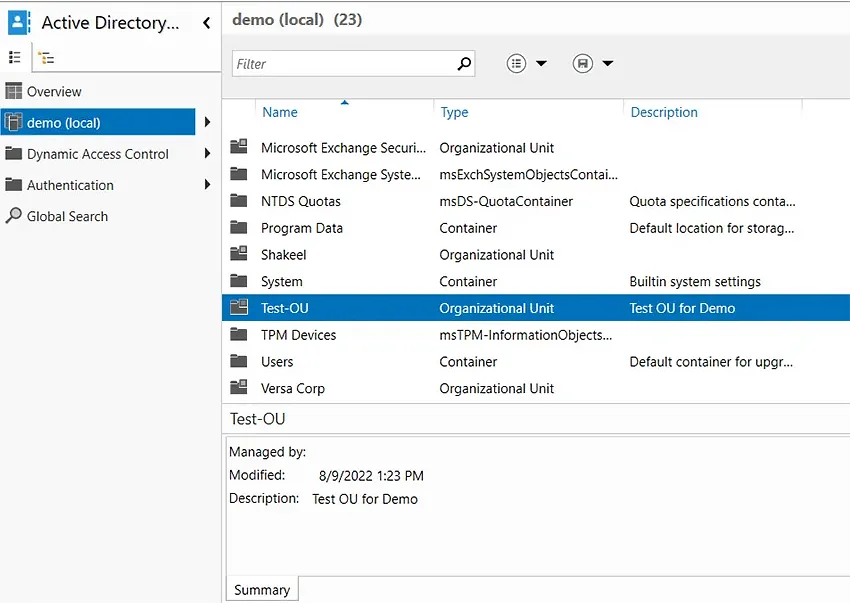
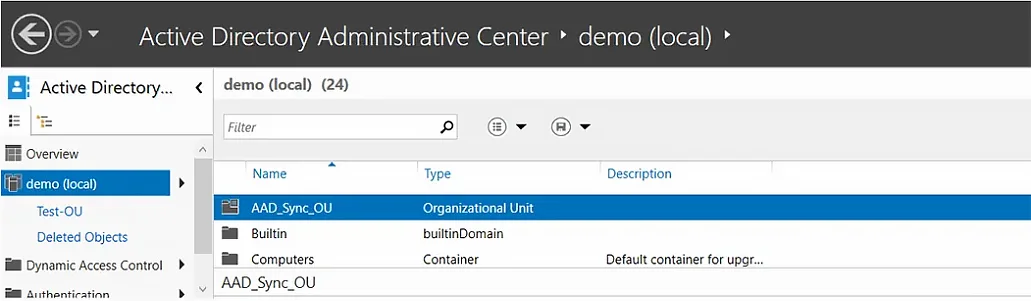
- In ADAC, select a domain from the left panel. Here, we have selected demo (local).
- Under the Tasks panel on the right, select New > Organizational Unit.

- In the Create Organizational Unit dialog box that appears, specify a name and description for the new OU. Here we have chosen Test-OU as the name and Test OU for Demo as the description.

- Click OK.
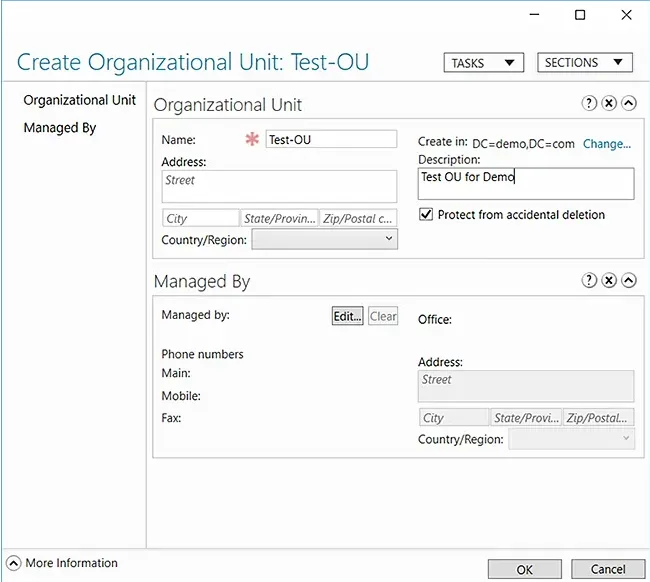
You can now check the domain and confirm the existence of the new OU.
Create a User in a Particular OU
When new employees join a company, IT administrators have to create their user accounts so that they can access the company’s resources and start working. Here is how you can use ADAC to create a user account in a particular OU:
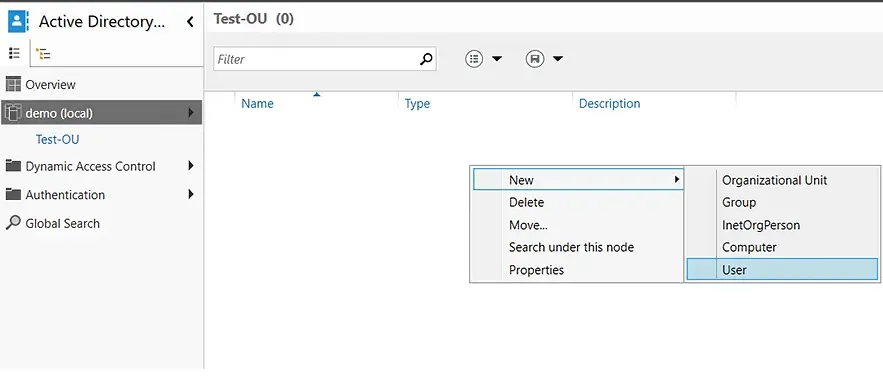
- Double-click the OU where you want to create a user account. In this case, we will be creating a new user account in the Test-OU container.
- Right-click in the blank area, hover over New, and select User.

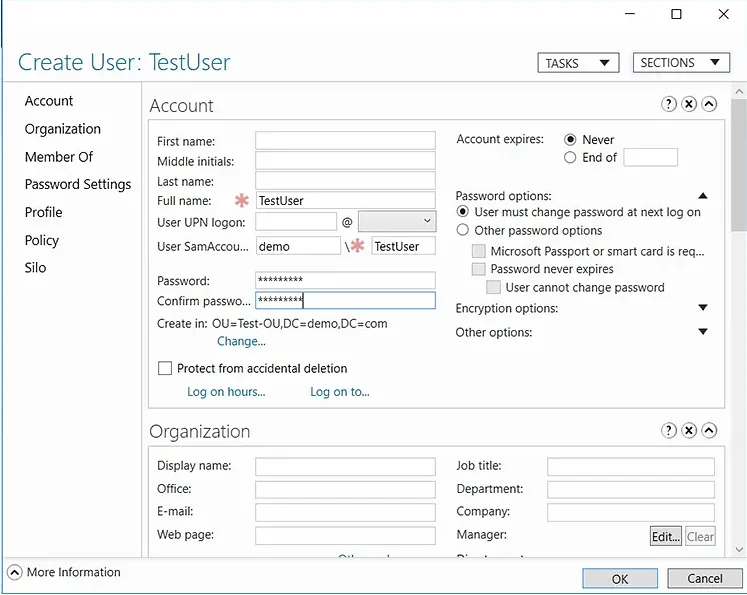
- Fill in the required fields and set a password for the new user account.

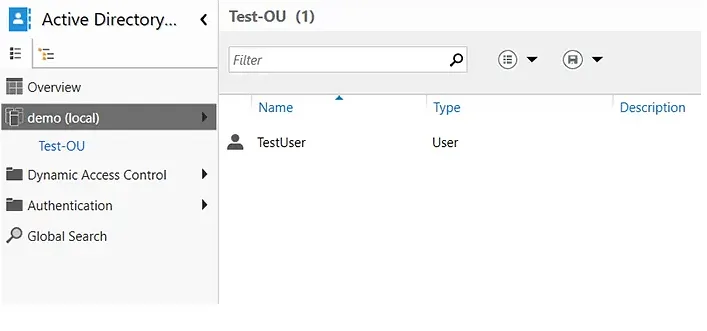
- Click OK to create the user in the selected OU.

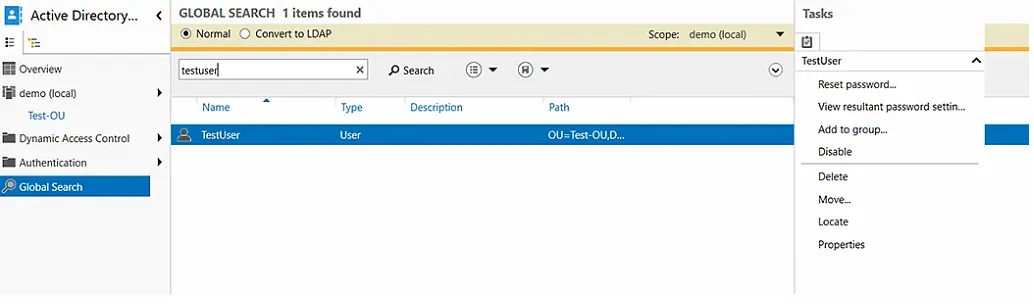
Reset a User’s Password
You can use ADAC to quickly reset a user’s password:
- In the left panel, select Global Search.
- Type the name of the user in the search bar. And in the Task panel on the right, select Reset password.

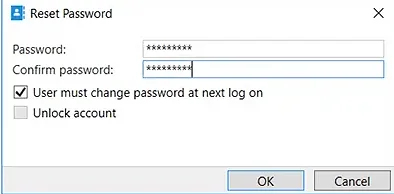
- Enter a new password that meets the requirements of your domain and check the User must change password at next log on checkbox.

- Click OK.
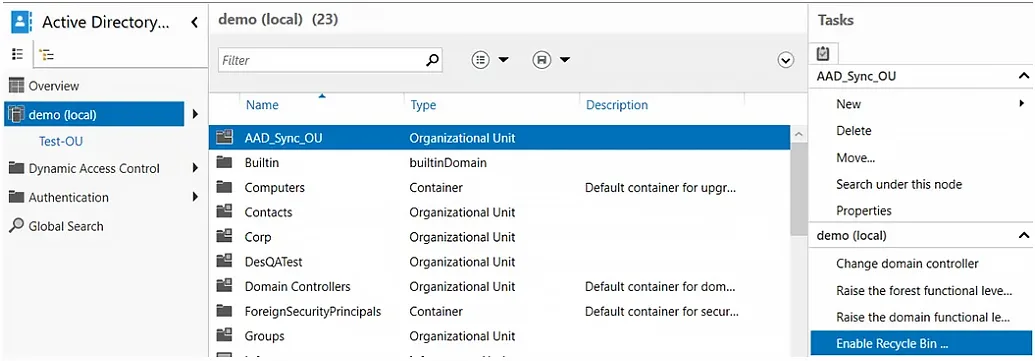
Enable the Recycle Bin to Quickly Restore Deleted AD Objects
If you accidentally delete an object from your directory, you can restore it — provided you have enabled the Recycle Bin feature. Here is how you can enable the Recycle Bin feature in ADAC:
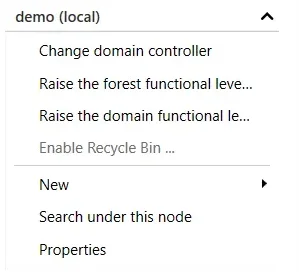
- In the left panel, select the domain for which you want to enable the Recycle Bin.
- In the Task panel on the right, select the Enable Recycle Bin option.

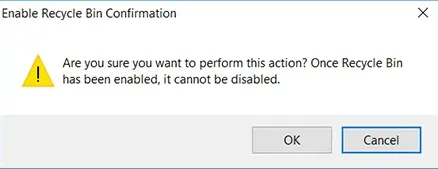
- When you are prompted to confirm your action, click OK.

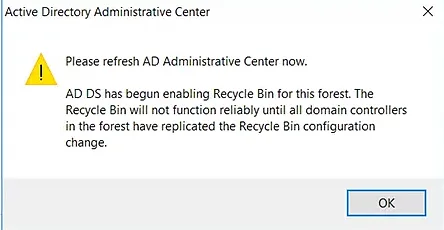
- ADAC will ask you to refresh the console. Click OK again.

- Press the F5 key to refresh ADAC. You will notice that the Enable Recycle Bin option is now grayed out, which means that the feature is enabled for the domain.

Delete a User from the Directory
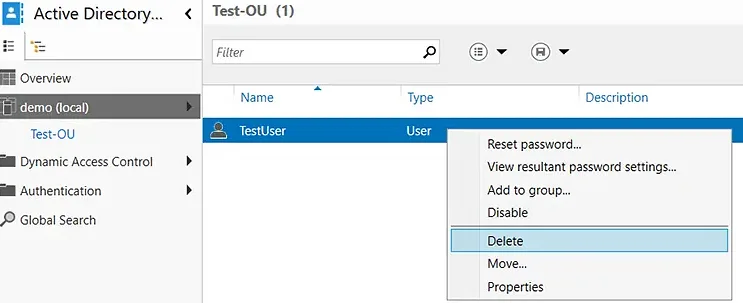
- Navigate to the desired domain and select the OU from which you want to delete a user.
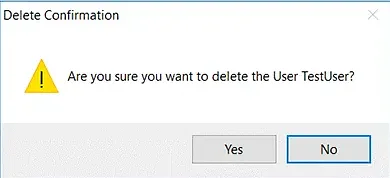
- Right-click the desired user and select Delete.

- You will be prompted with a confirmation message. Click Yes.

Restore a Deleted AD Object
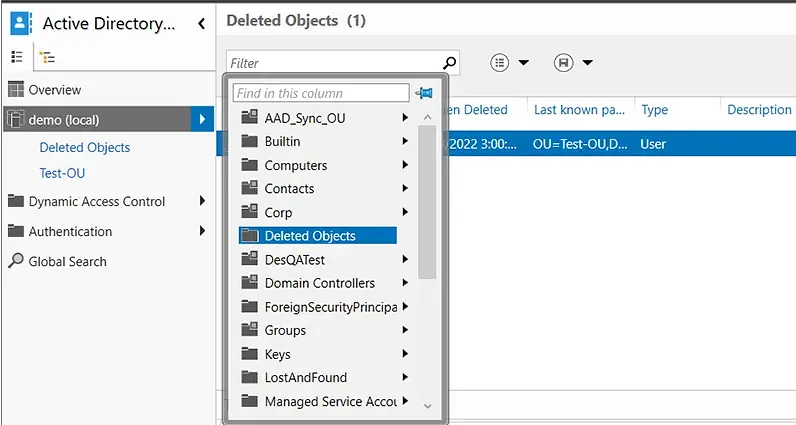
- In the left panel, click the arrow to the right of the user’s domain and select the Deleted Objects container.

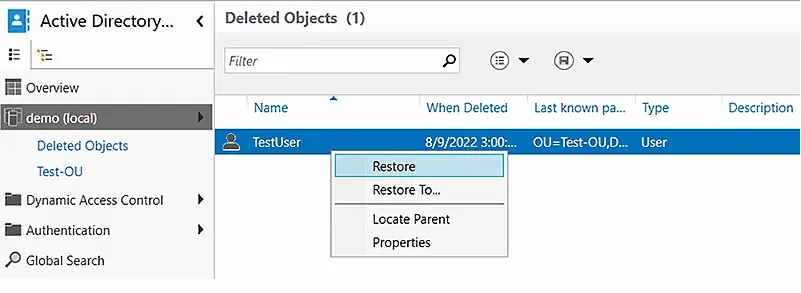
- Right-click the AD object you want to recover. To add the object to its original OU, select the Restore option. To restore it to a different OU, select the Restore To option and choose the desired container.

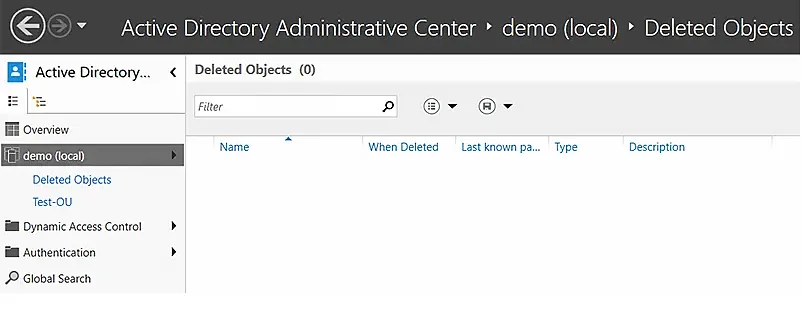
- Verify that the object has disappeared from the Deleted Objects container.

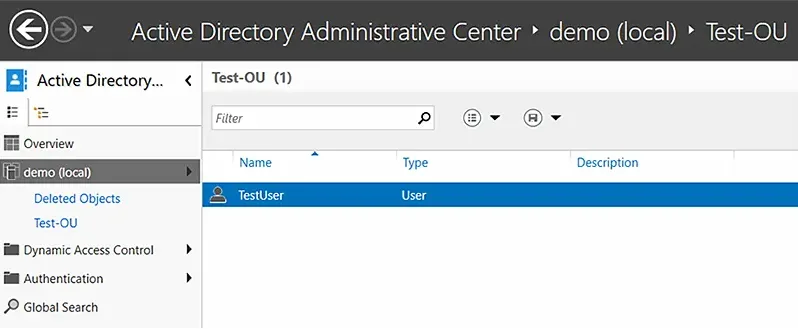
- Go to the OU where you restored the object and verify that it is there.

View Powershell History
The PowerShell history in ADAC is useful in multiple ways:
- Auditing and tracking — You can see all the changes that were made to the directory.
- Remediation — If an unauthorized modification was made, you can reverse it.
- Training and script creation — You can see the PowerShell cmdlets for all actions, which can help you build scripts to automate repetitive tasks and increase IT productivity.
To view the PowerShell history in ADAC:
- Navigate to the domain.
- Double-click Windows PowerShell History.


Improving Active Directory Management with Netwrix Directory Manager
While ADAC offers some valuable functionality, many organizations prefer a comprehensive AD management tool: Netwrix Directory Manager. This easy-to-use solution enables you to perform all the tasks that you can with ADAC — and much more.
Here are some of the key capabilities you get with Netwrix Directory Manager:
- Seamless user provisioning and deprovisioning
- Powerful group management
- Restoration of deleted groups
- Simplified password management
- Controlled delegation
- Thorough reporting
Seamless User Provisioning and Deprovisioning
Keep your directory up to date by syncing it with data from an Excel file, HR database or other authoritative source. Netwrix Directory Manager reads new user records from the source and automatically creates user accounts in your Active Directory.
This feature makes user provisioning and deprovisioning extremely easy and reliable. New recruits are onboarded quickly and parting employees are offboarded promptly, revoking their access.
- Thorough reporting
Powerful Group Management
Netwrix Directory Manager enables you to manage your AD groups dynamically. Simply create a query for a group and it will be used to assess group membership. This enhances security with up-to-date group memberships.
Netwrix Directory Manager also manages the group lifecycle: Groups remain active for a specified period and owners are notified before a group will expire. If the owner does not renew the group, Netwrix Directory Manager automatically expires it and then deletes it.
Restoration of Deleted Groups
Netwrix Directory Manager enables administrators to restore deleted groups, which reinstates all group attributes, memberships and permissions. Groups are also restored to their original container.
Simplified Password Management
Netwrix Directory Manager empowers business users to do the following on their own:
- Reset their domain account passwords
- Change their passwords
- Unlock their accounts
Users can perform these operations after completing multifactor authentication (MFA).
Helpdesk teams can also reset passwords and unlock accounts for users. They also have access to dashboards and live updates to audit and examine the tasks carried out by business users.
Controlled Delegation
Netwrix Directory Manager enables administrators to delegate certain directory administration tasks to business users. Users can manage their profiles, accounts, groups, workflows and much more.
Thorough Reporting
Active Directory does not come with any reporting tools, so administrators are forced to scroll through the Global Address List (GAL) manually to look for records.
Netwrix Directory Manager offers hundreds of insightful reports on Active Directory users, computers, groups, and contacts, such as:
- Groups and their last modified time
- Groups without members
- Groups without owners
- Users and the objects they own
- Disabled users
- Users without managers
- Users who have never logged on
- Computers that have never logged on to the network
- Disabled computers and their operating systems