The Move-Item cmdlet lets you move files, folders, registry keys, and subkeys in PowerShell with precision. You can move single or multiple files, rename them during the move, preserve or flatten folder structures, and work across local or network paths. Useful parameters include -Recurse, -Include, -Exclude, -Filter, -Force, and -WhatIf. For safety, combine moves with Test-Path, error handling (try/catch), and logging.
As a routine task, users move items, such as files and folders from one place to another on our computer, so that data is sorted and makes sense. While this can be accomplished with simple copy and paste options from within the File Explorer, advanced users may prefer PowerShell for efficiency and precision.
Definition: Move-Item Cmdlet
The Move-Item cmdlet in PowerShell moves an item from one location to another in the File Explorer, with its properties, contents, and child items intact. It can be used as follows:
- Move a file or folder from one directory to another
- Move multiple files or directories at once
- Move a registry subkey from one key to another
Once added to the new location, a moved item is removed from its original location.
As a prerequisite, the new location must be supported by the same provider.
Basic Syntax of Move-Item
The Move-Item cmdlet has the following basic syntax:
Move-Item -Path "sourceFilePath" -Destination "destinationFilePath"
An example of the syntax with the supported parameters is:
Move-Item
    [-Path] <String[]>
    [[-Destination] <String>]
    [-Force]
    [-Filter <String>]
    [-Include <String[]>]
    [-Exclude <String[]>]
    [-PassThru]
    [-Credential <PSCredential>]
    [-WhatIf]
    [-Confirm]
    [<CommonParameters>]
Move a Single File with Move-Item
To move a single file from one location to another through PowerShell, specify the source file path and destination directory in the Move-Item cmdlet. It is as:
Move-Item -Path <source file path>\<file name> -Destination <Destination path>
You can also rename the file in the move process.
Scenario 1 – Move a single file without renaming it
This cmdlet moves the Test.txt file from the C:\Temp directory to the C:\Backup directory without renaming the file:
Move-Item -Path C:\Temp\test.txt -Destination C:\Backup
Scenario 2 – Move a single le and rename it in the move process
This cmdlet moves the Test.txt file from the C:\Temp directory to the C:\Backup directory while renaming it to UseCase.txt:
Move-Item -Path C:\Temp\test.txt -Destination C:\Backup\UseCase.txt

Move Multiple Files
You can use wildcards in the Move-Item cmdlet to move multiple items at once, such as multiple files, from one location to another. For instance, you can easily move all files of the same extension from one location to another.
Scenario 1 – Move all files of the same extension using wildcards
This cmdlet moves all text files (*.txt) from the C:\Temp directory to the C:\Backup directory, leaving behind all other files:
Move-Item -Path C:\Temp\*.txt -Destination C:\Backup
Scenario 2 – Move all files regardless of extension
Use the Get-ChildItem cmdlet with the -File parameter to filter all files (and not folders) from the source directory. Then pipe the results to the Move-Item cmdlet to move the filtered files to the destination directory, leaving behind all folders.
In the following cmdlet, the -File parameter filters only the files in the C:\Temp directory. The Move-Item cmdlet then moves those files from C:\Temp to the C:\Backup directory, leaving folders in C:\Temp:
Get-ChildItem -Path C:\Temp\* -File | Move-Item -Destination C:\Backup
Scenario 3 – Move specific files
It is also possible to move specific files having the same or different extensions. In that case, you have to specify multiple files by providing an array of paths, using a comma to separate multiple values.
This cmdlet moves two files named Test.txt and UseCase.pdf from the C:\Temp folder to the C:\Backup folder:
Move-Item -Path C:\Temp\test.txt, C:\Temp\UseCase.pdf -Destination C:\Backup
Move a Directory
PowerShell’s Move-Item cmdlet is powerful enough to move a directory with all its contents – files, folders, sub-folders – to another directory. Or you can choose to move all content, leaving the empty directory behind. In both cases, the folder structure at the source is copied to the destination.
Scenario 1 – Move an entire directory with all its contents
This cmdlet moves the Temp folder with its contents to the C:\Backup folder.
Move-Item -Path C:\Temp -Destination C:\Backup
Notice that the Temp folder will be deleted from C:\ and placed in the Backup directory.
Scenario 2 –Move all content from a directory while leaving the directory behind
This cmdlet recursively moves all the files and folders from the Keys directory to the C:\Backup folder.
Move-Item -Path C:\Temp\Keys\* -Destination C:\Backup
Notice that in this case, the source directory (Keys) remains behind while all its content is moved. This cmdlet should leave the source directory empty.
Move Files to a Network Location
The Move-Item cmdlet can also move files to a network location. Simply provide the network path as the destination.
Consider the following:
- You must have the necessary permissions to access the network location.
- The network path must be accessible from the machine where you are running the cmdlet.
- You must do one of the following if the network location requires authentication:
- Map the network drive first using the New-PSDrive cmdlet or manually through Windows Explorer
- Specify credentials when accessing the network resource
Scenario 1 – Move a file to a network location
This cmdlet moves the Text.txt file from C:\Temp to a network location, which is a folder named Backup on a server named FileServer.
Move-Item -Path C:\Temp\test.txt -Destination \\FileServer\Backup
Scenario 2 –Prevent overwrite while moving a file
When moving a file to a network location with the Move-Item cmdlet, PowerShell will overwrite an existing file if the file name is the same, even when the -Force parameter is not provided.
To prevent overwriting, add a check before moving the file.
if (-not (Test-Path "\\FileServer\Backup\test.txt")) {
    Move-Item -Path "C:\Temp\test.txt" -Destination "\\FileServer\Backup"
}
else {
    Write-Host "A file with the same name already exists in the destination."
}
Test-Path checks if the file already exists in the destination. If yes, it will not move the file ad notify you instead.
Recursive File Moving
The PowerShell Move-Item cmdlet can also work with the -Recurse parameter to move all files from a directory and from all folders and sub-folders within it, to another location. You can also limit the move function to files of a specific extension.
Scenario 1 – Recursively move all files of the same extension
This cmdlet recursively moves all the PDF files from the C:\Temp directory and its sub-folders to the C:\Backup directory.
Get-ChildItem -Path C:\Temp\*.pdf -Recurse | Move-Item -Destination C:\Backup
Here, the Get-ChildItem cmdlet fetches the child items in the C:\Temp directory and its sub-folders that have a *.pdf file extension. It uses the -Recurse parameter to make the retrieval recursive.
The pipe (|) sends the results to the Move-Item cmdlet, that moves the pdf files to the Backup directory.
Note: By default, Get-ChildItem does not move hidden files. For that, use the -Force parameter with Get-ChildItem, and then pipe the results to Move-Item.
Scenario 2 – Recursively move all files
Use the -Recurse parameter with the Get-ChildItem cmdlet to recursively move files from one directory to another.
This cmdlet moves all files from the C:\Temp directory and its sub-directories to the C:\Backup directory. The -Recurse parameter is used to search through all sub-directories of the specified path while the -File parameter limits the cmdlet to retrieving files, excluding folders.
Get-ChildItem -Path C:\Temp -Recurse -File | Move-Item -Destination C:\Backup
Note that this cmdlet moves files only. No folder or sub-folder is affected. Moreover, the cmdlet moves the files to the root of the destination directory and does not create the folder structure of the source directory at the destination.
Filter Files
You can filter items based on specific criteria while moving them using the Move-Item cmdlet. For example, you may want to retain a specific file in the source directory or move files of a specific name or extension. The -Filter, -Include, and -Exclude parameters come in handy for such operations.
- The -Include parameter is used to include files that match a specific attribute, for moving. For example, you can specify file name(s) (c:\temp\test*) or extension(s) (*.txt) as attributes, so that only files matching the given attribute are moved to the destination location.
- The -Exclude parameter is used to exclude files that match a specific attribute, from being moved. For example, you can specify file name(s) (c:\temp\test*) or extension(s) (*.txt) as attributes, so that files matching the given attribute are not moved to the destination location.
- The -Filter parameter is similar to the -Include parameter but it is faster and more efficient than -Include.
Consider the following:
- You must use the whole folder content to include, exclude or filter specific data.
- These parameters can work with wildcards.
Note:
Before running the cmdlets provided in the scenarios below, make sure you are using the most recent PowerShell version. If not, then update your PowerShell version for smooth operations.
Scenario 1 – Exclude files of a specific extension
This cmdlet moves all files from the C:\Temp folder to the Backup folder except those that have a .txt extension.
Move-Item -Path C:\Temp\* -Exclude *.txt -Destination C:\Backup
Again, in the following cmdlet, the -Filter parameter will move all .docx files from C:\Temp to C:\Backup.
Move-Item -Path C:\Temp\* -Filter *.docx -Destination C:\Backup
Scenario 2 – Move files of a specific extension
This cmdlet moves only text files (.txt) from the C:\Temp folder to the Backup folder.
Move-Item -Path C:\Temp\* -Include *.txt -Destination C:\Backup
See the Move Multiple Files section for similar functions.
Scenario 3 – Move files having names that start with a specific string
This cmdlet moves files whose names start with “log”. It will not move files that do not start with “log” from C:\Temp.
Move-Item -Path C:\Temp\* -Include log* -Destination C:\Backup
Advanced Moving Scenarios
The Move-Item PowerShell cmdlet can also move files based on specific criteria, such as file size, date modified, and so on. For this purpose, you can choose any of these methods:
- Use the -Filter parameter
- Use Get-ChildItem with Where-Object to select files with specific attributes or date properties before moving them. It follows a three-step process:
- The Get-ChildItem cmdlet retrieves files from a source location.
- To filter for attributes, such as file size or last modified date, pipe the output to the Where-Object cmdlet.
- Next pipe the output to the Move-Item cmdlet to move the filtered files.
So, to move files larger than 5 GB, you find the files with Get-ChildItem, filter them with Where-Object and move them with Move-Item.
Scenario 1 – Move files and folders modified in the last X days
This cmdlet moves all files and folders modified in the last 30 days from the C:\Temp directory to the C:\RecentFiles directory.
Get-ChildItem -Path C:\Temp\* | Where-Object {$_.LastWriteTime -gt (Get-Date).AddDays(-30)} | Move-Item -Destination C:\RecentFiles
While you must be quite familiar with the Get-ChildItem and Move-Item cmdlets by now, let’s dive into Where-Object. This cmdlet filters the items modified in the last 30 days.
- $_ represents each object (file or folder) passed from Get-ChildItem.
- LastWriteTime is a property of the file/directory that shows the last time the item was modified or written to.
- (Get-Date).AddDays(-30) gets the current date and subtracts 30 days from it.
Scenario 2 – Move files and folders larger than a specific size
This cmdlet moves all files and folders that are larger than 2GB from the C:\Temp directory to the C:\LargeFiles directory.
Get-ChildItem -Path C:\Temp\* | Where-Object {$_.Length -gt 2GB} | Move-Item -Destination C:\LargeFiles
Maintain Folder Structure
The Move-Item cmdlet does not inherently copy or recreate the entire folder structure from the source to the destination path. However, there are certain ways to retain the folder structure while moving files to the destination:
- Combine the Move-Item cmdlet with other cmdlets, like Copy-Item and Remove-Item after verification
- Recreate the folder structure manually
Scenario 1 – Move a directory with its contents and folder structure intact
To move a directory with all its content and folder structure intact, see the Move a Directory section.
Scenario 2 – Move specific files while preserving folder structure
PowerShell supports more complex functions, where you can move specific files while recreating the folder structure at the destination.
This script moves specific files (e.g., .pdf files) while keeping the folder structure intact:
Get-ChildItem -Path "C:\Temp" -Recurse -Filter "*.pdf" | ForEach-Object {
    $destinationPath = $_.FullName.Replace("C:\Temp", "C:\Backup")
    $destinationDir = Split-Path $destinationPath
    if (-not (Test-Path $destinationDir)) {
        New-Item -ItemType Directory -Path $destinationDir
    }
    Move-Item -Path $_.FullName -Destination $destinationPath
}
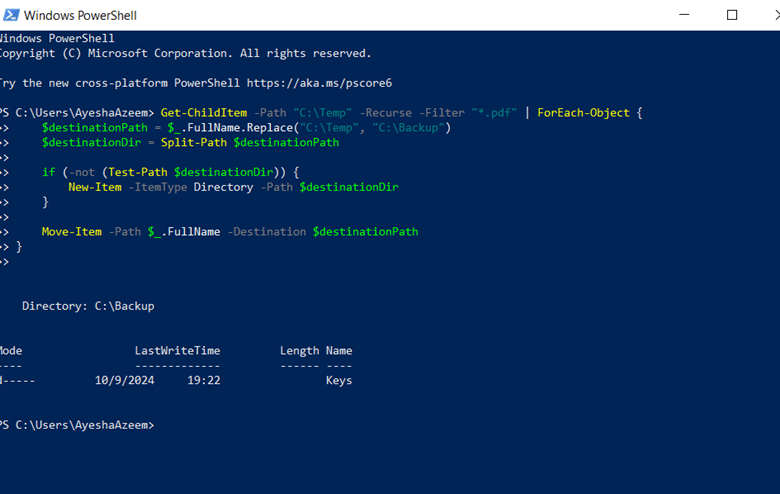
Here, Get-ChildItem -Recurse gets all .pdf files in the source directory, including sub-folders. ForEach-Object loops through each file found.
Replace(“C:\Temp”, “C:\Backup”) adjusts the source path to create the corresponding path in the destination, and New-Item -ItemType Directory creates the folder structure if the destination directory does not exist.
Handle Overwrites
Occasionally, you may need to overwrite an existing file. For this purpose, use the -Force parameter with the PowerShell Move-Item cmdlet.
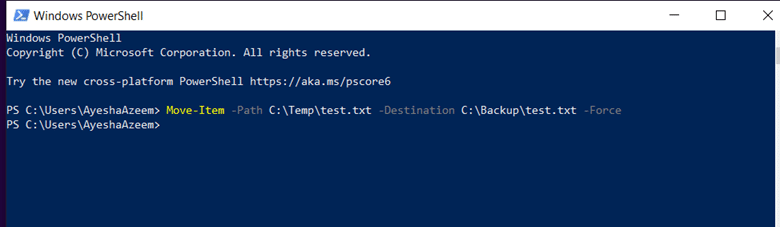
Scenario 1 – Overwrite a file at the destination
This cmdlet moves the test.txt file from the C:\Temp folder to the C:\Backup folder while overwriting any file that may exist at the destination with the same name.
Move-Item -Path C:\Temp\test.txt -Destination C:\Backup\test.txt -Force
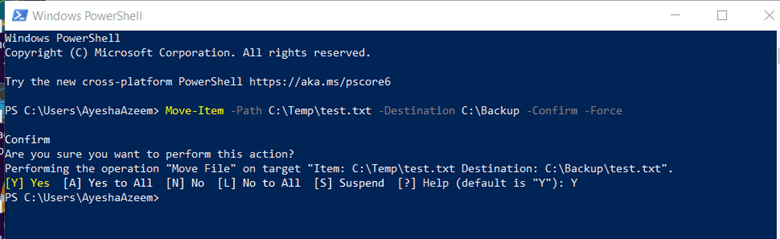
Scenario 2 – Overwrite a file at the destination after confirmation
Use the -Confirm parameter to get a confirmation prompt before overwriting files.
- This cmdlet displays a confirmation prompt if any of the PDF files already exist in the destination folder.
Move-Item -Path C:\Temp\*.pdf -Destination C:\Backup -Confirm -Force
- This cmdlet displays a confirmation prompt if the test.txt file already exists in the destination folder.
Move-Item -Path C:\Temp\test.txt -Destination C:\Backup -Confirm -Force
Type Y and press Enter to overwrite the files or type N and press Enter to skip them.
Test Commands Before Execution
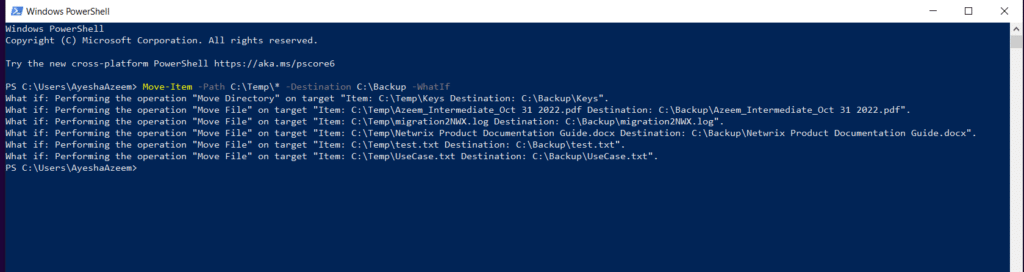
Use the -WhatIf parameter with the Move-Item cmdlet to view the results, i.e., check what would happen if the cmdlet runs. With this parameter, the cmdlet does not run but expected results are displayed. You can therefore be confident that the cmdlet does not move any item that is otherwise not intended to be moved.
Scenario 1 – View the expected result of a cmdlet without running it
This cmdlet displays the results when you attempt to use the Move-Item cmdlet to move all items from the C:\Temp folder to the Backup folder.
Move-Item -Path C:\Temp\* -Destination C:\Backup -WhatIf
Error Handling and Logging
You should consider implementing error handling and logging when using PowerShell’s Move-Item cmdlet to ensure that the script behaves as expected, and any issues are easily tracked and identified. PowerShell provides:
- Try-Catch for error handling
- Write-Log to write to log files
Basic error handling with Try-Catch
Following is a basic Try-Catch block for moving a file with error handling:
Try {
    Move-Item -Path C:\Temp\test.txt -Destination C:\Backup\test.txt -ErrorAction Stop
} Catch {
    Write-Output "Error moving file: $_"
}
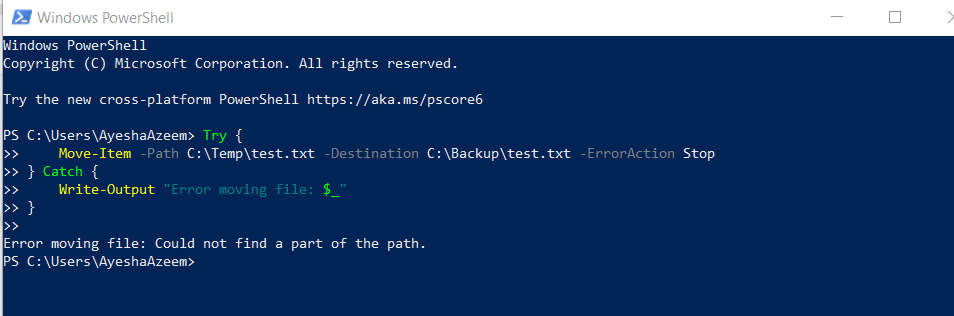
Here’s what you need to know.
- The Try block attempts to run the Move-Item cmdlet.
- The -ErrorAction Stop parameter tells PowerShell to stop the action and throw an error in case of an issue (say, the file does not exist or there are permission issues), and enter the Catch block.
- -The Catch block catches the error the Move-Item cmdlet throws.
- Write-Output displays the error message ($_ contains the error details). You can also replace Write-Output with logging functions like Write-Log to save the error to a log file.
The -ErrorAction parameter specifies what should happen if an error occurs. Possible values are:
- Stop – The operation will stop on the error
- Continue – The operation will continue after an error
- SilentlyContinue – The operation will ignore the error without displaying anything
- Inquire – Prompts the user for input when an error occurs
- Ignore – Ignores the error
Best Practices for File Management with PowerShell
Limit the cmdlet to one source and destination folder
The Move-Item cmdlet does not create a folder or the directory structure at the destination. You also cannot move two files of the same name from two different source locations at the same time. Hence it’s best to specify one source and one destination folder in a cmdlet.
Plan file organization
You must be clear about your file organization structure, especially before moving files in bulk. Firstly, the source directory must be organized with files and folders properly maintained, so while moving Items, you know that is being moved. Secondly, the folder structure at the destination must be well-defined, so every item moves as desired. This helps you easily locate each moved file.
Test cmdlets on sample data
Test the Move-Item cmdlet on sample data to ensure that the results are as expected. This will help address any oversight into overwrites or conflicts.
If you do not have enough sample data or you want to save time, use the -WhatIf parameter to simulate the move without actually running the cmdlet. In this way, you can test cmdlets and scripts to view the outcome before making any changes.
Keep backups
As a precaution, back up all the important files and folders before you use the Move-Item cmdlet, particularly the overwrite ones –to avoid being disoriented later.
Implement logging and error handling
Logging and error handling are useful tools to handle unexpected errors. Implementing these helps to identify and track any errors in the Move-Item operations.
You can either use the -ErrorAction parameter or the try-catch blocks in your cmdlets for error handling.
Conclusion
The PowerShell Move-Item cmdlet holds the power of a wizard when it comes to managing and organizing files. It caters to both novice and advanced users with a simple syntax at its very basis, that you can build up with parameters and scripts. You can move a single file, multiple files, hidden and read-only files, an entire directory with all its contents to another location, rename a file while moving it, handle overwrites, and much more. The cmdlet also supports logging and error handling to ensure that file moves are reliable and safe.
FAQs
What happens if a file with the same name already exists at the destination?
When you try to move a file using the Move-Item cmdlet and a file with the same name already exists the destination, then one of the following happens:
- The Move-Item cmdlet is run without the -Force parameter:
Move-Item -Path C:\Temp\test.txt -Destination C:\Backup\test.txt
The cmdlet throws an error and does not move the file.
- With the -Force parameter:
Move-Item -Path C:\Temp\test.txt -Destination C:\Backup\test.txt -Force
PowerShell will overwrite the file at the destination without asking for confirmation. This will replace the file in the destination with the file you’re moving.
See the Handle Overwrites section for additional information.
Can I move multiple files at once?
Yes, that’s possible with PowerShell’s Move-Item. You can:
- Move files of the same extension, files with different extensions, and all files from the root of a source directory. You can use the following cmdlet to move all files from the root of the source directory:
Get-ChildItem -Path C:\Temp\* -File | Move-Item -Destination C:\Backup
See the Move Multiple Files section for details.
- To recursively move all files of the same extension from the source directory, use this cmdlet:
Get-ChildItem -Path C:\Temp\*.pdf -Recurse | Move-Item -Destination C:\Backup
See the Recursive File Moving section for details.
- Move the source directory with all its contents using this cmdlet:
Move-Item -Path C:\Temp -Destination C:\Backup
See the Move a Directory section for details.
How do I move files with specific attributes?
The Move-Item cmdlet can move files based on specific criteria, such as file size, date modified, and so on. Here is a list of the common attributes that you can filter on:
- Hidden
- ReadOnly
- Archive
- Compressed
- Encrypted
Use these in the Where-Object filter to target files with those attributes. You can also combine multiple conditions using -and or -or in Where-Object to filter files with multiple attributes.
See the Filter Files and Advanced Moving Scenarios topics for additional information.
Can I use Move-Item to move files between different drives?
The simple answer is, yes. Files will be moved to the location you specify as the destination, be it the same as the source drive or a different drive.
How do you move a file and overwrite using Move-Item?
If you want to overwrite a file at the destination with a file you are moving, use the -Force parameter with Move-Item. For example:
Move-Item -Path C:\Temp\test.txt -Destination C:\Backup\test.txt -Force
PowerShell will replace the test.txt file in the Backup folder with the test.txt file from the Temp folder without asking for confirmation. See the Handle Overwrites section for additional information.
How can I move hidden files using PowerShell?
While moving a folder or multiple files of the same extension, the Move-Item cmdlet does not move hidden or read-only files. Use the Get-ChildItem cmdlet with the -Force parameter to include hidden and system files in the output, and then pipe the results to Move-Item.
You can use this cmdlet, for example, to move all the files, including hidden files.
Get-ChildItem -Path C:\Temp\ -Force | Move-Item -Destination C:\Backup\
To specifically move hidden files (and not visible files), use this cmdlet:
Get-ChildItem -Path C:\Temp\ -Force | Where-Object { $_.Attributes -match 'Hidden' } | Move-Item -Destination C:\Backup\
As you added a condition to filter hidden files, the cmdlet moves only the files that have the “Hidden” attribute set.
What are some common errors when using Move-Item and how can I troubleshoot them?
Some common errors along with their explanation and solution is given below.
File already exists
When you attempt to move a file or folder to a destination where a file already exists with the same name, the following error is displayed:
Move-Item : Cannot create a file when that file already exists.
Use the -Force parameter to overwrite the existing file.
Access Denied
When you do not have the necessary permissions to move the file, the following error is displayed:
Move-Item : Access to the path 'C:\Path\to\file.txt' is denied.
There could be many reasons for this, such as the file is protected, the destination folder requires admin privileges, or the file is in use by another process.
To resolve the issue, make sure you have the needful permissions. It is recommended that you run PowerShell as an administrator. Moreover, make sure that the file is not in use by another application.
File Locked by Another Process
When the file to be moved is being used by another program or process, the following error is displayed:
Move-Item : The process cannot access the file because it is being used by another process.
To resolve the issue, close any applications using the file.
Path Too Long
By default, Windows has a maximum path length of 260 characters, and Move-Item will fail if the source or destination path exceeds this limit. PowerShell displays the following error:
Move-Item : The specified path, file name, or both are too long.
To resolve the issue, either use shorter directory or file names, or enable long path support in Windows 10/11 or Windows Server via Group Policy or the registry.
Invalid Path or File Name
When source path or destination path is incorrect, misspelled, or does not exist, the following error is displayed:
Move-Item : Cannot find path 'C:\InvalidPath\file.txt' because it does not exist.
Double-check the path.
Destination Directory Does not Exist
When the destination directory does not exist, the following error is displayed:
Move-Item : Could not find part of the path 'C:\Backup\'Make sure the destination directory exists. Else create it before moving the files.
Moving a Directory into Itself
PowerShell does not allow you to move a directory into one of its sub-directories. On trying to do so, the following error is displayed:
Move-Item : Cannot move item 'C:\Temp\' to a subdirectory of itself, 'C:\Temp\Logs\'.
Make sure the destination is not a sub-folder of the source directory.
Is it possible to move files based on their content?
By itself, the Move-Item cmdlet cannot move files based on their content. You can, however, use Get-Content or other file reading methods with conditional logic (such as If-Else statements) to read the content of a file and then use Move-Item to move the file accordingly.
Here’s a sample script that checks if a file contains a specific word or phrase. If yes, it moves the file.
Note: Make the following changes before you run the script:
- Modify the $searchString variable to match the content you want to filter.
- Change $sourceDirectory and $destinationDirectory to the appropriate paths.
$sourceDirectory = "C:\SourceFolder"
$destinationDirectory = "C:\DestinationFolder"
$searchString = "SpecificText"
# Get all files in the source directory
Get-ChildItem -Path $sourceDirectory -File | ForEach-Object {
    $filePath = $_.FullName
    # Read the content of the file
    $content = Get-Content -Path $filePath
    # Check if the file contains the search string
    if ($content -match $searchString) {
        # Move the file to the destination directory
        $destinationPath = Join-Path -Path $destinationDirectory -ChildPath $_.Name
        Move-Item -Path $filePath -Destination $destinationPath
        Write-Host "Moved file: $filePath to $destinationPath"
    }
    else {
        Write-Host "File does not contain search string: $filePath"
    }
}
Get-ChildItem gets all the files from the source folder and ForEach-Object loops through each file. Get-Content reads the content of each file to checks if the content matches the specified string. Then Move-Item moves the files containing the string to the destination folder.
What if the file I am trying to move does not exist, or the source path is not valid?
In either case, PowerShell will throw an error.
Move-Item : Cannot find path 'C:\Temp\AppLog.txt' because it does not exist.
Similarly, if any element of the destination path does not exist, the cmdlet fails. It does not create a missing directory or any element of the path.
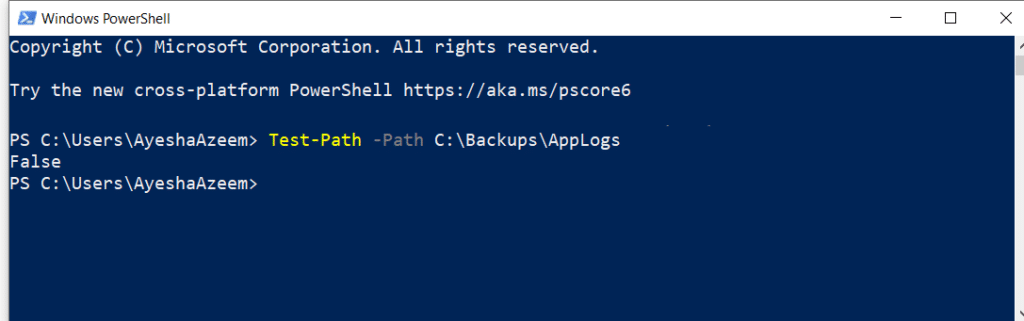
A good idea is to run Test-Path to check if the file exists. This cmdlet returns $true if all elements of the path exist and $false if any are missing.
Test-Path -Path C:\Backups\AppLogs
False