If your organization is being taken to court, you will be asked for certain pieces of electronically stored information (ESI). In particular, your organization might be required to hold onto the contents of an employee’s mailbox or produce all documents related to a case.
To help, Office 365 provides both litigation hold and eDiscovery capabilities.
Litigation Holds in Office 365
About Office 365 Litigation Holds
An Office 365 litigation hold suspends any retention policy or automatic deletion for a given mailbox so that no ESI can be removed from the mailbox.
Important: To be put on litigation hold, a mailbox must be assigned either an Exchange Online Plan 2 license or a separate Exchange Online Archiving license.
The normal workflows for deleted mailbox items in Office 365 involve the following:
- When a user permanently deletes a mailbox item or deletes an item from the Deleted Items folder, that item is moved to the Deletions subfolder in the Recoverable Items folder.
- When their retention period expires, mailbox items are moved to the Deletions subfolder automatically by the deletion policy.
- When a user purges an item in the Recoverable Items folder or the retention period expires for an item in that folder, the item is moved to the Purges subfolder in the Recoverable Items folder and marked for permanent deletion.
Office 365 litigation holds preserve the original and all modified versions of each item. Even if a user deletes an item from their mailbox using any version of Outlook, Office 365 retains the item for discovery purposes. In addition, during a litigation hold:
- An admin can use the Core eDiscovery tool to search for preserved ESI in the mailbox.
- The user can continue to send and receive new mail.
- The user’s archive mailbox (if it’s enabled) is also placed on hold.
You can configure how long a litigation hold lasts. While it lasts, ESI cannot be deleted from your system — the contents will not change, and deleted items are kept even though they may appear to the user to be gone. At the expiration of the period you set, the hold will automatically be removed and the existing retention policy (if any) that applies to the mailbox will be enforced.
Litigation hold is not an alternative to regular backup processes. It is designed to preserve electronically stored information to prevent information loss. It does not restore lost data.
If you’ve managed an Exchange on-premises installation, you might be familiar with another type of hold, the in-place hold. These holds were deprecated and removed from Exchange Online, so the only hold that is supported after the fall of 2018 is the litigation hold, which was introduced with Exchange Server 2010.
Differences between Email Archiving, Journaling and Retention Policy
Email archiving is a long-term storage method for ESI in mailboxes. Archiving will not save email forever; it’s a place for users to store old email data so they don’t exceed their mailbox capacity. Turning on the archive function gives the user an archive mailbox in addition to their current mailbox. Archived email remains available until it is deleted manually or due to storage limitations.
Journaling allows messages to be written to locations separate from mailboxes. Journaling helps with compliance by providing your company with another “source of truth”: If an email is deleted from the original mailbox or the mailbox becomes unavailable, the journal will still hold the message, as long as the journaling rule was functioning at the time the message was stored.
A retention policy states how long you must keep data before you can delete it. Depending on applicable regulations, your company may be required to retain email or other ESI for months or even years. A retention policy may also include requirements about data storage methods.
Creating a Litigation Hold in Office 365 using PowerShell
To place an Exchange Online mailbox on litigation hold using PowerShell, open a session to Exchange Online and then issue the following command, specifying the mailbox name and the number of days for the litigation hold:
Set-Mailbox mailbox@yourtenant.com -LitigationHoldEnabled $true -LitigationHoldDuration nnnn
To place an Exchange Online mailbox on litigation hold indefinitely, use the same command but omit the LitigationHoldDuration parameter:
Set-Mailbox mailbox@yourtenant.com -LitigationHoldEnabled $true
To set a litigation hold on all mailboxes in your Office 365 tenant, use the following command:
Get-Mailbox -ResultSize Unlimited -Filter {RecipientTypeDetails -eq "UserMailbox"} | Set-Mailbox - LitigationHoldEnabled $true -LitigationHoldDuration nnnn
Creating a Litigation Hold in Office 365 using the Web Interface
Alternatively, you can use the web interface. It will take a lot more time to enable a litigation hold on multiple mailboxes than it would take to issue one PowerShell command. But for one or two mailboxes, the process is simple:
1. Navigate to the Exchange Admin Center at https://outlook.office365.com/ecp.
2. From the dashboard, select recipients.
3. Double-click the mailbox you want to put on litigation hold. The following pop-up will appear. 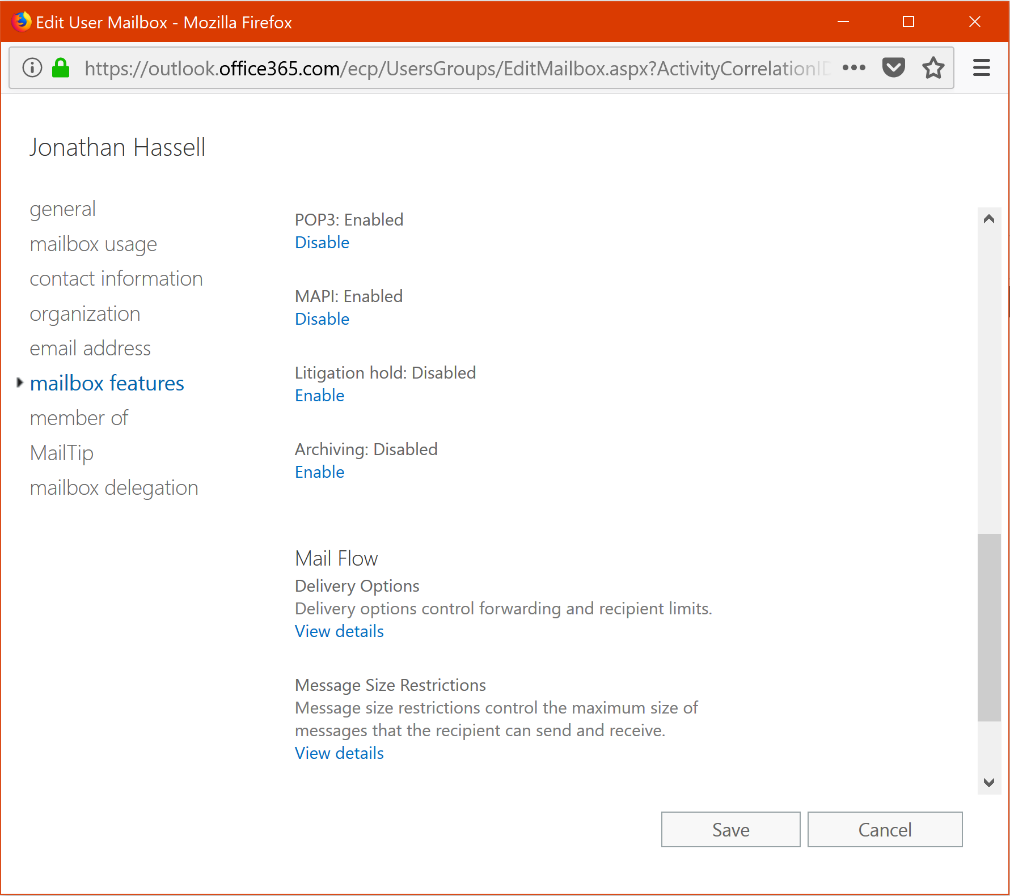
Figure 1. Putting litigation hold on a mailbox using the Exchange Admin Center
5. Click mailbox features on the left, and then scroll down to Litigation hold: Disabled.
6. Click Enable. The following screen will appear.
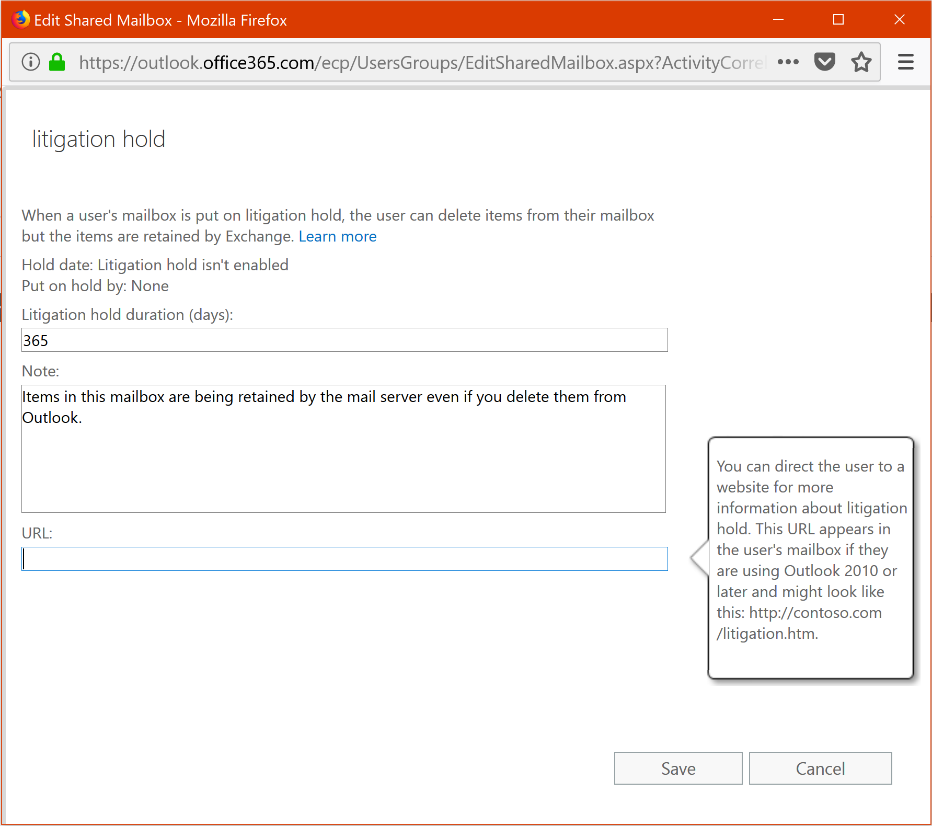
Figure 2. Enabling a litigation hold on mailbox
6. In the first field, specify the number of days you want the litigation hold to remain in effect.
7. In the Note section, you can enter text that will be displayed to the user in a small display ribbon in the Microsoft Outlook client. This is an effective way to explain to the user what’s happening and let them know that deleting an item won’t actually remove it. You can also enter a URL to an intranet or internet site that describes the hold, the reason behind it, details about the legal case, or whatever your communications team might want to say.
8. Click Save and then Save again, and the litigation hold will take effect.
To disable the hold, follow steps 1 and 2, but in step 3, instead of clicking Enable, click Disable. Then click Save.
Office 365 eDiscovery
Sometimes, administrators will be asked to find all materials that include a specified keyword or keywords across the organization’s Exchange Online mailboxes, Office 365 groups, Microsoft Teams, SharePoint Online and OneDrive for Business sites, and Skype for Business conversations. The Office 365 eDiscovery search feature can help you find this relevant electronically stored information across all these content sources. (If you need to search mailboxes only, use In-Place eDiscovery in the Exchange Admin Center.)
To use eDiscovery, an individual must be assigned the appropriate permissions. To do that, assign them one of the following roles in the Security & Compliance Center:
- Compliance Administrator
- eDiscovery Manager & Administrator
- Organization Management
- Reviewer
Choose the role based on which actions the user should be able to perform, such as controlling access to Core eDiscovery and Advanced eDiscovery cases, running the Content Search tool, exporting search results, or executing bulk removal of data.
eDiscovery Options: Content Search, Core eDiscovery, Advanced eDiscovery
Office 365 provides three useful eDiscovery tools:
- Content Search supports large searches of mailboxes, public folders, SharePoint Online sites and OneDrive for Business locations. You can run unlimited searches simultaneously on mailboxes and sites. The number of content sources and estimated number of search results will show in the details pane of the search page.
- Core eDiscovery is a basic eDiscovery tool for searching and exporting content in Office 365. You can use it to place holds on content locations like Exchange mailboxes, SharePoint sites, OneDrive accounts and Microsoft Teams.
- Advanced eDiscovery collects, preserves, analyzes, reviews and exports content for investigations. By using Office 365 Advanced eDiscovery, legal teams can manage eDiscovery custodians and the legal hold notification workflow, and perform a deep analysis of case data. This functionality requires either an Office 365 E3 subscription with the Advanced Compliance add-on, or an E5 subscription.
Creating an eDiscovery Case
To manage the holds, searches and exports for each term, you separate them into cases. That way, you can easily turn things on and off, close cases that are complete, and track what is happening with each search term.
To create an eDiscovery case, take the following steps:
1. In the Security and Compliance Center, from the left menu, choose Search & Investigation.
2. Choose eDiscovery from the sub-menu. You’ll be presented with the following screen.
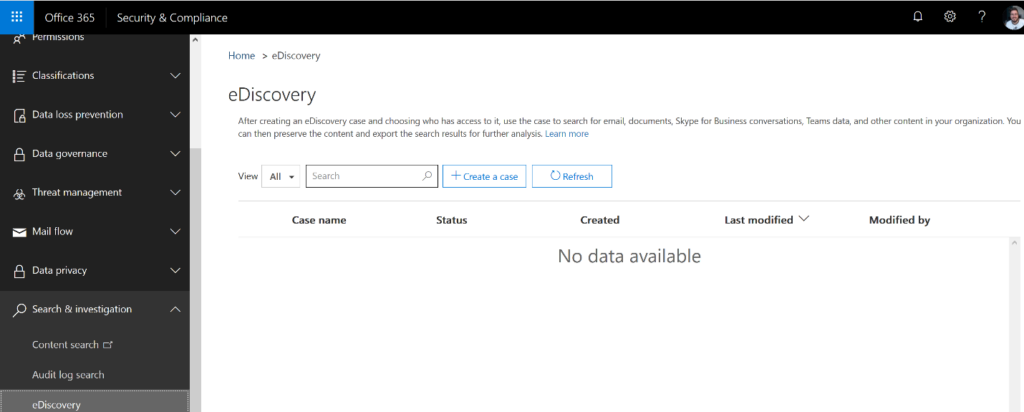
Figure 3. The eDiscovery portal in the Security and Compliance Center
3. Click + Create a case.
4. Give your case a friendly name and description, and then click Save.
Your case name will appear in the list. Click Open beside the case name to get started configuring discovery actions.
Add Users to an eDiscovery Case
To add users to an eDiscovery case, you must first add the user to the eDiscovery Manager role group on the Permissions page of the Security & Compliance Center:
1. On the Advanced eDiscovery page, navigate to the case you need to add the user to.
2. Click the Settings tab and then click Select in the Access and Permissions tile.
3. Click Update.
4. To add case members, click Add under “Manage members”. To add a role group, click Add under “Manage role groups”.
5. Tick the names of the users or role groups you want to add.
6. Click Add.
7. Click Save on the “Manage This Case” page.
Configuring eDiscovery Actions
In the eDiscovery Center, cases are split into three actions:
- Hold. To have a litigation hold automatically placed on all mailboxes, SharePoint sites and public folders with content that matches certain keywords and conditions, click Create Query and follow the wizard. The key screen on the wizard is the one where you specify the query conditions. The figure below illustrates how to specify a keyword and a date filter to limit the scope of the search and resulting holds.
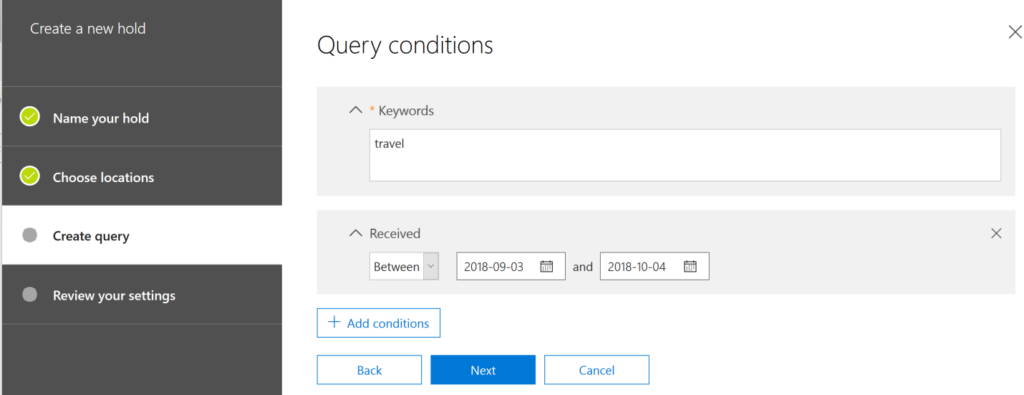
Figure 4. Specifying query conditions
- Search. With the eDiscovery search, you can save and run content searches for keywords and other content, and you can set the scope of the search to only held locations, all content locations or a custom configuration. You can start a search query, step away and come back after it is complete, so this is a good option for larger tenants.
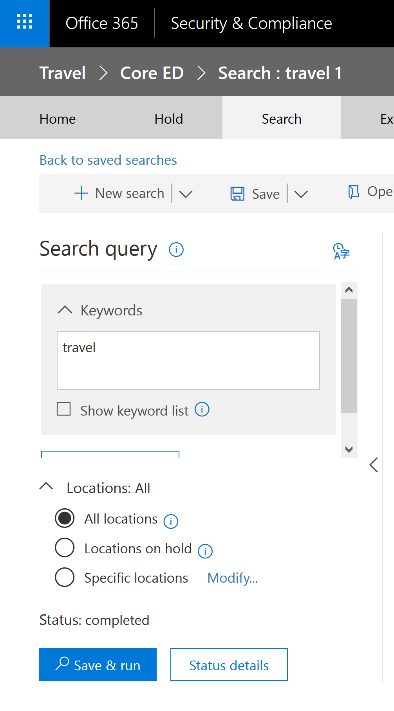
Figure 5. Searching
- Export. The export area allows you to export the search results to a PST file, which you can then download and open on your own local computer or provide to counsel. You can choose to export to a single PST file or to one PST file per mailbox, and the output will be encrypted using a key that you choose. The wizard will walk you through the steps required to export data.
Assigning eDiscovery Permissions
Being able to globally search on whatever keyword you specify across all of the mailboxes in your tenant is a powerful privilege that requires discretion and respect. Therefore, you need to assign a designated eDiscovery manager who will have permissions to preview search results, export results and manage all aspects of the eDiscovery process. Choose this person wisely; they will have full access to every piece of data stored in your tenant, regardless of other permissions that are set.
To designate an eDiscovery manager, take the following steps:
1. In the administrator portal, go to Security & Compliance, and then click the only option in the left pane.
2. Scroll down to the eDiscovery Manager role and click the checkbox.
3. In the pop-up window that appears, specify a user for the eDiscovery Manager role and a user for the eDiscovery Administrator role — the latter needs to have administrative privileges.
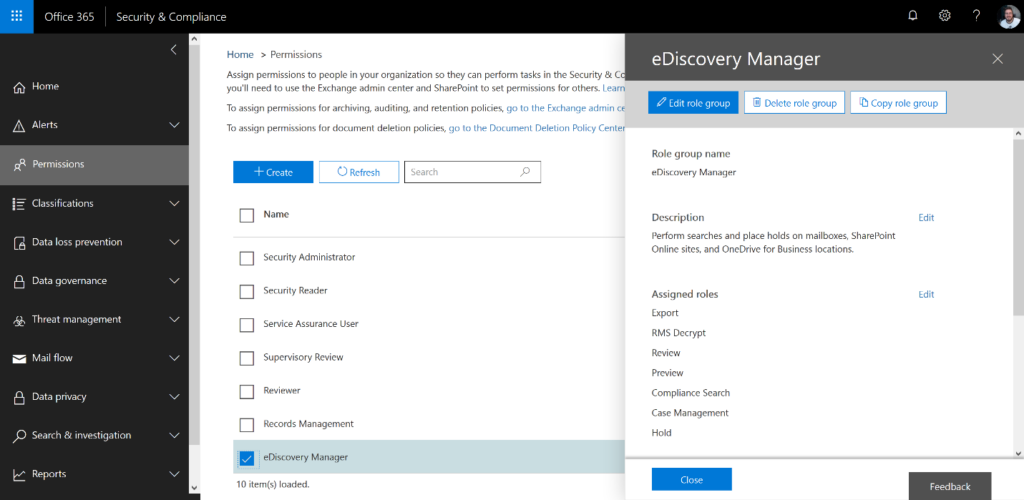
Figure 6. Designating an eDiscovery manager
How Netwrix Helps with Litigation Holds and eDiscovery in Office 365
Netwrix offers a robust solution for finding the right documents for investigation and legal proceedings. Since these documents are often scattered across the infrastructure, in Office 365 and other and cloud platforms like Box or Dropbox, as well as in in-prem file servers and databases, it is extremely valuable to have a solution that discovers data across your entire IT ecosystem.
The Netwrix solution enables you to quickly find data relevant to your case across multiple on-prem and cloud repositories. It also helps you preserve this ESI from alteration and destruction, and collect all evidence to a central location for further review. It even automatically redacts PII and other information that is not needed for the legal proceeding so you can avoid breaches of confidential information.
In addition, the Netwrix solution enables you to:
- Streamline identification of ESI sources
- Reduce eDiscovery and litigation support costs
- Minimize business disruptions during litigation
- Facilitate document review and processing
- Preserve collected data for litigation support
- Enforce information governance