To help admins manage local users and groups with PowerShell more easily, Microsoft provides a cmdlet collection called Microsoft.PowerShell.LocalAccounts. Previously, you had to download and import it into PowerShell explicitly, and also install Windows Management Framework 5.1; in the Windows Server 2016 and Windows 10 operating systems, the cmdlet collection is included as a standard module.
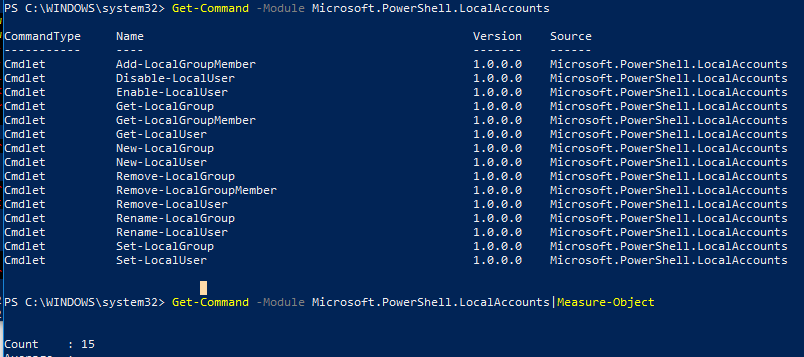
There are 15 cmdlets in the LocalAccounts module. You can view the full list by running the following command:
Get-Command -Module Microsoft.PowerShell.LocalAccounts
- Add-LocalGroupMember — Add a user to the local group
- Disable-LocalUser —Disable a local user account
- Enable-LocalUser — Enable a local user account
- Get-LocalGroup — View local group preferences
- Get-LocalGroupMember — View the list of all local group members
- Get-LocalUser — View a local user account’s preferences
- New-LocalGroup — Create a new local group
- New-LocalUser — Create a new local user account
- Remove-LocalGroup — Remove a local group
- Remove-LocalGroupMember — Remove a member from a local group
- Remove-LocalUser — Remove a local user account
- Rename-LocalGroup — Rename a local group
- Rename-LocalUser — Rename a local user account
- Set-LocalGroup — Change the settings of a local group
- Set-LocalUser — Change the account settings of a local user
Managing Local User Accounts with PowerShell
Let’s see how you can use these commands to perform common tasks related to managing local users on a Windows 10 computer.
Listing users and their properties with PowerShell
First, let’s get a list of all local user accounts on the machine. We’ll use the Get-LocalUser cmdlet:
Get-LocalUser

As you can see, we have two local user accounts, and one of them is disabled (the one that has “False” in the “Enabled” column).
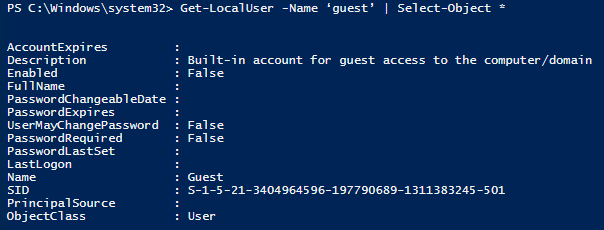
If you want to output all the properties and their values for a local user account, you need to use the Get-LocalUser cmdlet with the following parameters:
Get-LocalUser -Name ‘guest’ | Select-Object *
To get the value of a particular local user account attribute, type its name after the Select-Object parameter. In this example, we want to know the value of the PasswordLastSet attribute for the account with the username “administrator”:
Get-LocalUser -Name ‘administrator’ | Select-Object PasswordLastSet

Creating a local user with PowerShell
Let’s create a new user with the help of the New-LocalUser cmdlet. This cmdlet can create the following types of user accounts:
- Windows local user accounts
- Microsoft accounts
- Azure Active Directory accounts
When creating a local user account, never type in the password as plain text; always convert it to a secure string using the ?AsSecureString or ?ConvertTo-SecureString parameter. Here’s the command for creating a new local user account:
$UserPassword = Read-Host –AsSecureString
New-LocalUser "Netwrix" -Password $UserPassword -FullName "Netwrix" -Description "CompleteVisibility"
In a Windows 10 environment, users can authorize under their Microsoft accounts, so we can create a new local user account that binds to a Microsoft account’s credentials. Use the following script to do this (note that you don’t need to type in the password because it is stored in the Microsoft cloud):
New-LocalUser -Name "MicrosoftAccountSomeAccount@outlook.com" -Description "Microsoft Account"
In order to create a local account that binds to your Azure AD, use the following command:
New-LocalUser -Name "AzureADNetwrix@enterprise.com" -Description "Azure AD Account"
Changing a local user’s password or password properties with PowerShell
To change the password of a local user account, we need to use the Set-LocalUser cmdlet. Let’s change the local admin password:
$UserPassword = Read-Host –AsSecureString
Set-LocalUser -Name Administrator -Password $UserPassword –Verbose
To set the Password never expires to a local user with PowerShell, we need to run the following script:
Set-LocalUser -Name Netwrix –PasswordNeverExpires $False
Deleting a local user account with PowerShell
To remove a local user account, you need to use the Remove-LocalUser cmdlet:
Remove-LocalUser -Name Netwrix -Verbose
Managing Local Groups with PowerShell
Now let’s turn our attention from local users to local groups.
Reviewing local groups with PowerShell
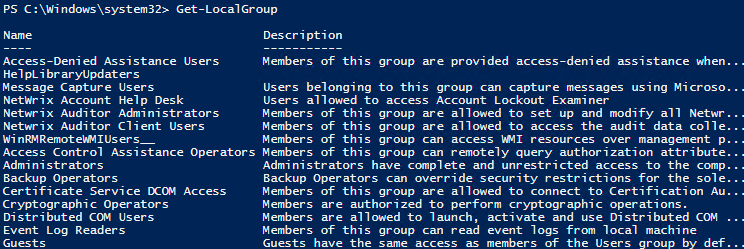
First, let’s get a list of all groups on our Windows Server:
Get-LocalGroup
Adding a local group with PowerShell
Now let’s create a new group:
New-LocalGroup -Name 'Netwrix Users' -Description 'Netwrix Users Group'
Adding users to a local group with PowerShell
To add a user (or a group) to a local group, we need to use the Add-LocalGroupMember cmdlet. For example, suppose we want to add users to the local Administrators group, but we don’t want to add them one by one. Let’s add a group to local Administrators, namely the “Netwrix Users” group:
Add-LocalGroupMember -Group 'Administrators' -Member ('Netwrix',’Netwrix Users') –Verbose
If your computer or server is a part of the domain, you can also add domain account and groups to local groups in order to give those users special local rights on the server. Add them using the format “DomainNameUser” (for a user) or “DomainNameDomain Group” (for a group).
Viewing the membership of a particular group with PowerShell
Now let’s list all the members of a particular local group:
Get-LocalGroupMember -Group 'Netwrix Users'
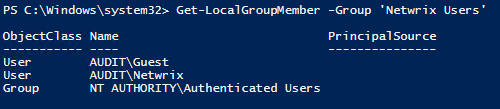
As you can see, the command shows all the local account and groups that are members of the group “Netwrix Users”. Although only local accounts and groups are listed here, this command will also show any domain users and group, as well as all Microsoft and Azure AD accounts.
Viewing all groups that a user is a member of using PowerShell
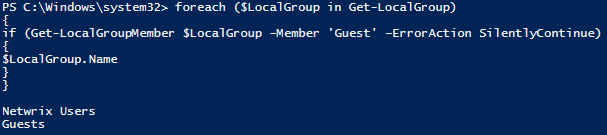
To list all the groups that a particular user is a member of, we’d run the following script:
foreach ($LocalGroup in Get-LocalGroup)
{
if (Get-LocalGroupMember $LocalGroup -Member 'Guest' –ErrorAction SilentlyContinue)
{
$LocalGroup.Name
}
}
Removing a local group with PowerShell
To remove a local user account from a group, you need to use the Remove-LocalGroupMember cmdlet:
Remove-LocalGroupMember -Group 'Netwrix Users' –Member 'guest'
Managing local users and groups remotely with PowerShell
If you want to manage local user account and groups remotely, you need to connect to the remote workstations via WinRM using the Invoke-Command and Enter-PSSession cmdlets. For example if we want to output the membership of the local Admin group remotely on multiple computers we need to run the following script:
$search = new-pssession -computer pcname1,pcname2,pcname3
invoke-command -scriptblock {Get-LocalGroupMember -Group 'Administrators'} -session $search -hidecomputername | select * -exclude RunspaceID | out-gridview -title "LocalAdmins"
As you can see, it is rather easy to manage local groups and users via PowerShell, but to ensure security, compliance and business continuity, it’s essential to audit all these changes. To learn about configuring native auditing, please refer to the Windows Server Auditing Quick Reference Guide.