The New-ADGroup cmdlet in PowerShell enables administrators to create Active Directory groups efficiently while defining key attributes like scope, category, description, manager, and OU placement. Groups can be created individually, from existing group templates, or in bulk using CSV files. By specifying parameters such as GroupScope, GroupCategory, and ManagedBy, admins can streamline group creation and ensure accurate access control.
Introduction
Active Directory offers two types of groups, which are both quite valuable:
- Distribution lists are quite handy for sharing information.
- Security groups are indispensable for accurately and efficiently granting access to resources based on users’ roles and responsibilities.
Ensuring that these groups are created promptly, populated with the right members, and deleted when they are no longer needed is vital to both user productivity and security.
The easiest way for administrators to manage AD objects, including AD groups, is to use either Active Directory Users and Computers (ADUC) or Active Directory Administrative Center (ADAC). But while these tools are great for simple management tasks, they have limitations. In particular, you cannot update many attributes during object creation, and you cannot create multiple objects at once.
To overcome these limitations, administrators can turn to PowerShell. This article explains how to use the PowerShell to create a group while specifying various properties, create a group using an existing group as a template, and create groups in bulk using a CSV file as input. Then it offers a powerful third-party tool that simplifies group creation and management.
The New-ADGroup Cmdlet
Using the New-ADGroup cmdlet, you can create an AD group and define many of its attributes. There are many ways to create objects using the New-ADGroup cmdlet, some of which are as follows:
- You can simply use the New-ADGroup command with the required parameters.
- You can also use an existing group as template for creating a new group. In this way, the new group has the same properties as those of the template group.
- You can use a CSV file to create multiple objects and can set multiple properties using the columns as values for the created groups.
New-ADGroup: Syntax
Here is the syntax of the New-ADGroup cmdlet:
New-ADGroup [-WhatIf] [-Confirm] [-AuthType <ADAuthType>] [-Credential <PSCredential>] [-Description <String>] [-DisplayName <String>] [-GroupCategory <ADGroupCategory>] [-GroupScope] <ADGroupScope> [-HomePage <String>] [-Instance <ADGroup>] [-ManagedBy <ADPrincipal>] [-Name] <String> [-OtherAttributes <Hashtable>] [-PassThru] [-Path <String>] [-SamAccountName <String>] [-Server <String>]New-ADGroup: Parameters
The New-ADGroup cmdlet offers the following parameters:
| Parameter | Description |
| -WhatIf | Provides information about the output of the command before running it |
| -Confirm | Provides a confirmation prompt before running the command |
| -AuthType | Specifies the authentication method to use, i.e., Basic or Negative |
| -Credential | Provides alternative credentials to run the command (by default, the credentials of the logged-on user are used) |
| -Description | Populates the description of the group |
| -DisplayName | Sets the display name of the group |
| -GroupCategory | Specifies the group type: distribution or security (default is security) |
| -GroupScope | Sets the group scope: domain local, global, or universal (a value is required) |
| -HomePage | Sets the URL of the home page for the group |
| -Instance | Specifies a group that is to be used as a template for setting the properties of the new group |
| -ManagedBy | Specifies the group owner |
| -Name | Sets the group name |
| -OtherAttributes | Sets the values of attributes for which no parameter is available |
| -PassThru | Used to request output from cmdlets that don’t return anything by default (usually to make sure the cmdlet behaved as expected) |
| -Path | Provides the distinguished name of the OU where the group should be created (the default is the built-in OU named “Users”) |
| -SamAccountName | Populates the Security Account Manager (SAM) name of the group |
| -Server | Provides the directory server (domain controller or AD LDS instance) where the group should be created |
Creating Groups using New-ADGroup
Now let’s walk through using some of these parameters to create an AD group.
- Create a Basic Group
- Create a Group with a Description
- Create a Group and Specify Its Manager
- Create a Group in a Specific OU
- Create a Group with a Specific Group Type and Scope
- Create a Group on a Specific DC or LDS Instance
- Create a Group with Other Attributes
- Create a Group using an Existing Group as a Template
- Create Groups in Bulk
Create a Basic Group
If you type only the New-ADGroup command in PowerShell as shown below, you will be prompted to specify the group name and group scope, since those parameters are required. Moreover:
- The group type will be “Security” by default.
- The group will be created in built-in OU named “Users”.
It is shown in the following screenshot.
New-ADGroup

Create a Group with a Description
The following cmdlet creates a group with a description:
New-ADGroup -Name “Marketing” -Description “This is a group for marketing people”
Note that the New-ADGroup cmdlet does not show any output; to see the details of the new group, such as the description we specified, use the following command:
Get-ADGroup Marketing -Properties * | select name,description
Create a Group and Specify Its Manager
You can use the -ManagedBy parameter to set the owner of the group. The owner can be a user or a group. Specify one of the following as the parameter value:
- DN (Distinguished Name
- GUID (Globally Unique Identifier)
- SID (Security Identifier)
- SAM (Security Account Manager) name
The following cmdlet uses the SAMAccountname of a user to set it as the group owner:
New-ADGroup -Name “Finance” -GroupScope Universal -ManagedBy “AbbeyCrawford”
Create a Group in a Specific OU
You can use the -Path parameter to specify the distinguished name of the OU where you want to create the group:
New-ADGroup -Name Human_Resource -GroupScope Universal -Path "OU=NBC,DC=milkyway,DC=local"By using the Get-ADGroup cmdlet, we can see that the group was created where we specified:

Create a Group with a Specific Group Type and Scope
To create a group with a certain group type and group scope, use the -GroupCategory and -GroupScope parameters, respectively:
New-ADGroup -Name VPN -GroupCategory “Security” -GroupScope “DomainLocal”
Create a Group on a Specific DC or LDS Instance
If you have a requirement to create new group on a specific domain controller or LDS instance for the group to be available immediately for use, you can use the following cmdlet:
New-ADGroup -Server dcexch2013.milkyway.local -Name "Accounts" -GroupScope DomainLocal -GroupCategory Distribution
Create a Group with Other Attributes
The New-ADGroup cmdlet has a handful of parameters to define common group attributes like the ones we used in the previous examples. To populate any attribute that does not have a corresponding parameter, you can use the -OtherAttributes parameter:
New-ADGroup -DisplayName "Engineering3" -Name "Engineering3" -Path "OU=VPN,DC=milkyway,DC=local" -GroupCategory Distribution -GroupScope Universal -Description "This is another Engineering group" -OtherAttributes @{'company'=”Versacorp”;'department'=”Engineering”}
Create a Group using an Existing Group as a Template
Sometimes you already have a group that is quite similar to the one you want to create. Instead of specifying all the attributes manually, you can create a new group based on the properties of an existing group. Simply use Get -ADGroup to get the existing group’s attributes and pipe them to the New-ADGroup command, as shown below. Notice that you can override unwanted properties from the template group.
Get-ADGroup Engineering -Properties Description | New-ADGroup -Name "Engineering2" -SamAccountName "Engineering2" -GroupCategory Distribution -PassThru
Create Groups in Bulk
PowerShell also enables you to create objects in bulk based on a CSV file. Here is a sample CSV file:
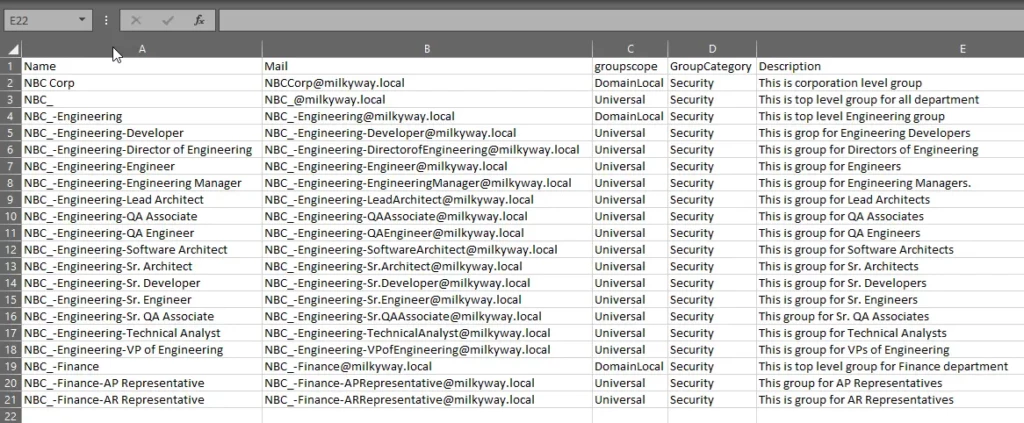
The following script will put the contents of that CSV file into a variable ($Import_Group), and then pass the records one by one to New-ADGroup:
$Import_Group = Import-Csv -Path c:\groupslist.csv

foreach ($group in $Import_Group) {New-ADGroup -Name $Group.Name -Path “OU=NBC,DC=milkyway,DC=local” -Description $Group.description -GroupCategory $group.groupcategory -GroupScope $Group.groupscope -Otherattributes @{'Mail'=$Group.Mail}}
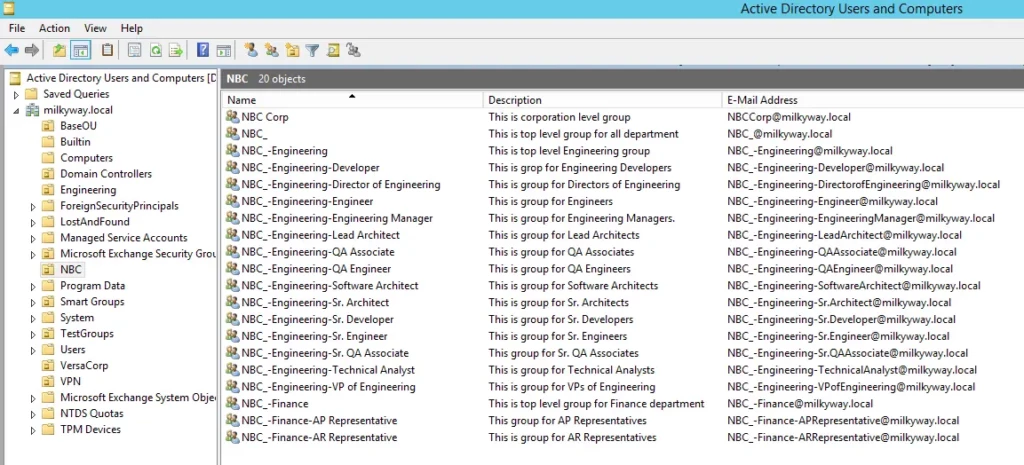
We can use the following cmdlet to see the newly created groups and their populated attributes:
Get-ADGroup -Filter 'Name -like "NBC*"' -SearchBase "OU=NBC,DC=milkyway,DC=local" -Properties * | ft name,mail,groupcategory,groupscope,description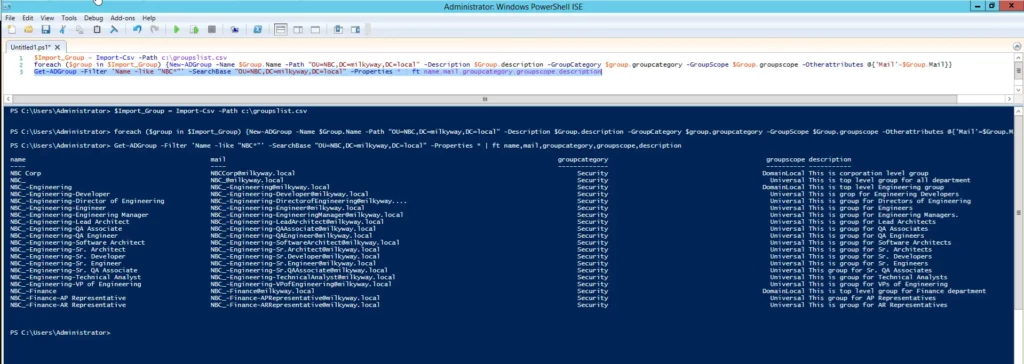
Alternatively, we can look at the newly created groups in ADUC:
Creating Groups with Netwrix Directory Manager
Netwrix Directory Manager is a powerful tool for creating groups in the directory. It can work with Active Directory and Azure AD to facilitate group creation and management. You can use any of the following modules to create groups:
- GroupID Management Shell
- GroupID Automate
- GroupID Self-Service
GroupID Management Shell
GroupID Management Shell is a command-line interface that provides a great alternative to PowerShell. You can create and manage users, mailboxes, contacts and groups in Active Directory and Azure AD.
The New-Group Cmdlet
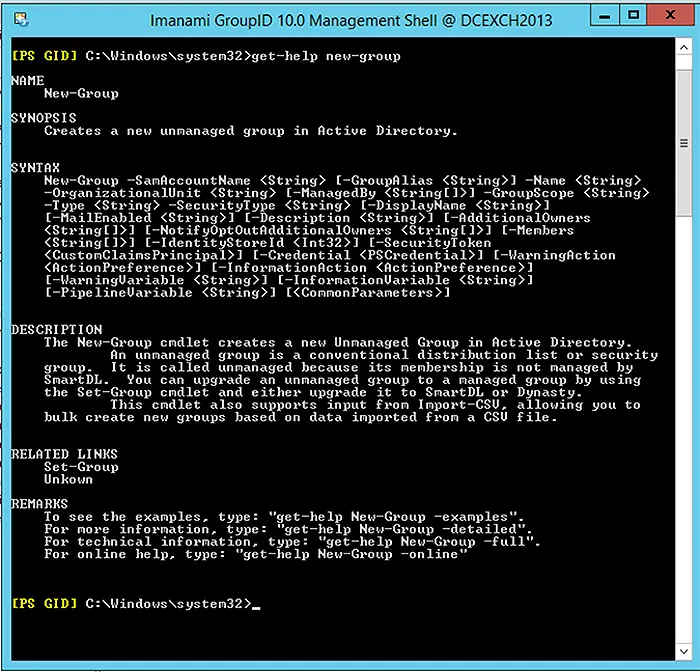
Like its PowerShell namesake, GroupID Management Shell’s New-Group cmdlet enables you to create a new group in the directory.
Syntax
The New-Group cmdlet has the following syntax:
New-Group -SamAccountName <string> -Name <string> -OrganizationalUnit <string> -GroupScope <string> -Type <string> -SecurityType <string> [-GroupAlias <string>] [-ManagedBy <string[]>] [-DisplayName <string>] [-MailEnabled <string>] [-Description <string>] [-AdditionalOwners <string[]>] [-NotifyOptOutAdditionalOwners <string[]>] [-Members <string[]>] [-IdentityStoreId <int>] [-SecurityToken <CustomClaimsPrincipal>] [-Credential <pscredential>] [<CommonParameters>]Required Parameters
The New-Group cmdlet requires the following parameters:
- SamAccountName
- Name
- OrganizationalUnit
- GroupScope
- Type
- SecurityType
Create Criteria-based Smart Groups
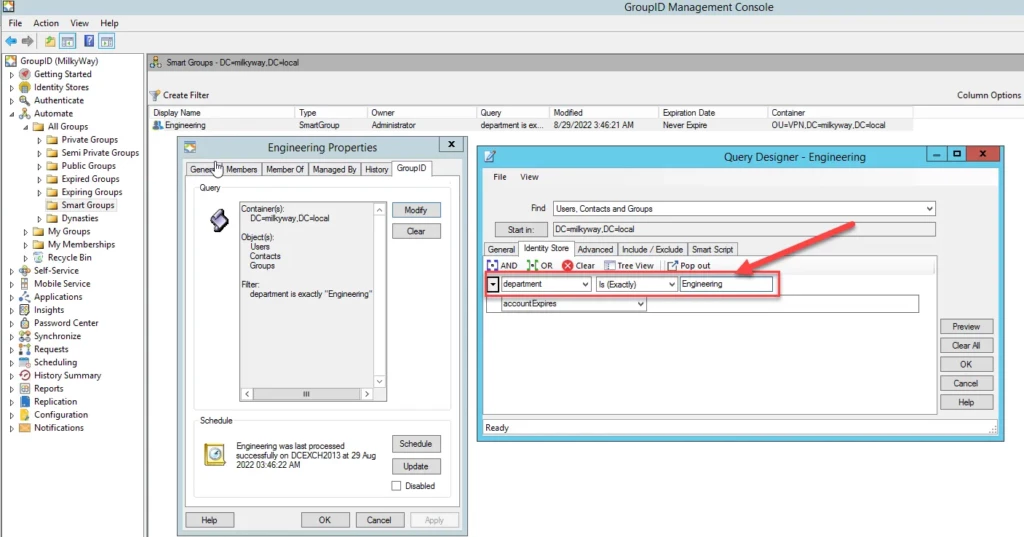
Netwrix Directory Manager enables you to create security groups and distribution lists. Moreover, you can also create Smart Groups, whose membership is dynamically updated using the LDAP query you associate with it.
In addition to creating groups, you can:
- Manage the type, scope, security type and ownerships of groups.
- Specify an expiry date when the group becomes inactive.
- Move groups between domains within a forest.
The following screenshot shows a query that will fetch all users whose department is set to “Engineering” and add them to the group’s membership. Users are also automatically removed from groups when their directory information changes or they are deprovisioned.
Create Groups via Self-Service Web Portal
Netwrix Directory Manager also offers a self-service web-portal that enables business users to create and manage their groups in the directory. Users can:
- Search the directory.
- Create and update directory objects.
- Maintain and update their directory profiles.
The following screenshot shows the dashboard for a user named “Administrator”:
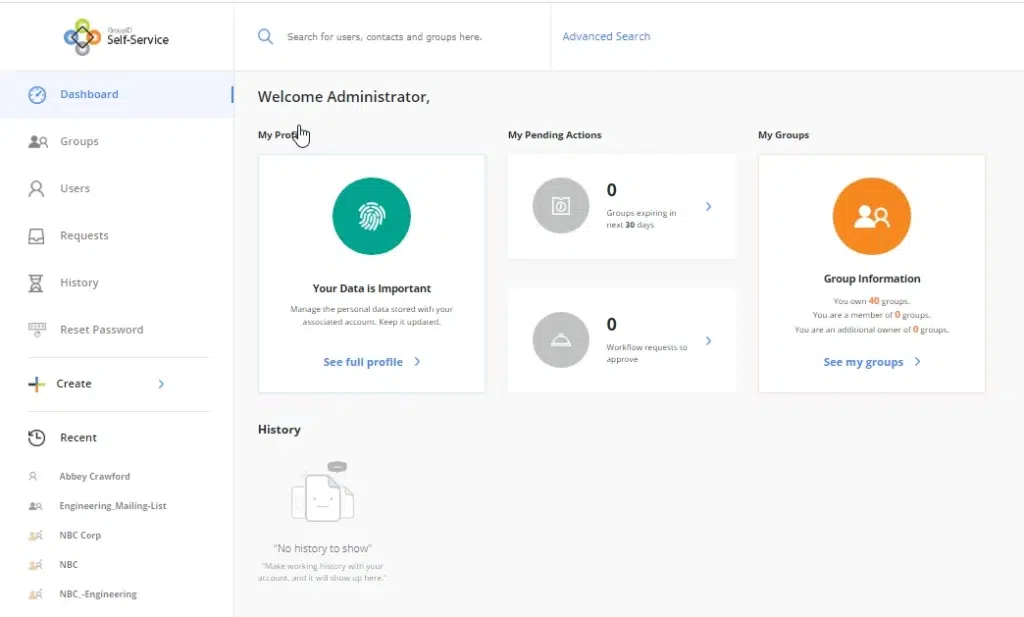
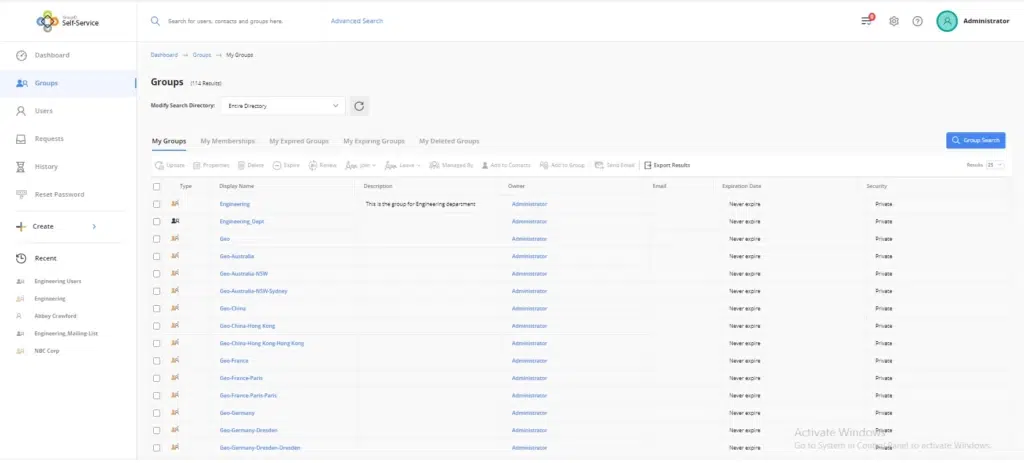
Below, you can see the My Groups tab of the Groups page of the portal, which lists the groups that the logged-on user owns. Switching to the My Membership tab would display the groups that the logged-on user is a member of. The other tabs relate to the powerful group expiration feature of Netwrix Directory Manager.
Benefits of the Self-Service Portal
When users maintain and update their own groups, data is more accurate and reliable. To ensure security, administrators can control what users can view and change using the portal. For example, administrators can:
- Use role-based access to delegate group creation to specific personnel.
- Determine what attributes to expose for group creation and update.
- Implement workflows to ensure that data is correct before changes are applied.
- Designate recipients to get notification emails when a user changes an object in the directory.
- Enable history tracking to track the history of all objects.
Create a Group using the Self-Service Portal
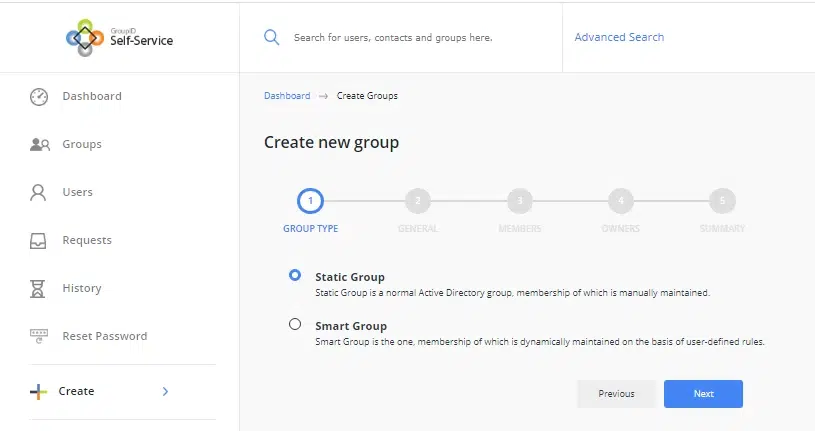
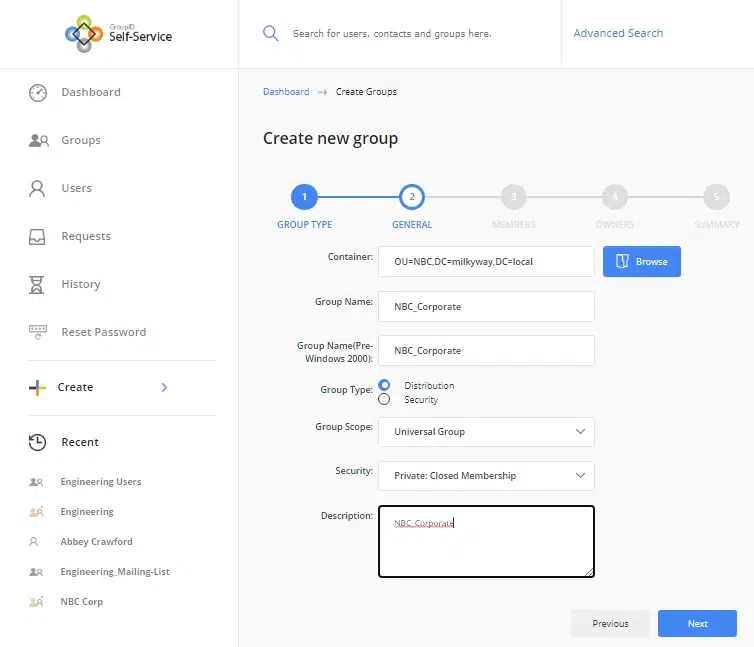
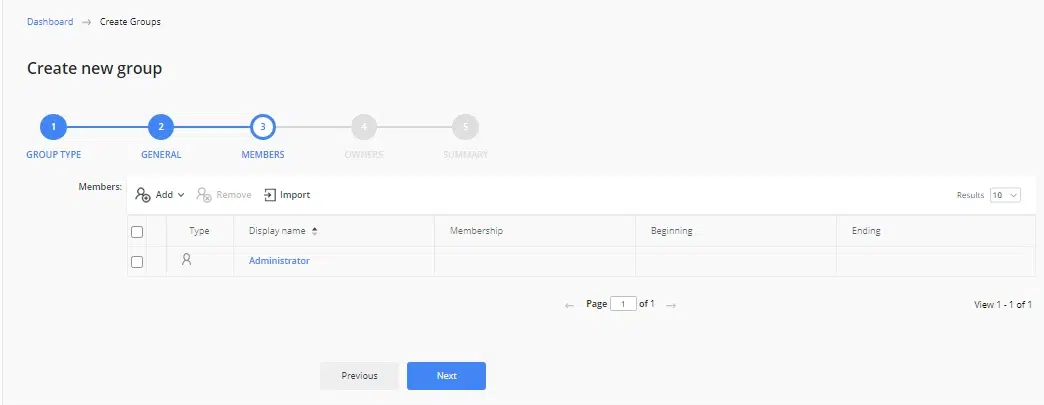
To create a new group using the Self-Service portal, simply step through the Create New Group wizard:
- Select the type of group you want to create, static group or Smart Group:
- Specify the core properties of the group, including its container (OU), name, and type:
- Then search for users and add them to the group as members.
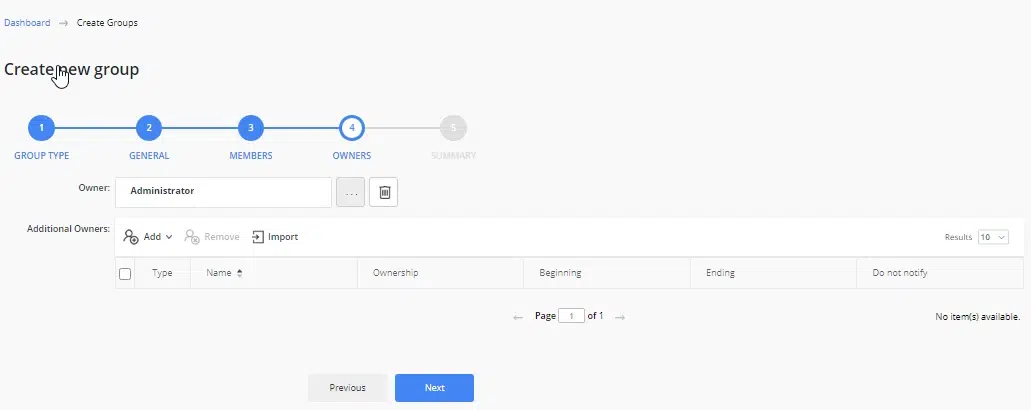
- Next, specify a primary owner and any additional owners for the group:
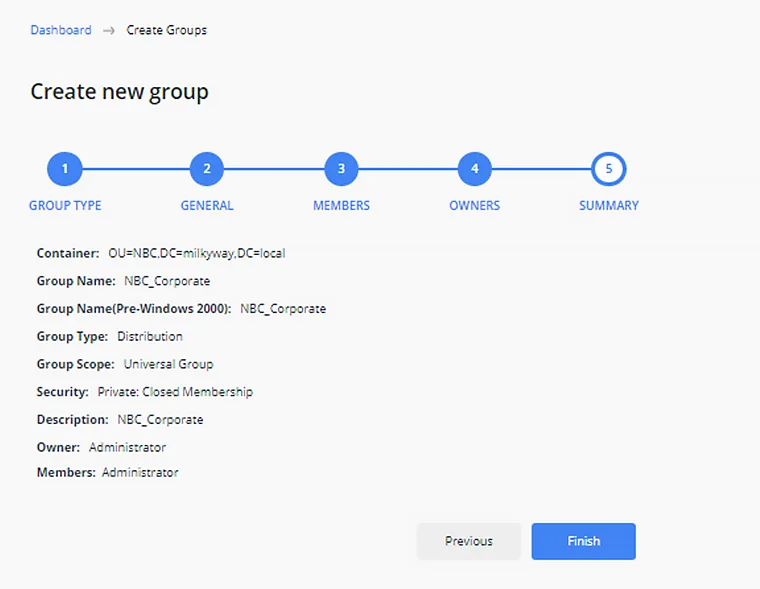
- On the last page of the wizard, review a summary of your selections and click Finish to create the group:
